
High availability
TheA Knocknoc deployment has three parts: the Server (web app), its Database (PostgreSQL), and one or more Orchestration Agents. How you run the first two decides your availability; the Agents are resilient by design (see below).
One thing makes Knocknoc forgiving here: a Server outage does not revoke access. Agents keep enforcing existing grants and reconnect on their own, so a short outage during maintenance or failover is harmless. You do not need zero-downtime rolling upgrades to stay safe.
Choosing a topology
These are example deployments, not fixed products. The web tier, the database, and the load balancer are independent choices, so mix them to suit your environment. Web nodes can berun deployedhot/hot inor varioushot/cold. ways to match your high-availability needs and deployment models.
Ultimately the Knocknoc solution comprises these three components:
The Server (web-app)database can be deployed:
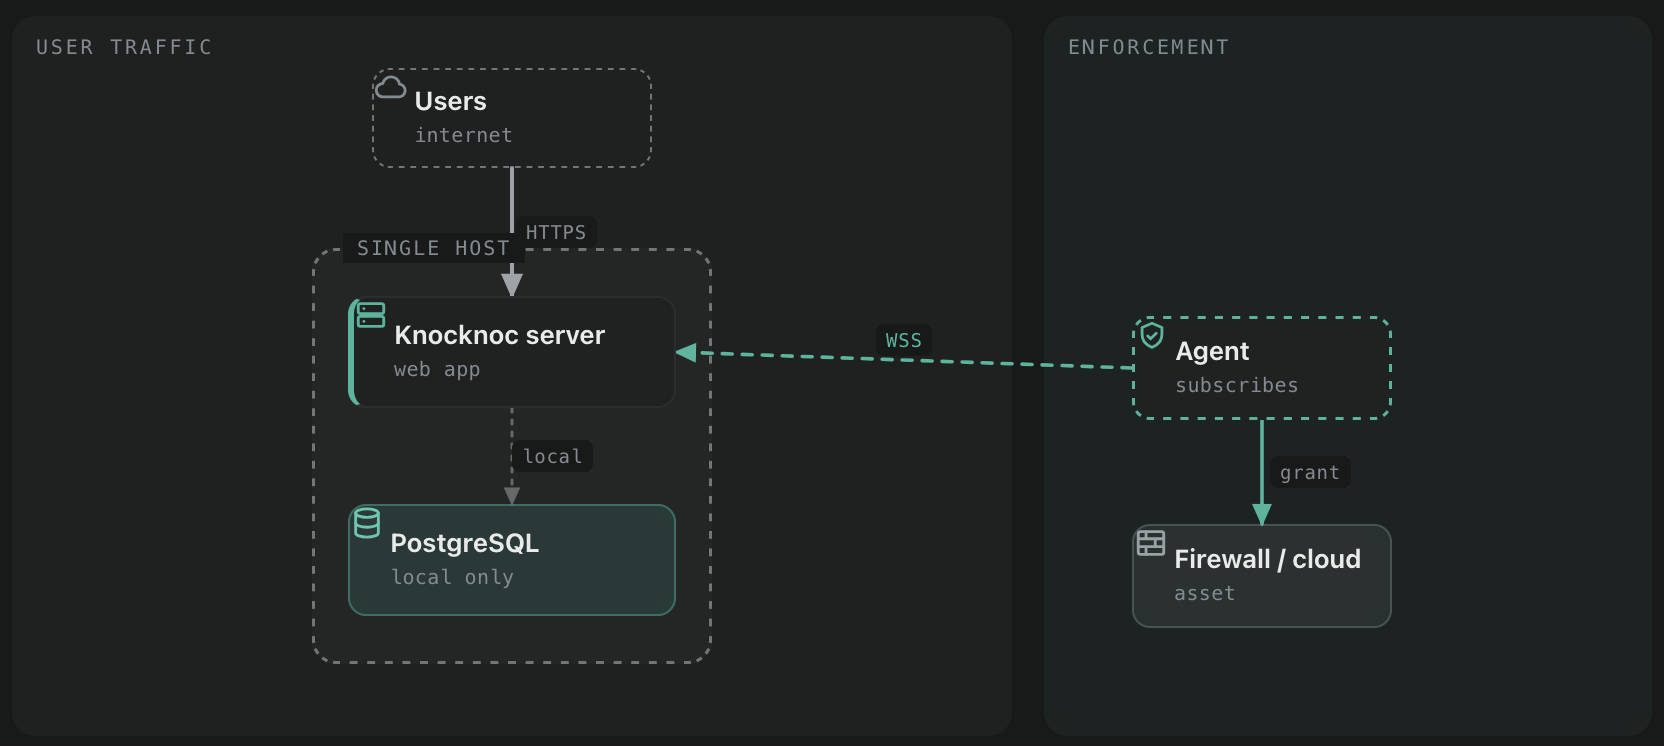
Single node
Web app and PostgreSQL on one host. PostgreSQL is local only and not externally reachable. Simple to run and the default after a standard install. Scale it vertically.
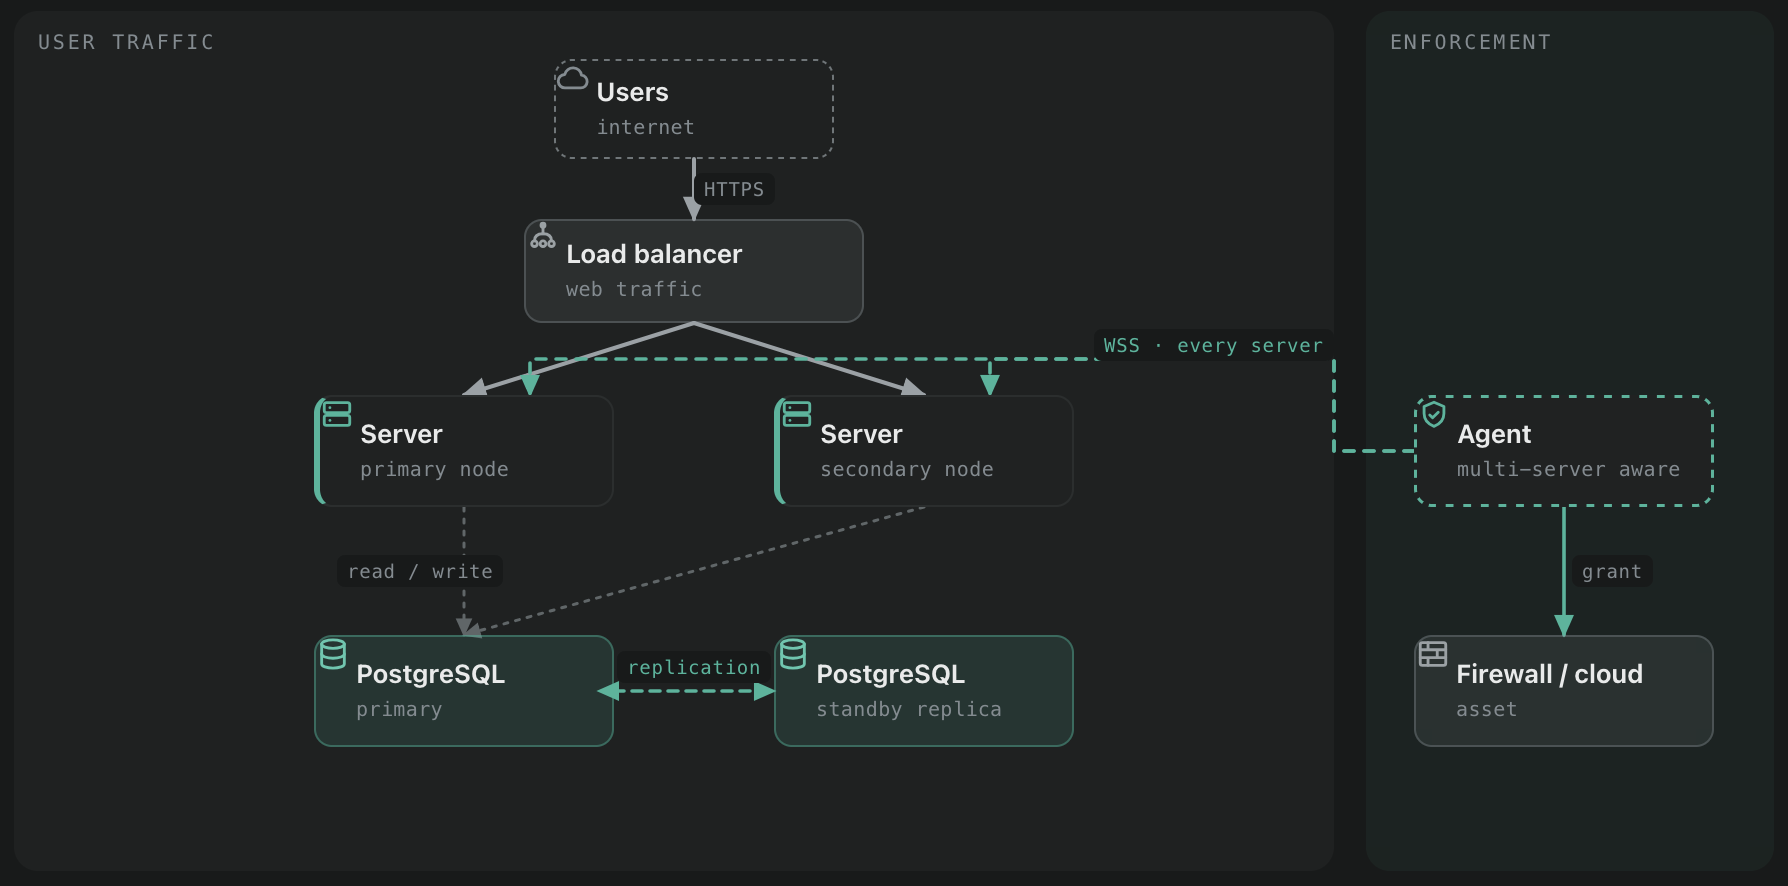
Shared-primary
Several web apps share one database backendthat sourceruns on (see below) thatand is notexposed running onfrom) one of the web nodes. A load balancer spreads web traffic across the nodes; run them hot/hot or hot/cold as you prefer. This couldis bethe natural next step from a single node: Knocknoc can expose its existing local database without you provisioning separate infrastructure. Add a replicated standby (shown in the diagram) for database failover, or point the nodes at a DBaaS instead. Replication and the standby are optional.
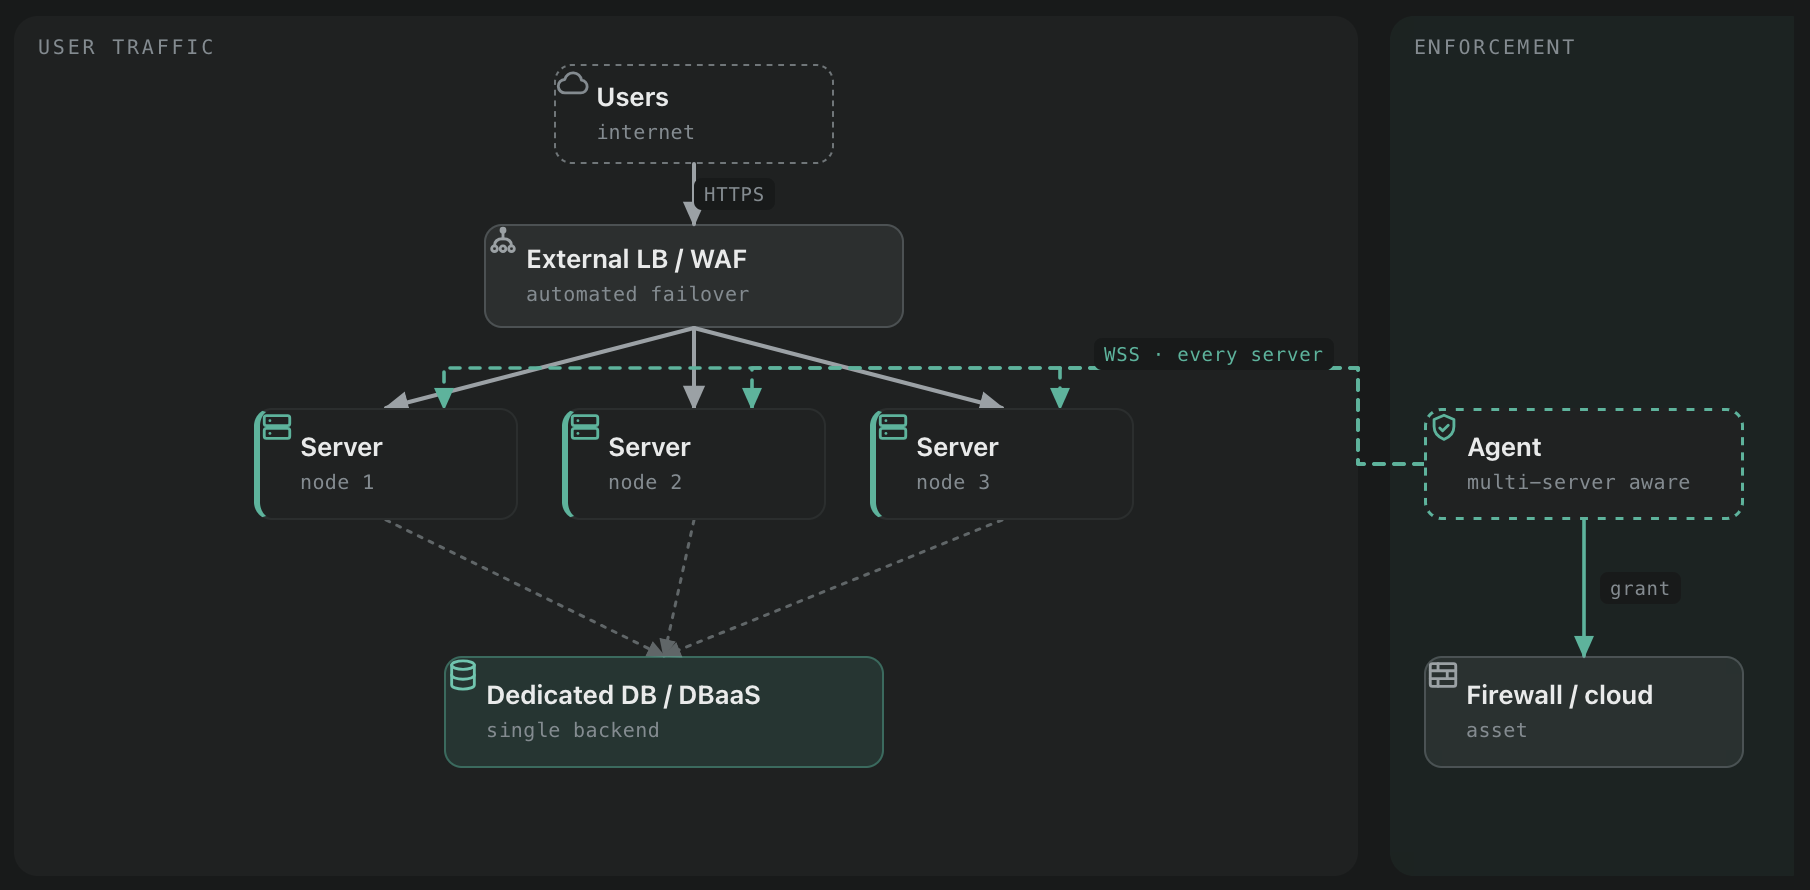
Multi-node
Several web apps run against a single database backend that lives off the web tier, on a dedicated database host or a DBaaSmanaged service like (Amazon RDSRDS, etc.Google HorizontalCloud web-tierSQL, scalingAzure meansDatabase, hot/hotDigital access.Ocean, Heroku, and similar). An external HTTP load-balancer/load balancer or WAF isspreads deployedweb traffic and can fail over on health or performance; run the nodes hot/hot or hot/cold. Keeping the database separate lets you manage and scale it independently of the web tier, and lean on your provider's database HA if you use a managed service.
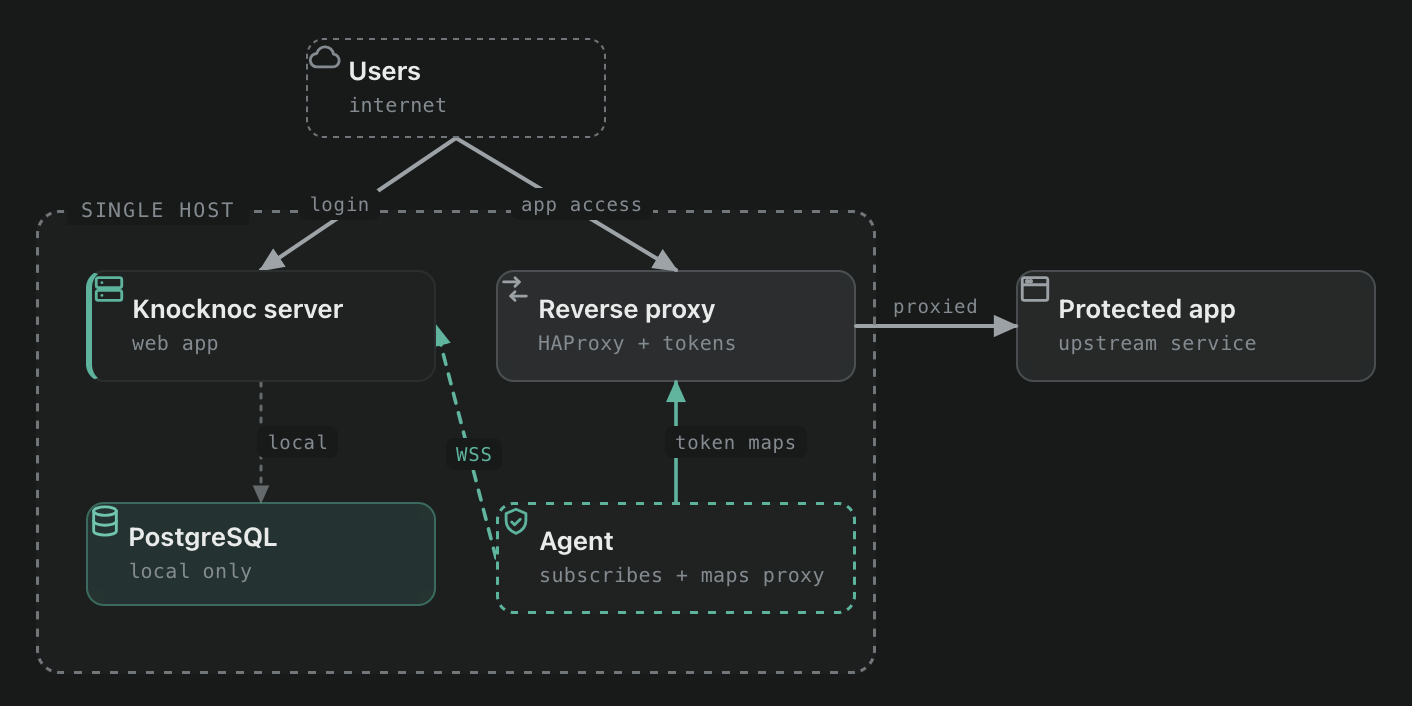
All-in-one with reverse proxy
Web app, database, and a local Agent in reverse-proxy mode on one host. The Agent provides in-line HTTP/TCP protection in front of a protected app while also orchestrating external systems, host firewalls, or cloud control layers. A self-contained way to maintaindrop webKnocknoc stateinto andan handleisolated automated failover based on availability or performance.
Agent high-availability
TheAgents Databaseare (Postgres)resilient canwithout bespecial deployed:configuration:
On-hostDeploy(withthemthenextServer),towhich would rely on VM failover along with the Web tier.
Agent high-availability:
Setting up multiple web nodes
"AllTo ingo one" mode with reverse-proxy:
1.
Single node deployment
FollowingExpose the default Server installation guide will deploy the Web application and Postgres database on athe single node. Postgres is installed locally and external access to this database is denied.
Externalizing a single/primary node
After deployment, a single-node installation can be converted into a multi-node database source, allowing other web-nodes to read/write from this web + database node.
This can be achieved by utilizing the Knocker command "exposedb", or adjusting Postgres manually.
Using Knocker
Using the "knocker exposedb -- on the primary init" featureinitsystemhost. will:It a)binds configure PostgresPostgreSQL to bind to 0.0.0.0:, 5432,5432b) createcreates a user andwith a random password, c)links linkthat the user/permissionsuser to theyour existing database using the connection string infrom your Knocknoc config, d)and outputprints the resultsconnection string to use on the other nodes. (You can also configure PostgreSQL for easyexternal consumption.access by hand if you prefer; exposedb just does it for you.)
$ sudo /opt/knocknoc/knocker/knocker exposedb --init
Copy the relevant connection string output,from thisthe output; you will beneed neededit whenon configuringeach additionalsecondary node.
2. Allow-list the secondary nodes
External access is denied until you allow each source IP. Add the secondary web nodes.
You(and thenany must use the --add feature to addother trusted IPsources); address sources that are allowed to connect to Postgres, an additional allow-listing security feature. These can be listed with --list or removedremove withentries --remove.as needed.
$ sudo /opt/knocknoc/knocker/knocker exposedb --add "203.0.113.7/32"
You are now ready to configure the secondary web-node(s) which will connect to this database. Note these secondary nodes need to be added using the above --add IP address allowlisting command, otherwise they cannot connect to the database you have now externalized.
Installing Knocknoc web on additional nodes
On the secondary web-node(s), when installing Knocknoc choose option 3 at the database-source question stage. Option 3 connects this newly installed Knocknoc web-instance to an existing remote Knocknoc database. Whereas option 1 is new local database install and option 2 is a "new" external database source such as a fresh Postgres as-a-service source.
At installation you can bind Knocknoc to an external IP or 0.0.0.0 (on port 8756), use HAProxy locally set up with Knocker, or otherwise integrate your load-balancer how you see fit to distribute inbound traffic across the multiple web-nodes. Persistence is typically managed by a cookie introduced and managed by the load-balancer, as per standard practice.
If Knocknoc cannot access the remote database, you may need to use --add <host's IP address> as above.
$ sudo /opt/knocknoc/knocker/knocker exposedb
This script "externalizes" your local database, allowing you to run multiple Knocknoc web-app servers utilizing this database.

Running --init re-configures your local Postgres database service to listen externally, creates a user login/password, and
adds (or removes) IP addresses to the trusted Postgres list - allowing external webapps to connect to the Knocknoc database.


Usage:
  sudo /opt/knocknoc/knocker/knocker exposedb [--init | --add <CIDR> | --remove <CIDR> | --list] [--conn URI]

Options:
  --init             Initialize/expose the database for external access
  --add <CIDR>       Add access rule to pg_hba.conf for the specified CIDR (e.g., 192.168.1.0/24)
  --remove <CIDR>    Remove access rule from pg_hba.conf for the specified CIDR
  --list             List all IP addresses currently allowed to access the database
  --conn <URI>       Optional: PostgreSQL connection string (default value is taken from your '/opt/knocknoc/etc/knocknoc.conf')
  -h, --help         Show this help text

Examples:
  # Initialize/expose database for external access sudo /opt/knocknoc/knocker/knocker exposedb --initlist
# Add/remove access rules for a CIDR
  sudo /opt/knocknoc/knocker/knocker exposedb --add "203.0.113.7/32"$ sudo /opt/knocknoc/knocker/knocker exposedb --remove "203.0.113.7/32"
#A allnode allowedthat IPis addressesnot sudoon /opt/knocknoc/knocker/this list cannot connect to the database. Run knocker exposedb -- listhelp#for Ifall usingoptions, including --conn for a non-default connection string/configstring.
3. sudoInstall /opt/knocknoc/knocker/knockerthe exposedbweb --init --conn "postgres://user:pass@host:5432/dbname"
sudo /opt/knocknoc/knocker/knocker exposedb --add "1.2.3.4/32" --conn "postgres://user:pass@host:5432/dbname"
nodes
Install Knocknoc on theeach secondary web-node(s),node. optBind forit to a directly-accessiblereachable Knocknocaddress (bindfor example 0.0.0.0:), 8756)8756andthen selectat the database question choose option 3 forto connect to the existing remote Knocknoc database configuration:(option 1 is a new local database, option 2 is a fresh external database). If the node sits behind a load balancer or reverse proxy, set TrustedForwarders to that proxy's address so client IPs are read correctly; the default is safe when there is no proxy in front, and you can change it later:
 _  ___   _  ___   ____ _  ___   _  ___   ____
| |/ / \ | |/ _ \ / ___| |/ / \ | |/ _ \ / ___|
| ' /|  \| | | | | |   | ' /|  \| | | | | |
| . \| |\  | |_| | |___| . \| |\  | |_| | |___
|_|\_\_| \_|\___/ \____|_|\_\_| \_|\___/ \____|

Please answer the following questions to configure Knocknoc correctly. (No existing configuration detected, starting fresh)
Please refer to https://docs.knocknoc.io/ if you need more help.

Enter IP and port to listen on (default: 127.0.0.1:8756): 0.0.0.0:8756

If you're running behind a reverse-proxy, set the trusted forwarders.
Default is safe if not. You can adjust this later, see Server Install on https://docs.knocknoc.io
Enter TrustedForwarders (default: 127.0.0.1/32): 192.168.100.1/32

Knocknoc stores its data in PostgreSQL, and you can choose how to configure the database.
You have three options:
  1) Use a local PostgreSQL installation (default)
  2) Use a new external or preconfigured PostgreSQL database
  3) This Server is a web node only, use pre-existing external Knocknoc database

Option 1, 2, or 3? (default is 1): 3

Enter pre-existing external Knocknoc database connection string: postgres://knocknoc:[email protected]:5432/knocknoc
If a node cannot reach the database, confirm its IP has been added with exposedb --add on the primary.
4. Front the nodes with a load balancer
Distribute inbound traffic across the web nodes with a load balancer. You can set up HAProxy locally with Knocker or use your own LB/WAF. Persistence is normally handled by a load-balancer cookie, as is standard practice.
Health-check each node on the /_status route (for example https://example.knocknoc.io/_status). This is required, not optional: the route reports whether a server is up and whether its version is in step with the database, so the load balancer can pull a node that is down or out of date out of rotation on its own. It is also what makes the upgrade process below safe.
Upgrading servers in an HA deployment
When multiple servers share one database, upgrade them one at a time with only one server serving traffic during the change. The first server you upgrade updates the shared database to the new version. Older servers still in rotation are then out of step with that database, which risks errors. The steps below avoid that.
Server downtime during an upgrade is a few seconds at most, and access to protected resources is unaffected throughout.
1. Check server status and settings
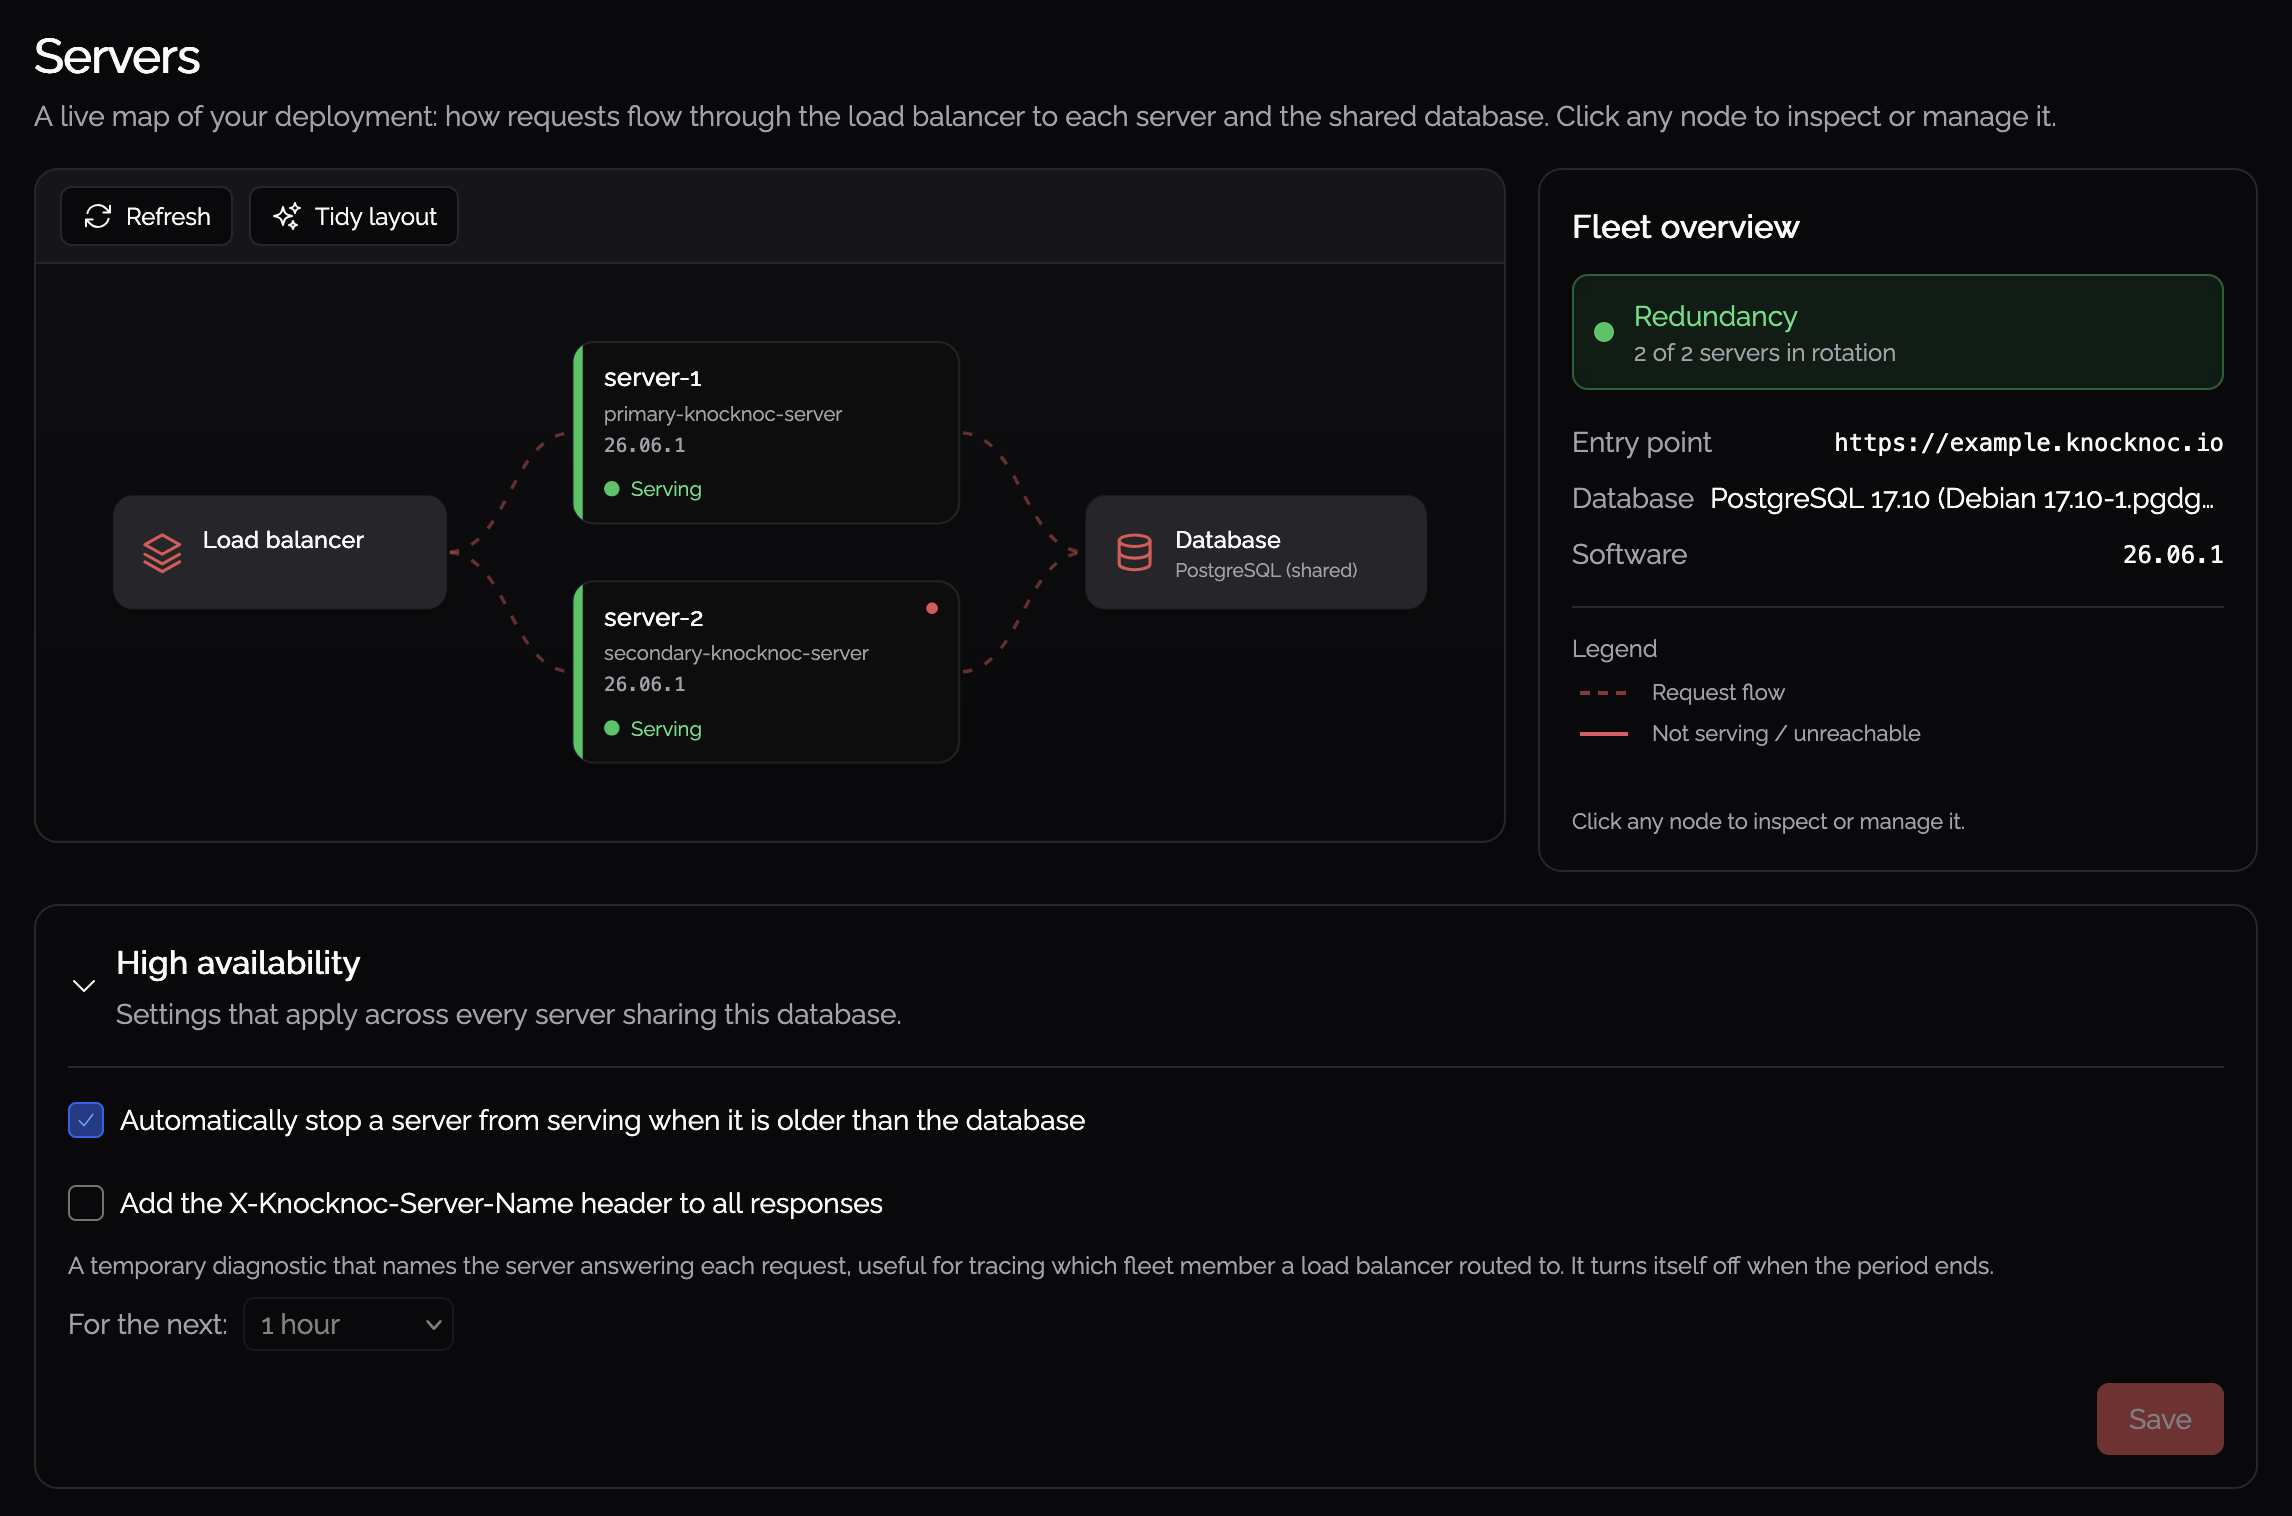
In the admin portal, confirm every server sharing the database is listed and online. A missing or offline server points to an existing problem; fix it before upgrading.
Then check two things:
/_status route (see above). This process relies on it to pull out-of-date nodes out of rotation.
2. Take all but one server out of rotation
Leave only the server you will upgrade first in rotation; take the rest out. This guarantees no older server can talk to the database once it has been migrated.
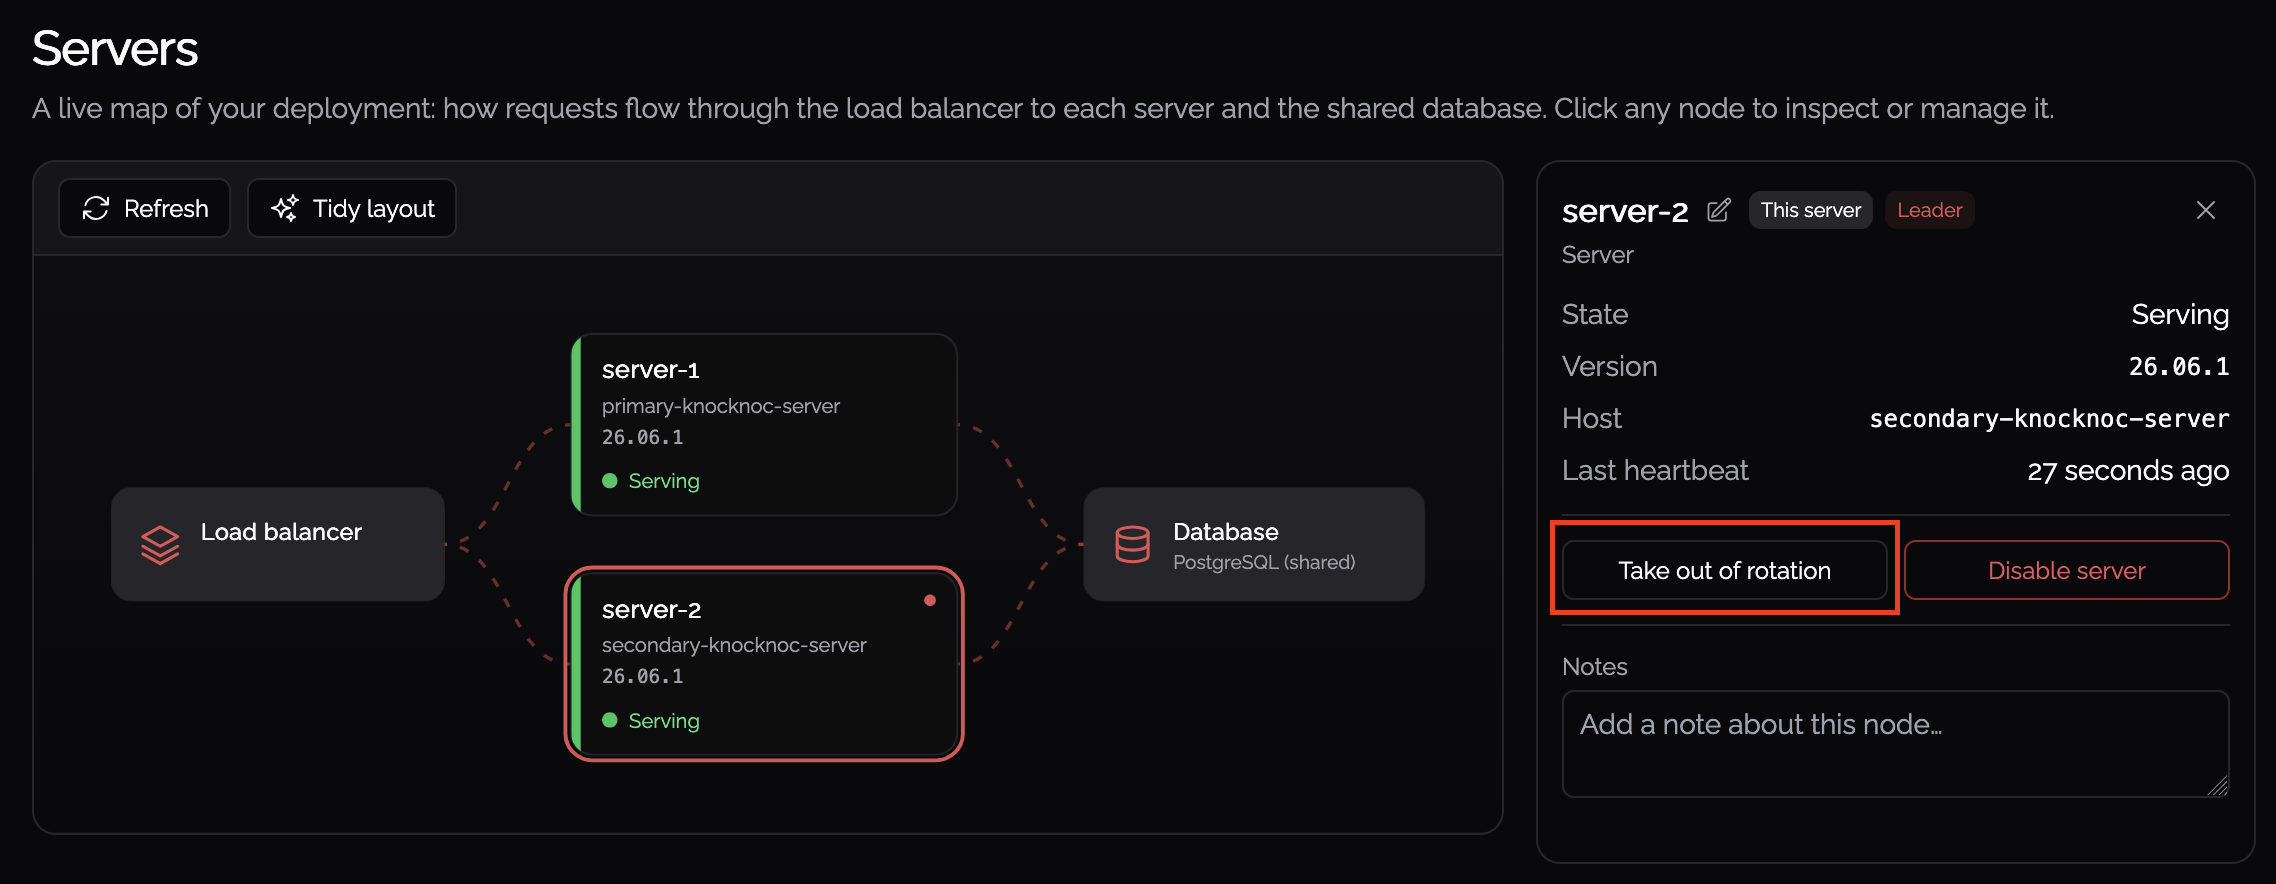
Wait up to 90 seconds after each change for the load balancer to stop serving from those servers.
3. Upgrade the in-rotation server
Upgrade the one server still in rotation, following your organisation's standards. It migrates the database as it restarts. See Updates and upgrades for the upgrade itself.
4. Upgrade the remaining servers and restore rotation
Upgrade each remaining server the same way, then bring it back into rotation. Once every server is on the new version, the fleet is fully in service again.