
Microsoft Azure NSG
Overview
This integration allows for IP addresses to be dynamically managed within Azure Network Security Groups (NSGs), which are used by default as the inner firewalls protecting virtual machines. Other Azure assets (PaaS etc) are managed using separate Knocs.
Prerequisites
This utilizes the Azure CLI binary, which must be installed on the Agent machine.
- For Debian, follow these steps:
# You can try OS packages...
# However we recommend using the latest binary packages from Microsoft
curl -sL https://aka.ms/InstallAzureCLIDeb | sudo bash


## Update the list of packages
#sudo apt-get update

## Install pre-requisite packages.
#sudo apt-get install -y azure-cli

## Update it.
## If the version is significantly behind, you may need to install from Microsoft (see below)
#az upgrade

## If you have any errors running, you may need to install from Azure directly
## do this if you get warnings or errors
##
#echo "if you get errors, update using the below!"
#echo "sudo apt remove azure-cli"
#echo "rm -rf ~/.azure"
#echo "curl -sL https://aka.ms/InstallAzureCLIDeb | sudo bash"
Permissions in Azure
To interact with the Azure NSG - via the API - you need to first create a service principal and assign the limited permissions, as shown below:
Create a custom role (for limited NSG edit access)
-
Go to Azure Portal: https://portal.azure.com
-
Search for “Subscriptions” and select your subscription.
-
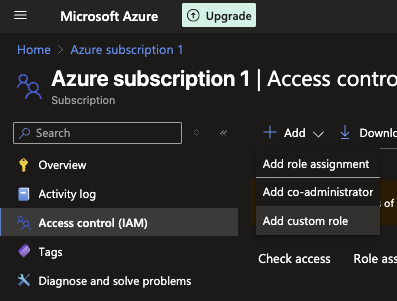
In the left menu, click “Access control (IAM)”.
-
Go to the “Roles” tab and click + Add > Add custom role.
-
Basics tab:
-
Name:
Knocknoc NSG Edit -
Description:
Can read and edit rules in a Network Security Group.
-
-
Permissions tab:
-
Click + Add permissions
-
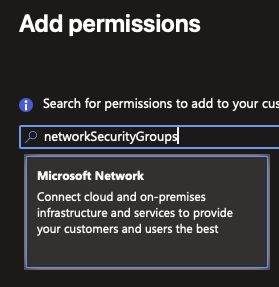
In the search box, type:
networkSecurityGroups - Click on the "Microsoft Network" card

-
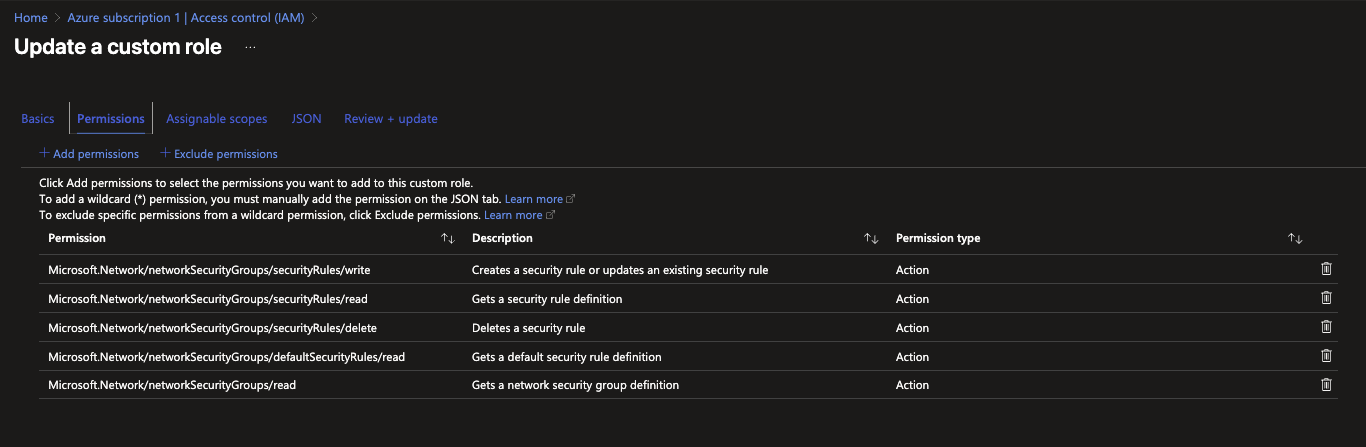
Add these permissions:
-
Microsoft.Network/networkSecurityGroups/read -
Microsoft.Network/networkSecurityGroups/securityRules/read -
Microsoft.Network/networkSecurityGroups/securityRules/write -
Microsoft.Network/networkSecurityGroups/securityRules/delete
-
-
Click Add
-
-
Assignable scopes tab:
-
Click + Add assignable scope
-
Select your resource group, or subscription if broader access is fine.
-
-
Review + create the custom role.
Create a Service Principal in Azure Portal
1. Go to the Azure Portal
- Visit: https://portal.azure.com
2. Search for “App registrations”
- In the top search bar, type
App registrationsand select it.
3. Click “+ New registration”
- Name:
Knocknoc-NSG-Editor(or anything you prefer) - Supported account types: Leave as "Single tenant" (default)
- Redirect URI: Leave blank (not needed for non-interactive apps)
Click Register
4. Go to “Certificates & secrets”
- Click + New client secret
- Give it a name like
NSG-Edit-Automation - Set expiration (e.g., 24 months)
- Click Add
Copy the generated secret value immediately. You won’t be able to retrieve it later.
5. Find Application (client) ID
-
In the Overview tab of your app registration:
-
Copy the Application (client) ID
-
Also copy the Directory (tenant) ID
-
6. Assign the Custom Role (Knocknoc NSG Edit)
-
Go to your Resource Group (or subscription) where the NSG lives.
-
Click Access control (IAM).
-
Click + Add > Add role assignment
-
Choose:
-
Role:
Knocknoc NSG Edit(or your custom role name) -
Assign access to:
User, group, or service principal -
Select: Find and select your registered app (
Knocknoc-NSG-Editor)
-
Click Save
Configuring the Knoc
Using the Knocknoc Admin panel, select the Firewalls, Active, then Azure NSG option.
Note that the Azure CLI binary must be installed on the agent machine, and running a recent version. See below.
You need these values:
- Client-ID (Username/service principal account, which we configured earlier)
- Client Secret (Password for the service principal above)
- Tenant ID (copied from the App Registration "Directory (tenant) ID", also found as the "Parent management group" on the Subscription page)
For the relevant NSG, you need these values:
- Resource group and existing NSG name
- Port and Protocol
- Direction (Inbound or Outbound)
Configure the Knoc, utilizing Firewalls -> Active, then "Azure NSG":
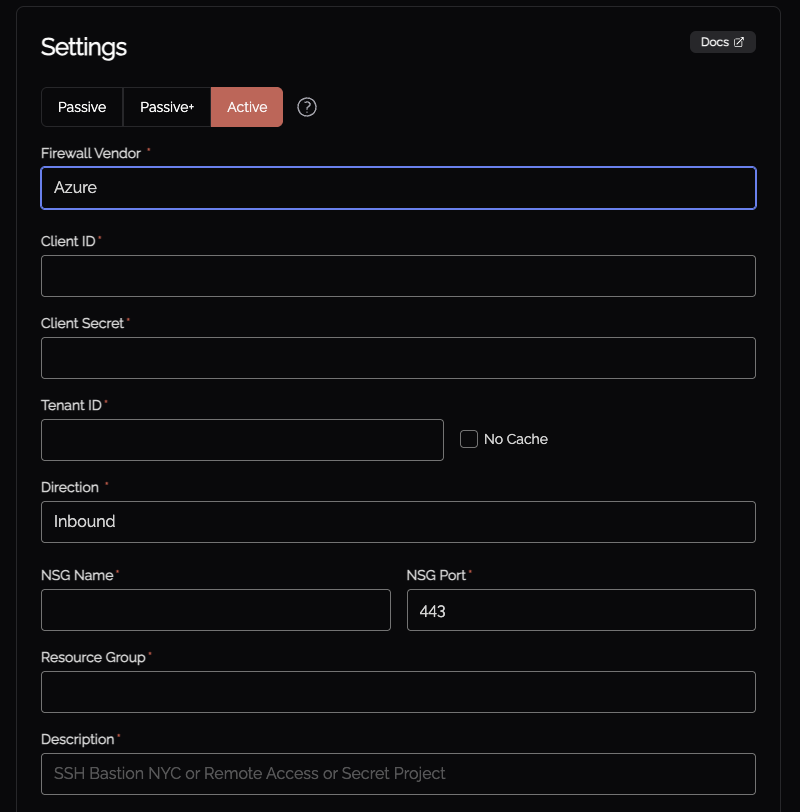
In addition to the above, the "No cache" option removes any tokens/secrets the Azure CLI client leaves on the Agent operating system, located within the Agent "var" folder which is typically /opt/knocknoc-agent/var/. This naturally increases the time-taken for successive grants/revokes as a session token is obtained each execution rather than the Azure CLI tool using cached values, however naturally provides a security benefit.
Viewing the results
Log in to the Azure Portal and visit the related NSG.
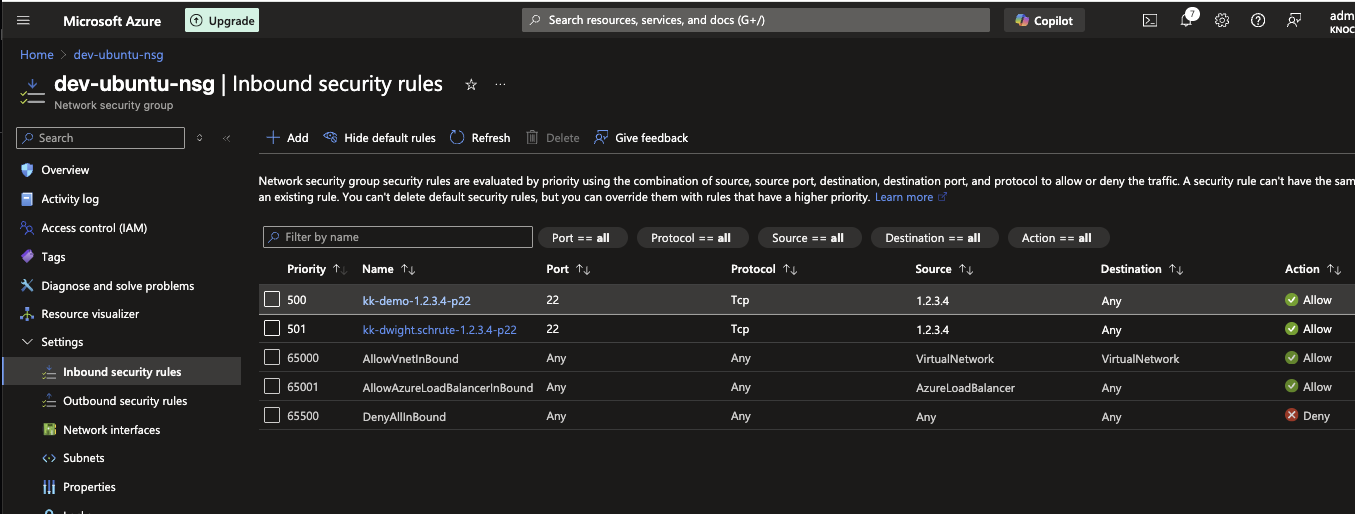
Rules will be created starting with priority 500, up to the built-in maximum of 4096. If you have rules >=500 it will automatically work around these, however your effective usable space for rules will naturally be reduced.
An example of the captured data is shown below. This includes adding the user to the rule-name along with the port ("demo" and "p22").
Deduplication
For this integration, de-duplication is disabled - meaning any additional/subsequent users logging in from the same source IP address will also be added and gracefully removed from the NSG, allowing for username-level attribution.
Errors
If you experience any errors back from the Azure CLI, you may need to upgrade from Microsoft directly instead of using your operating-system package
# If you have any errors running, you may need to install from Azure directly
# do this if you get warnings or errors
sudo apt remove azure-cli

rm -rf ~/.azure

curl -sL https://aka.ms/InstallAzureCLIDeb | sudo bash
JSON if you prefer
{
    "properties": {
        "roleName": "Knocknoc NSG edit",
        "description": "",
        "permissions": [
            {
                "actions": [
                    "Microsoft.Network/networkSecurityGroups/read",
                    "Microsoft.Network/networkSecurityGroups/securityRules/read",
                    "Microsoft.Network/networkSecurityGroups/securityRules/write",
                    "Microsoft.Network/networkSecurityGroups/securityRules/delete"
                ],
                "notActions": [],
                "dataActions": [],
                "notDataActions": []
            }
        ]
    }
}