
Check Point
Knocknoc controls access on Check Point gateways in one of two ways. In Active mode the Knocknoc agent pushes each authenticated user's IP to the gateway over the API, assigning a pre-existing Access Role; firewall rules that match that role then allow the traffic. In Passive mode Knocknoc publishes the current allow-list as an External Dynamic List (EDL) that a Check Point Network Feed object polls on a timer; no agent is involved.
Pick Active when revocation must take effect promptly (grants apply and clear in about a second). Pick Passive when you would rather avoid the Identity Awareness setup and a minute-scale refresh window is acceptable.
| Active (API) | Passive (Network Feed / EDL) | |
|---|---|---|
| How access flows | Agent updates the gateway on each grant and revoke | Gateway polls a Knocknoc-hosted IP list |
| Latency on grant/revoke | ~1 second | One refresh interval (1 min minimum, 60 min default) |
| Knocknoc agent | Required, with outbound HTTPS to the gateway | Not required |
| Network direction | Agent to gateway (+ Agent pulling from Server) | Gateway to Knocknoc server |
| Best for | Short-lived, interactive access where prompt revocation matters | Steady-state grants where a refresh delay is tolerable |
Setup: Active (API)
Requirements
- Check Point gateway with the Identity Awareness software blade available. This guide is verified against R81.10–R82.10. (The API has been available since R80.10, but use a currently-supported release.)
- Network reachability from the Knocknoc agent to the gateway over HTTPS. The API is served by the gateway on TCP 443; if your gateway publishes its portal on a non-standard port, append it in the Gateway Hostname field as
host:port. - Management access to create the API client, an Access Role, and a rule that references it.
How it works
- A user authenticates to Knocknoc.
- Knocknoc sets up an identity on the gateway with the user's IP address and the Access Role.
- The gateway records the identity. Any rule referencing the Access Role now matches traffic from that IP.
- On revocation or logout, Knocknoc removes the identity and the gateway stops matching that IP.
The Web API authenticates with a shared secret, and the gateway also enforces a source-IP allow-list on the client object, so the secret alone is not enough: the agent's source IP must be authorised.
One agent per gateway. The gateway holds a single identity per IP from the Web API source, so a second
add-identityfor the same IP overwrites the first. When several Check Point Knocs target the same gateway, the agent merges their Access Roles into one identity so they don't clobber each other. This coordination is per-agent and in-memory, so run only one Knocknoc agent per gateway, and have all Knocs against that gateway agree on the shared secret and Insecure setting. If you would rather not rely on it, give every Knoc the same Access Role and differentiate them at the rule level (destination/service) instead.
Step 1: Enable the Identity Awareness blade
The blade is enabled on the gateway object, not in the Gaia portal.
- In SmartConsole, open the gateway object.

- On General Properties, under Network Security blades, tick Identity Awareness.
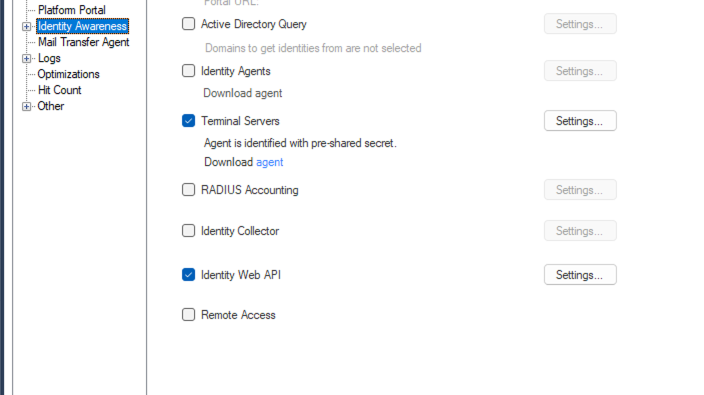
- Step through the Identity Awareness Configuration Wizard. The wizard requires you to enable at least one Method For Acquiring Identity before it will let you finish. Knocknoc doesn't use any of these methods (it uses the Web API, configured separately in Step 2), so pick whichever needs the least setup. In testing, Terminal Servers was the lowest-configuration option to get through the wizard.

- Finish the wizard and click OK. Do not install policy yet; do it once after Step 2 so both changes ship together.

Step 2: Create the Identity Web API client
This is the credential object the agent authenticates against. It carries the shared secret and the agent's source-IP allow-list.
- In the Object Explorer, create a new Host for the agent:
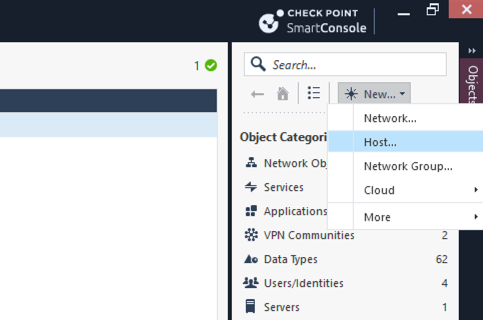
- Name: e.g.
knocknoc-agent. - IPv4 Address: the source IP the agent connects from (mind any NAT, proxy, or jump host on the path).
- Name: e.g.
- Open the gateway object and go to Identity Awareness > Identity Web API.
- Tick Identity Web API, then click Settings.
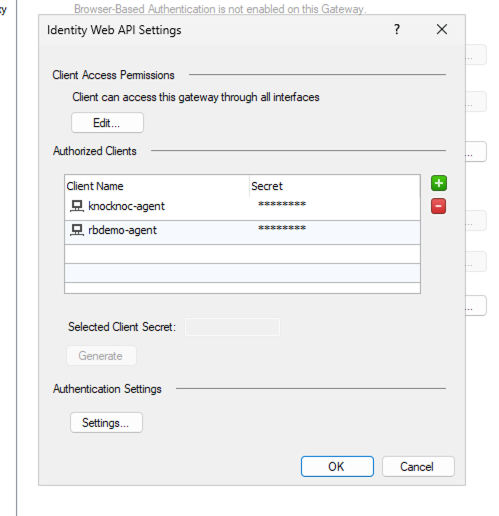
- Under Authorized Clients, click + and select the host you created.
- Set the Client Secret to a strong shared secret. Record it now; you will paste it into Knocknoc, and the Web API never lets you read it back, only reset it.
- Click OK on the client, OK on the gateway object, then Install Policy.


To change the agent's source IP later, update the host object, not the client.
Step 3: Create an Access Role
The Access Role is what your firewall rules match on. Knocknoc assigns existing roles to authenticated IPs; it never creates or modifies them.
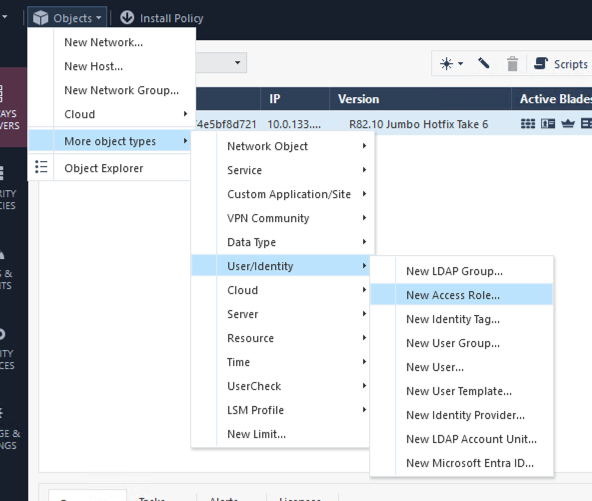
- In the Object Explorer, choose New Access Role.

- Configure:
- Name: descriptive, e.g.
knocknoc-users. Case-sensitive; note it exactly. - Networks: Any network (Knocknoc supplies the per-IP scope at runtime).
- Users: Any user (Knocknoc carries the user identity in the payload).
- Machines: Any machine. Remote Access Clients: Any client.
- Name: descriptive, e.g.
- Click OK.
Step 4: Create a firewall rule referencing the Access Role
This rule is what actually grants access once Knocknoc pushes an identity.
- Open the Security Policies rulebase.

- Add a rule above any deny rule that would block the traffic:
- Source: the Access Role from Step 3.
- Destination: the protected resource(s).
- Services & Applications: the protocol/port to allow.
- Action: Accept. Track: Log (so Knocknoc-driven access shows in the tracker).
- Install Policy.

You only install policy once, when you add the rule. Subsequent grants are applied live and need no further install.
Step 5: Deploy the Knocknoc agent
Deploy the orchestration agent on a host with HTTPS reachability to the Web API endpoint on the gateway. Its outbound source IP must match the host object you authorised in Step 2.
Step 6: Create the Knoc
- Select the Firewalls/Appliances Knoc type.
- Choose the Active tab and pick Check Point as the Vendor.
- Configure the connection:
| Field | Description |
|---|---|
| Gateway Hostname | Hostname (or host:port) of the gateway serving the Web API, e.g. gw.example.com. Append a port only if the gateway's portal is published on a non-standard one (e.g. gw.example.com:4434). For HA clusters, point this at the cluster VIP. |
| Insecure | Tick only if the gateway presents a self-signed certificate. Leave unticked for production. |
| Shared Secret | The Client Secret from Step 2. Knocknoc encrypts it at rest. |
| Access Role | The exact name of the Access Role from Step 3 (e.g. knocknoc-users). Case-sensitive. The role must already exist on the gateway. |
4. Set knoc options and user access as desired
5. Select the agent from Step 5.
Step 7: Validate
Either on the review step or after saving the Knoc, click Validate connection. The agent runs four probes, stopping at the first failure:
- Config sanity: local check that the hostname, shared secret, and access role are all set.
- Reachable: a read-only call that exercises DNS, TCP, and the TLS handshake to the gateway.
- Auth: confirms the shared secret and the source-IP allow-list, and detects a disabled Identity Awareness blade.
- Access Role: informational only, always reported as a skip. The Web API has no endpoint to verify role names ahead of time, so a mistyped role is not caught here; it surfaces at grant time (as CHKP052) only on gateway versions that flag it. Confirm the spelling in SmartConsole.
Step 8: Test
- Log into knocknoc as a user that is assigned to the knoc either directly or through a group.
- On the management server, open Logs & Events > Logs and filter on the Access Role name. The user's IP should appear in a
New Identity Logged Inentry within about a second. - Confirm network access to the protected resource works.
- Log out (or let the grant expire) and confirm a matching
Identity Logged Outevent and that access is removed.
To check on the gateway CLI, pdp monitor all lists every identity held by the PDP; Knocknoc-pushed identities appear with the source IDENTITY_WEB_API.
mgmt_cli alternative. Every step above can be driven from the management CLI instead of SmartConsole. Note that on R82.10 the schema separates the enable flag (
identity-awareness-settings.identity-web-api, boolean) from per-client config (identity-awareness-settings.identity-web-api-settings.authorized-clients.N.{client, client-secret}), whereclientreferences an existing host object. The olderidentity-web-api.authorized-clients.addpath that appears in many community posts does not exist on R82.10. Example:# Host for the agent (its IP becomes the authorized source) mgmt_cli -r true add host name "knocknoc-agent" ip-address "<agent-source-ip>" # Enable the Web API and register the client (must be one call; # enabling identity-web-api without authorized-clients fails validation) mgmt_cli -r true set-simple-gateway name <gateway-object-name> \ identity-awareness-settings.identity-web-api true \ identity-awareness-settings.identity-web-api-settings.authorized-clients.1.client "knocknoc-agent" \ identity-awareness-settings.identity-web-api-settings.authorized-clients.1.client-secret "<shared secret>" # Open the listener to external interfaces (default INTERNAL_INTERFACES is loopback-only on single-interface gateways) mgmt_cli -r true set-simple-gateway name <gateway-object-name> \ identity-awareness-settings.identity-web-api-settings.client-access-permissions.accessibility.allow-access-from "ALL_INTERFACES" mgmt_cli -r true add access-role name knocknoc-users networks.1 any users.1 any-user machines.1 any-machine mgmt_cli -r true add access-rule layer "Network" position top name "Knocknoc - allow access role" \ source.1 knocknoc-users destination.1 <destination-object> service.1 <service-object> action accept track.type Log mgmt_cli -r true publish mgmt_cli -r true install-policy policy-package "Standard" targets.1 <gateway-object-name>
Setup: Passive (Network Feed / EDL)
In Passive mode Knocknoc does not talk to the gateway at all. The Knocknoc server publishes the current set of authenticated IPs as a plain-text list (an External Dynamic List), and a Check Point Network Feed object polls that URL on its refresh interval and resolves it to the current set of IPs. Rules that reference the Network Feed object then match the user IPs.
The trade-off is refresh latency: a new grant only takes effect after the next poll, and a revoked grant only stops matching after it drops out of a poll. The minimum interval is one minute; the default is 60. Choose a value no longer than the shortest grant lifetime you expect to issue.
Requirements
- Check Point R80.40 or later management (Network Feed objects were introduced in R80.40; R82/R82.10 are well-supported).
- Network reachability from the gateway to the Knocknoc server's EDL URL over HTTPS. If the gateway can't reach the server directly, front it with knocproxy or a TLS-terminating reverse proxy.
Step 1: Create the EDL (Passive) Knoc in Knocknoc
-
Create a new Knoc and choose the EDL (Passive) type.
-
Under EDL Security, choose how the gateway will authenticate when it polls the list:
- Secret-based (recommended): Knocknoc auto-generates a secret. The gateway fetches the list with HTTP Basic Auth using the username
apiuserand the secret as the password. - IP-based: no credentials; access is restricted to the source IPs you list. Use this only when the gateway can't send Basic Auth, and be aware the list of end-user IPs is then readable by anything connecting from an allowed source.
- Secret-based (recommended): Knocknoc auto-generates a secret. The gateway fetches the list with HTTP Basic Auth using the username
-
Save the Knoc, then copy its EDL URL from the Knoc overview. It has the form:
https://<knocknoc-server>/api/v1/allowlists/<acl-id>/<token>.txtFor secret-based access the same screen also shows the URL with credentials embedded (
https://apiuser:<secret>@<knocknoc-server>/...), which is convenient for testing.
Step 2: Create the Network Feed object on Check Point
- In the Object Explorer, choose New > More > Network Object > Network Feed.
- Configure:
- Name: descriptive, e.g.
knocknoc-allow-list. The rule in Step 3 references this name. - Feed URL: the EDL URL from Step 1.
- Format: Flat List (Knocknoc serves one IP per line).
- Data type: IP Address.
- Ignore lines with prefix:
#. - Check feed interval: minutes between polls (default 60, minimum 1). Set this to the shortest grant lifetime you want to support cleanly.
- Name: descriptive, e.g.
- Under Advanced, configure Authentication to match the Knoc:
- For a secret-based Knoc, set username
apiuserand the secret as the password. - For an IP-based Knoc, leave it empty.
- For a secret-based Knoc, set username
- Click Test Feed to confirm the gateway can reach the URL and parse the response, then OK.
mgmt_cli alternative.
mgmt_cli -r true add network-feed name knocknoc-allow-list feed-url "<edl-url>" feed-format "Flat List" feed-type "IP Address" update-interval 1 ignore-lines-that-start-with "#". Addusername apiuser password <secret>for a secret-based Knoc, then publish.
Step 3: Reference the Network Feed in a firewall rule
- Open the Security Policies rulebase.
- Add a rule above any deny rule that would block the traffic:
- Source: the Network Feed object from Step 2.
- Destination: the protected resource(s).
- Services & Applications: the protocol/port to allow.
- Action: Accept. Track: Log.
- Install Policy.
You only install policy once. Subsequent allow-list changes flow through the feed refresh and need no further install.
Step 4: Assign users and test
- Assign users and/or groups to the Knoc.
- Log in as a test user and confirm the IP appears in the published list (open the EDL URL, or use Test Feed on the Network Feed object).
- After the next refresh interval, confirm network access works. On the gateway, the feed is materialised in the kernel and visible to
fw tab -t external_feed_data(output format varies by release).
Troubleshooting
Active mode
The Gaia portal alone is not enough. Gaia handles OS-level config on the gateway (interfaces, routing, blade enable/disable, NTP, DNS) but does not expose the Identity Web API client object, which lives in the management database. In a Standalone deployment the management server runs on the same box, so you can reach it over SSH; in a distributed deployment you need access to the management server.
SmartConsole is Windows-only. From a Mac, run it in a Windows VM or RDP to a Windows host. The build version must match the management server (R82.10 management needs R82.10 SmartConsole). Download it from your Check Point User Center under Support & Services > Downloads.
Quantum Spark / SMB appliances (1500/1600/1800 series managed via the local WebUI, with no separate Security Management Server) do not expose the Identity Awareness Web API. Use the Passive mode instead, or a different connection.
Web API returns 404 / portal not online. Configuring the Web API only updates the management database; the gateway's Multi-Portal layer does not register the new portal until policy is installed. If requests to the Web API return a 404, install policy from SmartConsole. (On R82.10 Standalone, SmartConsole's Install Policy has been observed to register the portal where
mgmt_cli install-policyfrom a separate session did not.)
Start with the agent logs. Common patterns:
err_login_failed_wrong_password(CHKP003): the Shared Secret on the Knoc doesn't match the Client Secret on the gateway. Reset the Client Secret (you can't read the existing value) and update the Knoc.err_login_failed_user_unauthorized(CHKP004): the agent is connecting from an IP the Web API client doesn't accept. The authorised IP comes from the host object bound to the client, so update that host to the address the agent actually egresses with (mind NAT, proxy, jump host).- Bare HTTP 404 or 403 (
CHKP005): Check Point returns the same response whether the secret is wrong or the source IP isn't authorised, so this code can't tell them apart. Check both on the Web API client. - Auth passes but Access Role fails with
CHKP004: the client accepts your agent's IP for reads (show-identity) but not writes (add-identity). Confirm the host object bound to the client carries the agent's egress IP. CHKP054(session timeout below minimum): the grant lifetime Knocknoc sent was below the gateway's Identity Awareness minimum (300 seconds by default). Raise the Knoc's Maximum Grant Duration, or lower the gateway'spdp_session_timeoutfloor.- TLS errors (
CHKP002): trust the gateway's CA in the agent's system trust store, or set Insecure for lab use.
Grants succeed but traffic is still blocked (wrong Access Role). Validation deliberately skips the Access Role check, because the Web API can't verify role names ahead of time: add-identity returns HTTP 200 for any string and stores it verbatim in the PDP. If the configured role doesn't match a real Access Role object in policy, the identity registers but no rule matches. Compare the role string byte-for-byte against mgmt_cli show access-roles (case, spaces, dashes vs underscores) and confirm an installed rule references it. On gateway versions that emit a role not found warning, the agent surfaces this as CHKP052 at grant time; many versions don't, hence the skip.
Identities survive an agent restart. If the agent crashes mid-grant, in-flight identities stay on the gateway until their session timeout expires. The agent's per-IP registry is in-memory only, and the Web API has no list-all endpoint to enumerate them on restart. Once the server reconnects, it replays the live grant set and the registry converges. Shorter grant lifetimes tighten this staleness window.
Passive mode
- Feed never updates: use Test Feed on the Network Feed object. A reachability or auth failure there points at the URL, the credentials, or a network path the gateway can't traverse. On the management server, feed activity is logged in
$FWDIR/log/cpm.elg. - 401 / authentication failure on the feed: for a secret-based Knoc the gateway must send Basic Auth with username
apiuserand the EDL secret as the password. Confirm the secret hasn't been regenerated in Knocknoc. - No matches even though IPs are in the list: confirm the Network Feed object is referenced by an installed rule and that the Check feed interval has elapsed since the grant.
Error Codes
The Knocknoc agent reports structured error codes when Check Point operations fail. You can find more details on resolving these issues here.