
Palo Alto
Knocknoc integrates with Palo Alto firewalls and the Panorama management system to dynamically grant and revoke network access based on authenticated user sessions. Knocknoc updates existing in-policy lists rather than changing policies overall, making dynamic access change-safe, least-privilege and securely implemented.
There are three integration modes:
- Active - Near-instant access control for Palo Alto/Panorama, no commit required (recommended)
- Passive+ - Firewalls poll a securely-hosted External Dynamic List (EDL), with an active refresh signal sent to Panorama/Palo Alto to reduce access latency from ~5 minutes to ~2 seconds
- Passive - Firewalls poll an EDL every 5 minutes. No agent required, good for data-diode environments.
|
Active (Recommended) |
Passive+ (Simpler environments) |
Passive (Data-diode) |
|
|---|---|---|---|
| Speed | Near-instant |
~2s (large EDL sets slow) |
~5 minutes |
| Mechanism | Active API | EDL refresh signal | EDL polling (no agent) |
| Commit required | No | No | No |
| Auto timeout |
In-firewall |
Agent orchestrated | Polling period |
| Agent required | Yes | Yes | No |
| Panorama support | Yes | Yes | Yes |
Active Mode
Active mode provides real-time access control by communicating directly with the Palo Alto firewall or Panorama, via the Server Orchestration Agent. No user/client installation is required. When a user authenticates and is granted access, their IP is added immediately; when the grant expires or is revoked, the IP is removed. No commit is required.
Prerequisites on the Palo/Pano
Before configuring Knocknoc, you need to set up the following on your Palo Alto firewall or Panorama.
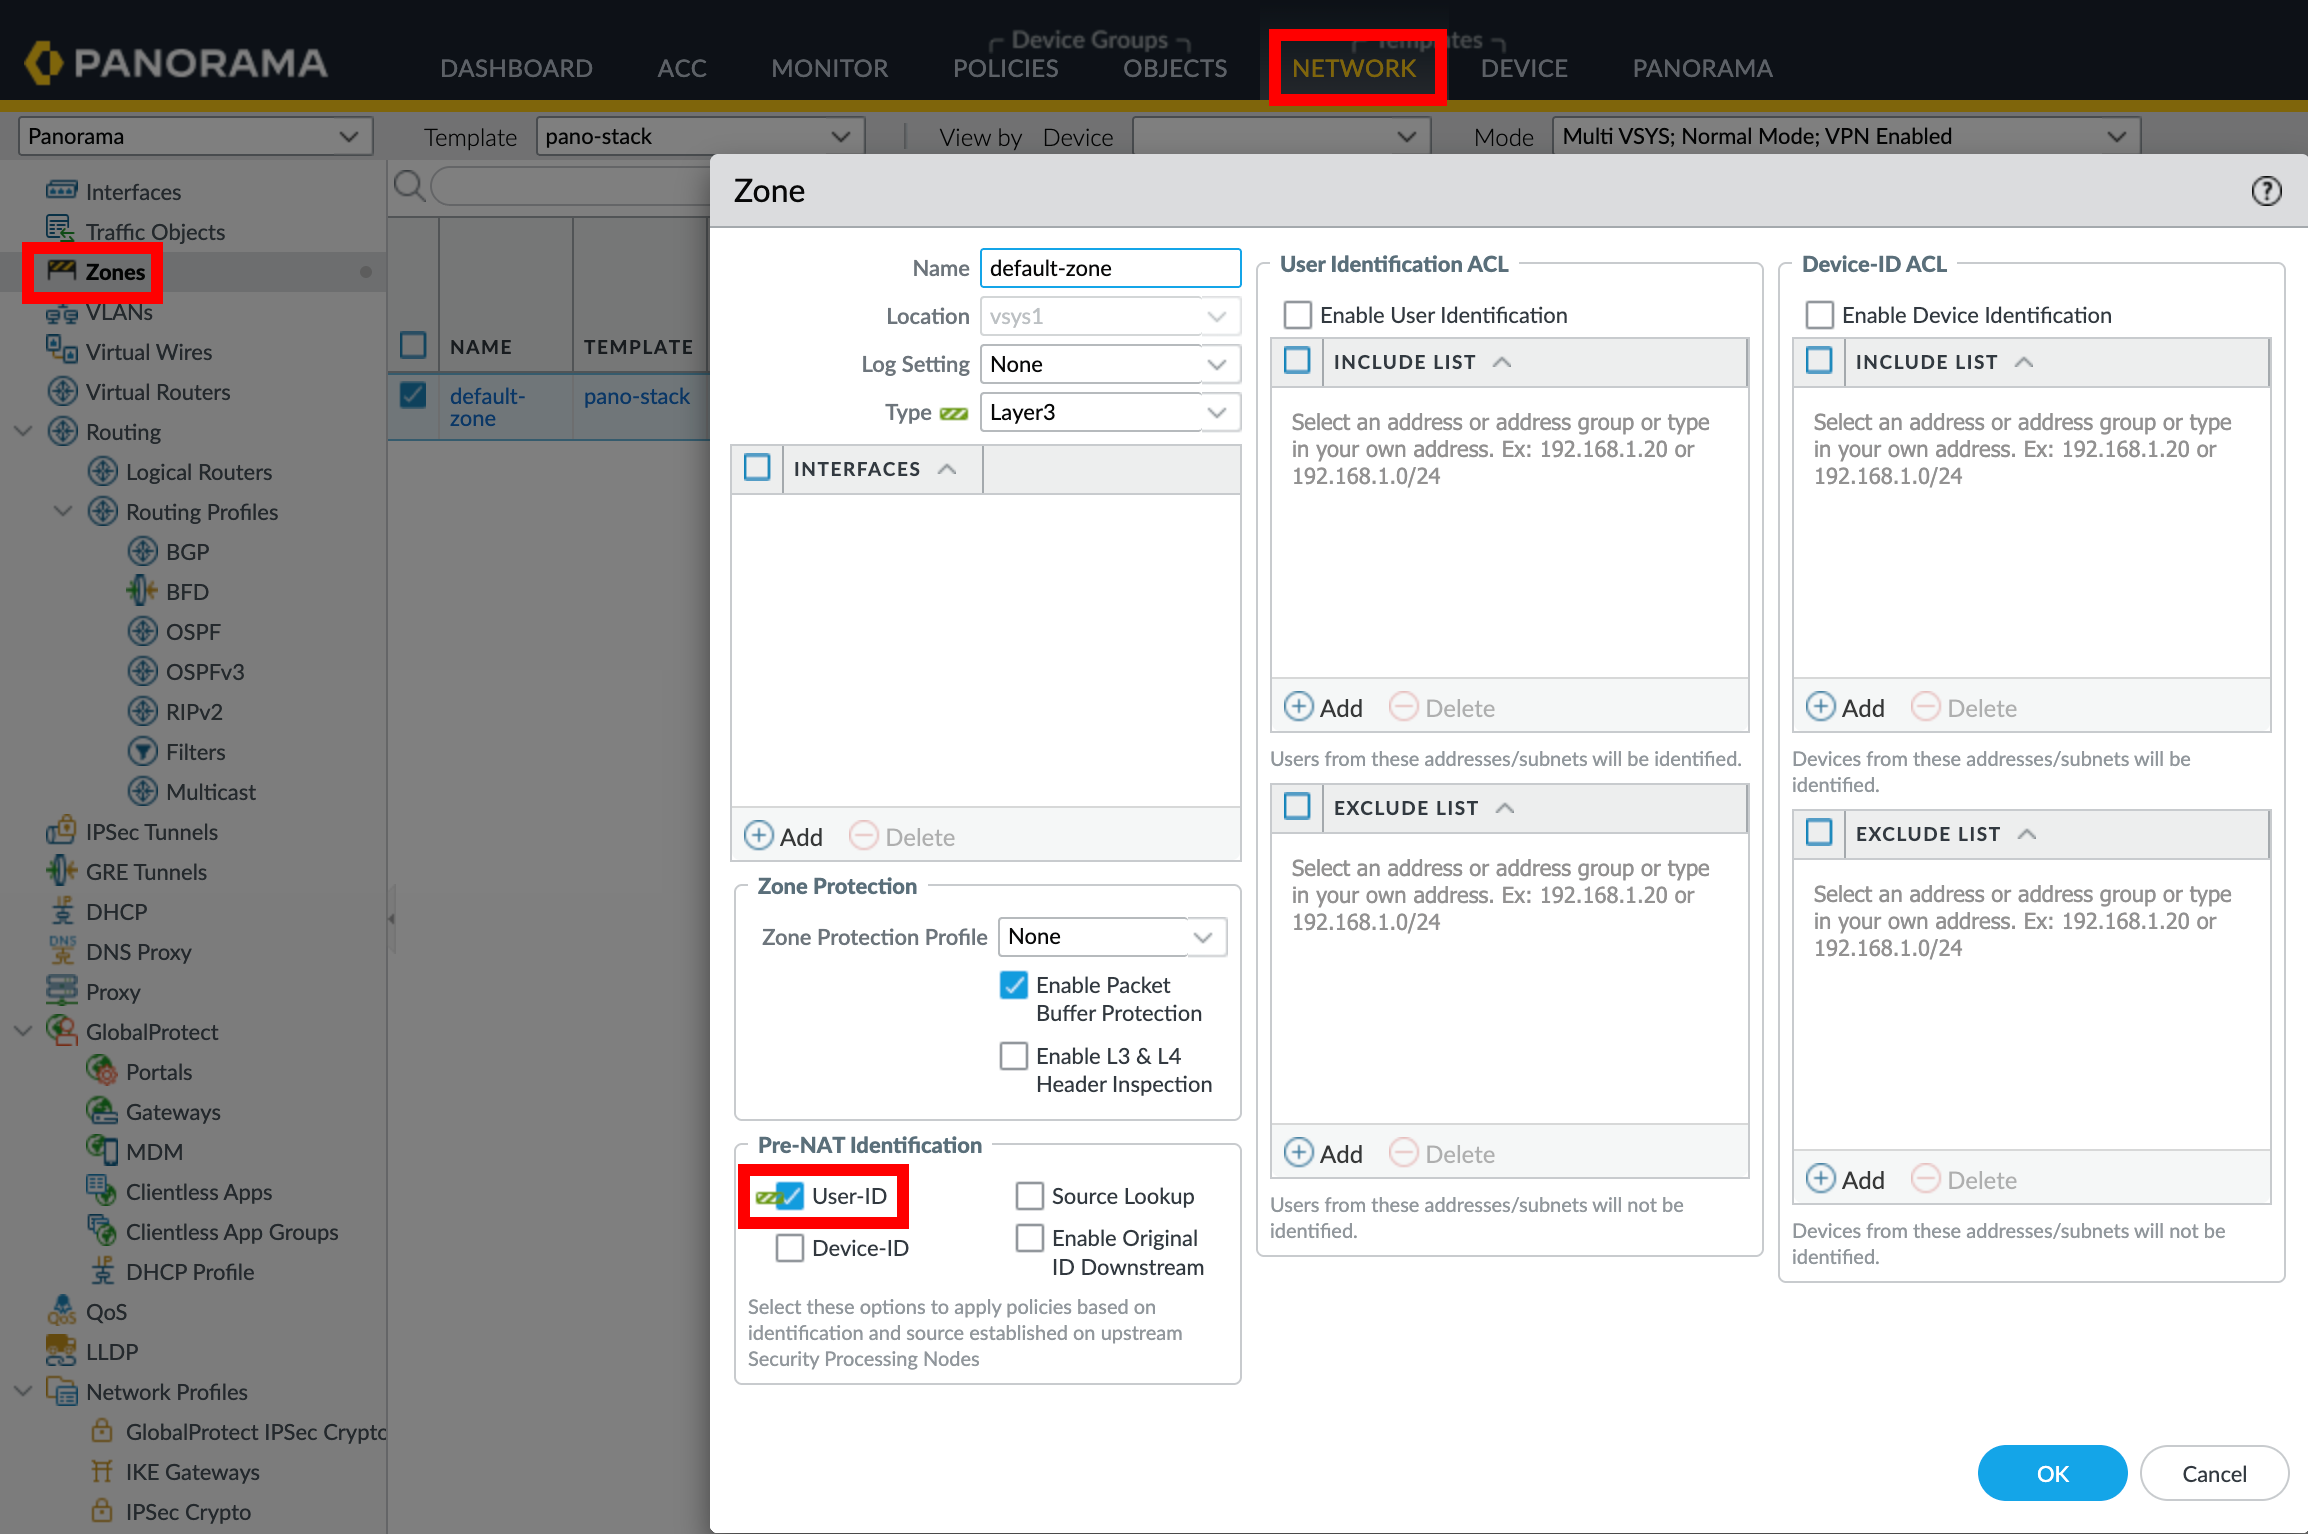
1. Enable User-ID on Zones
2. Create an Address Group
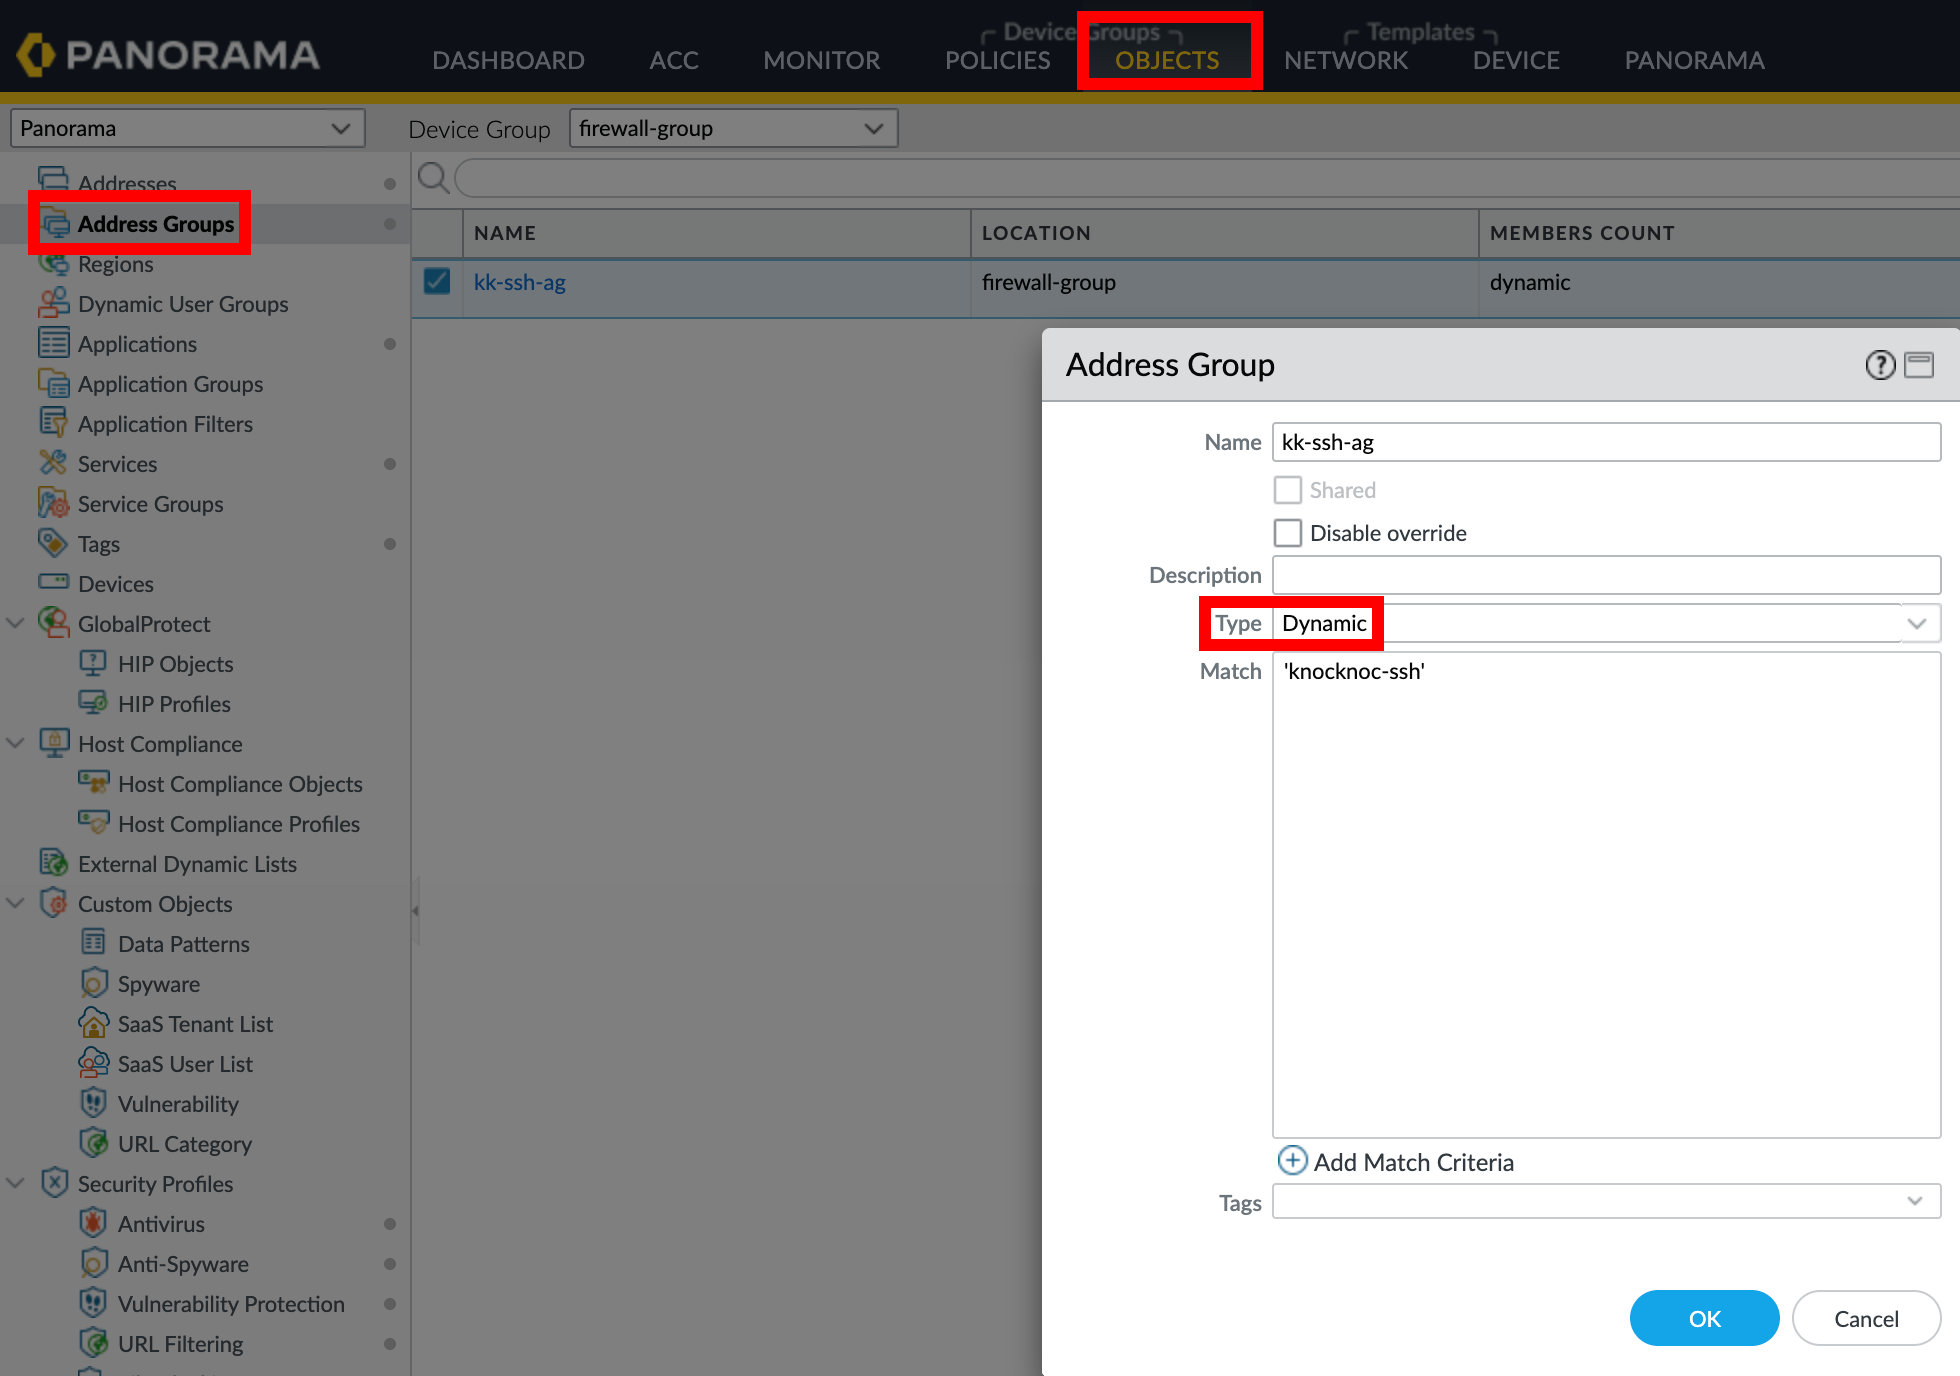
When using Panorama, create the address group in the appropriate Device Group and push to managed firewalls.
3. Create a Security Policy Rule
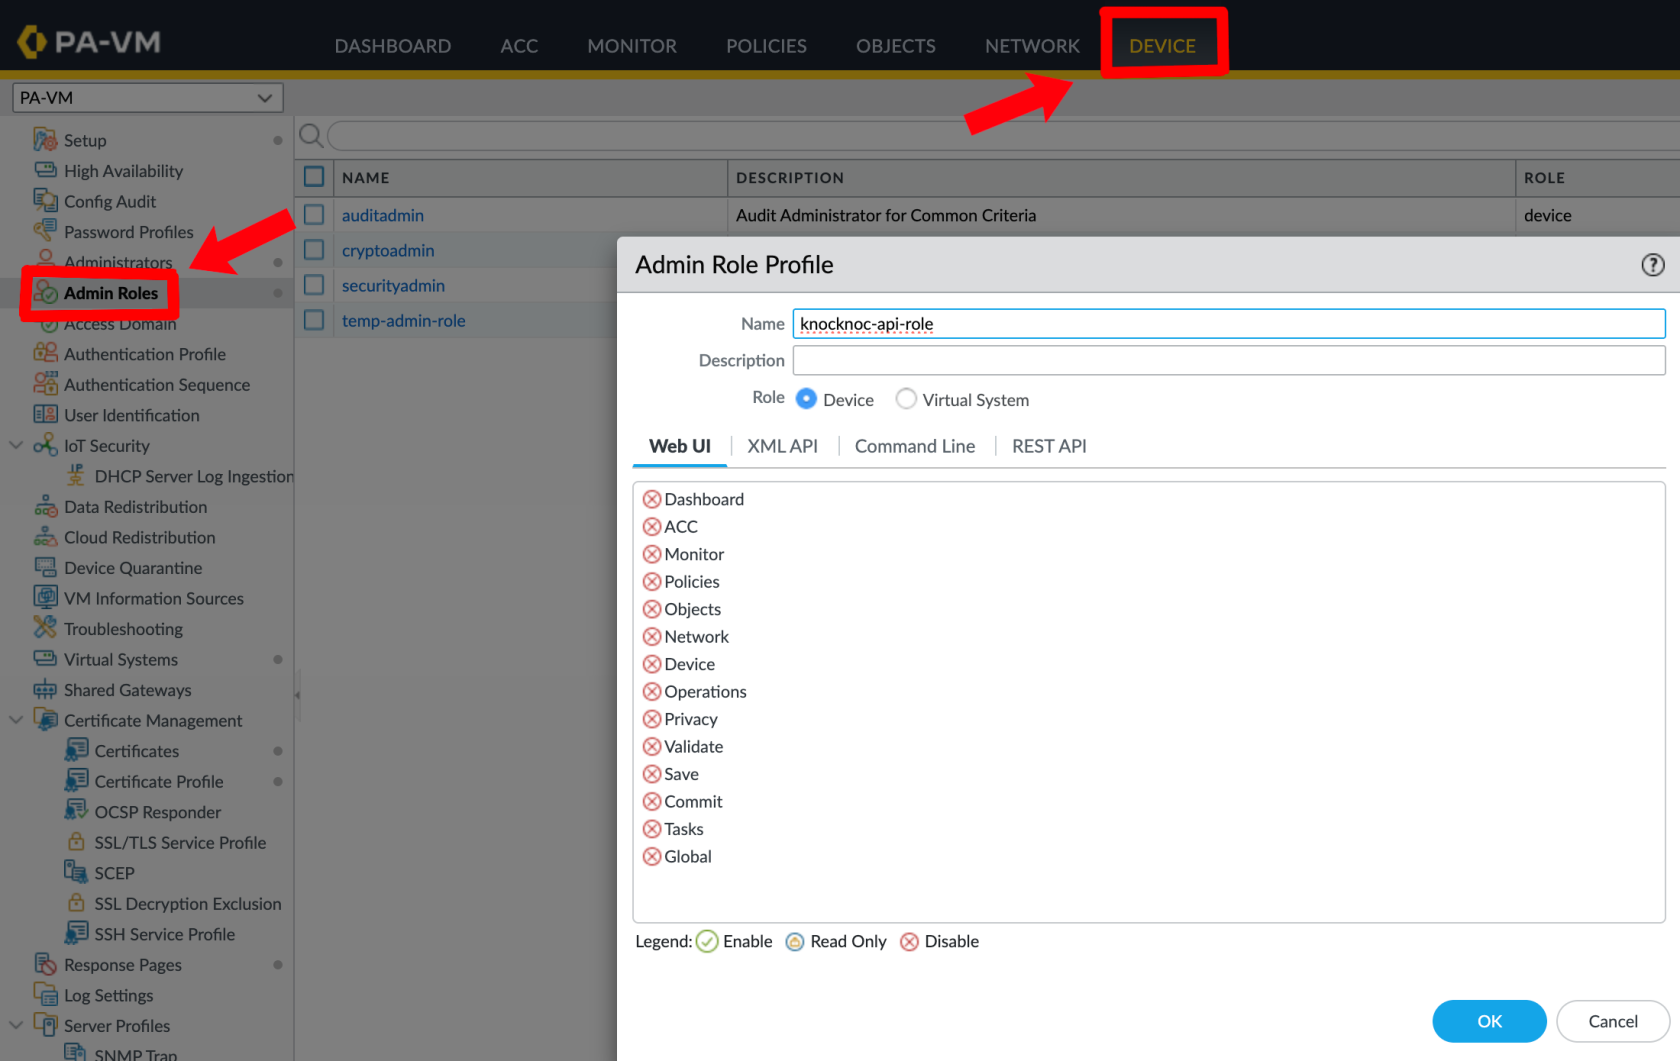
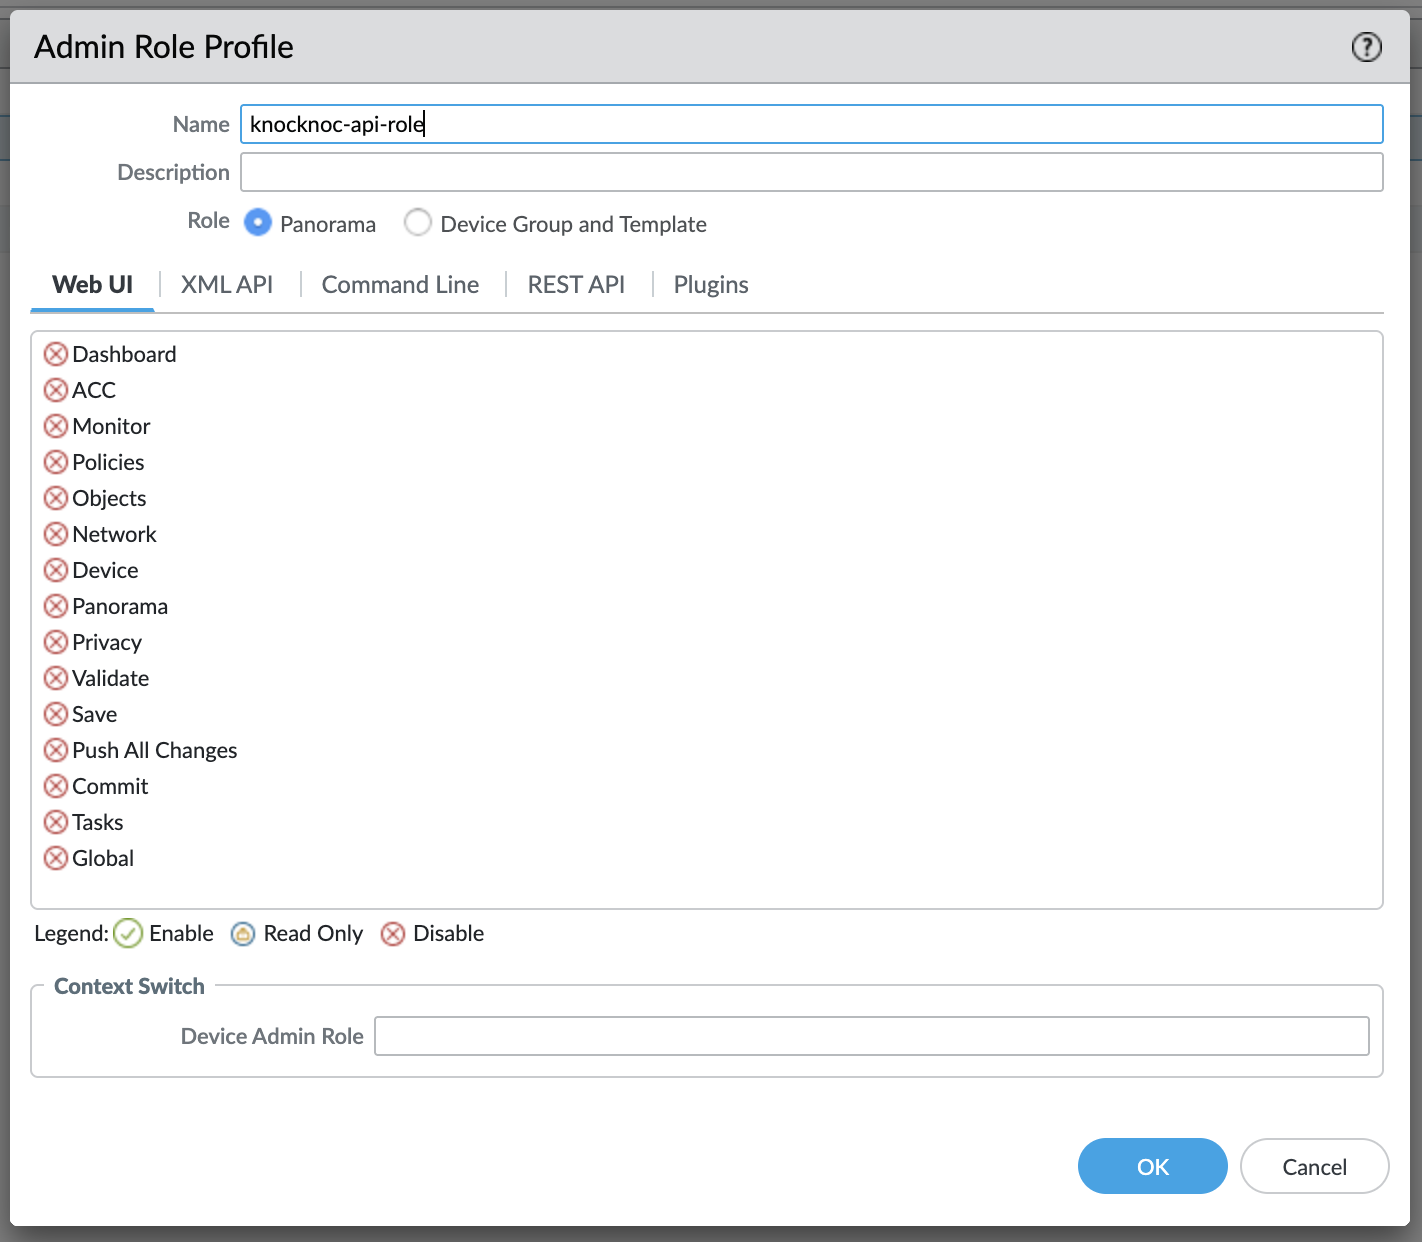
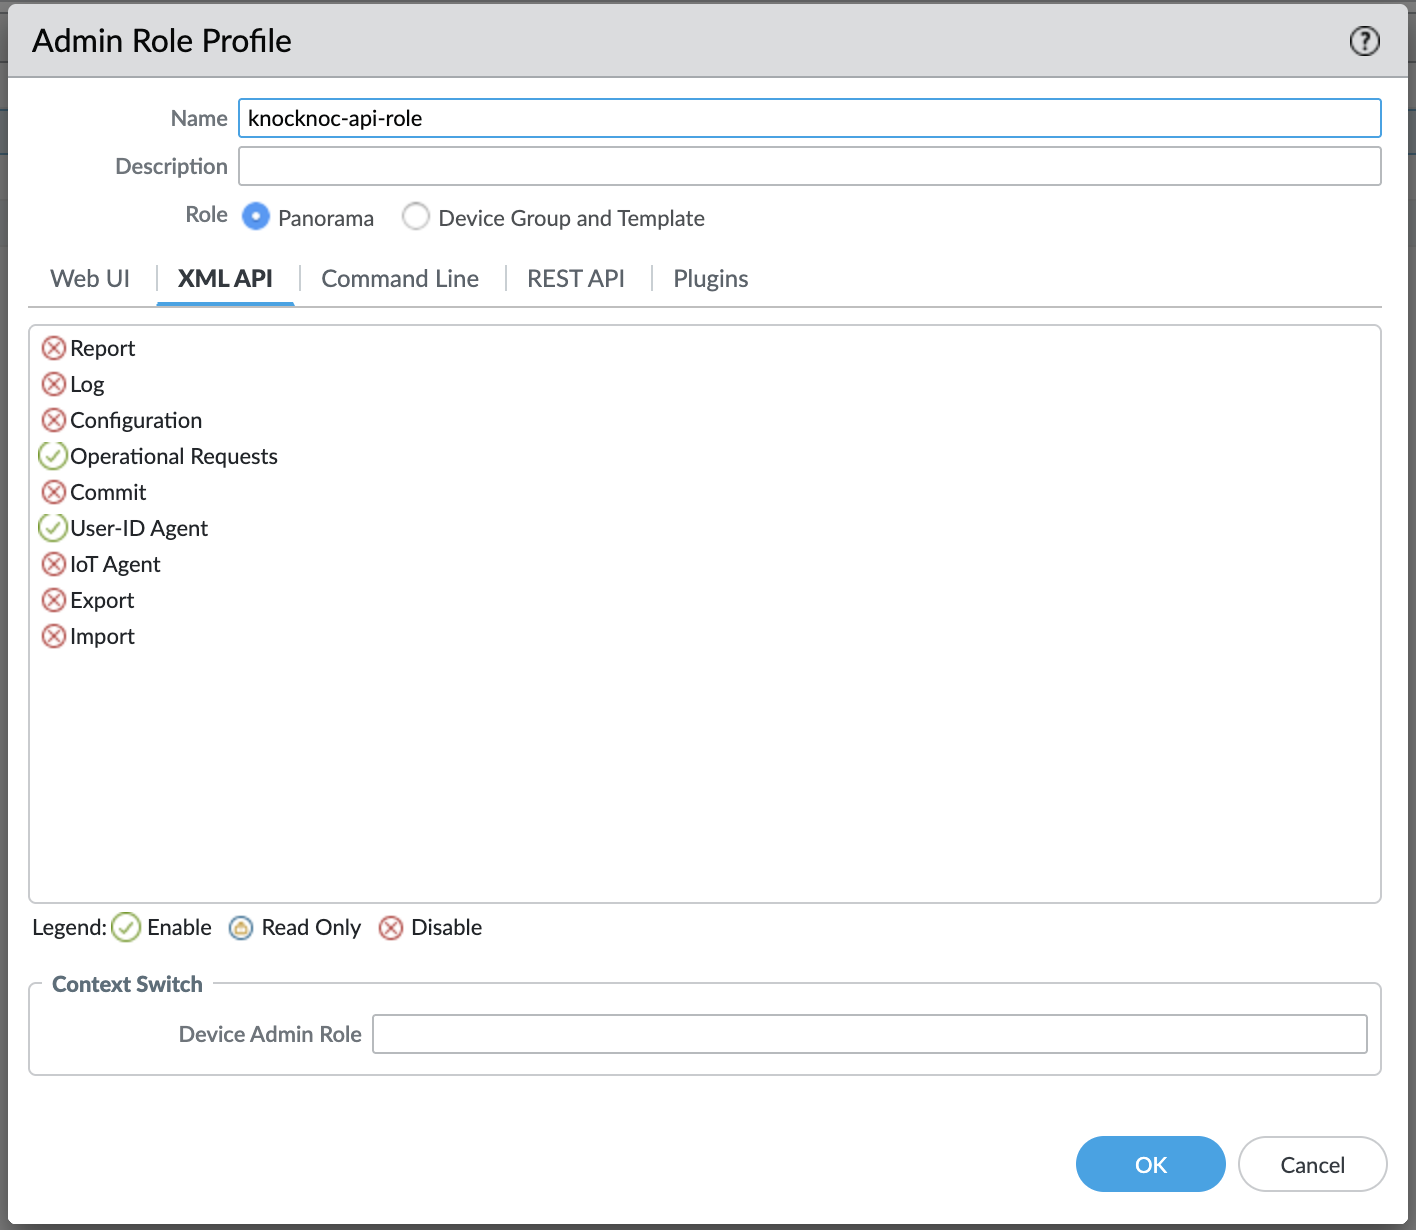
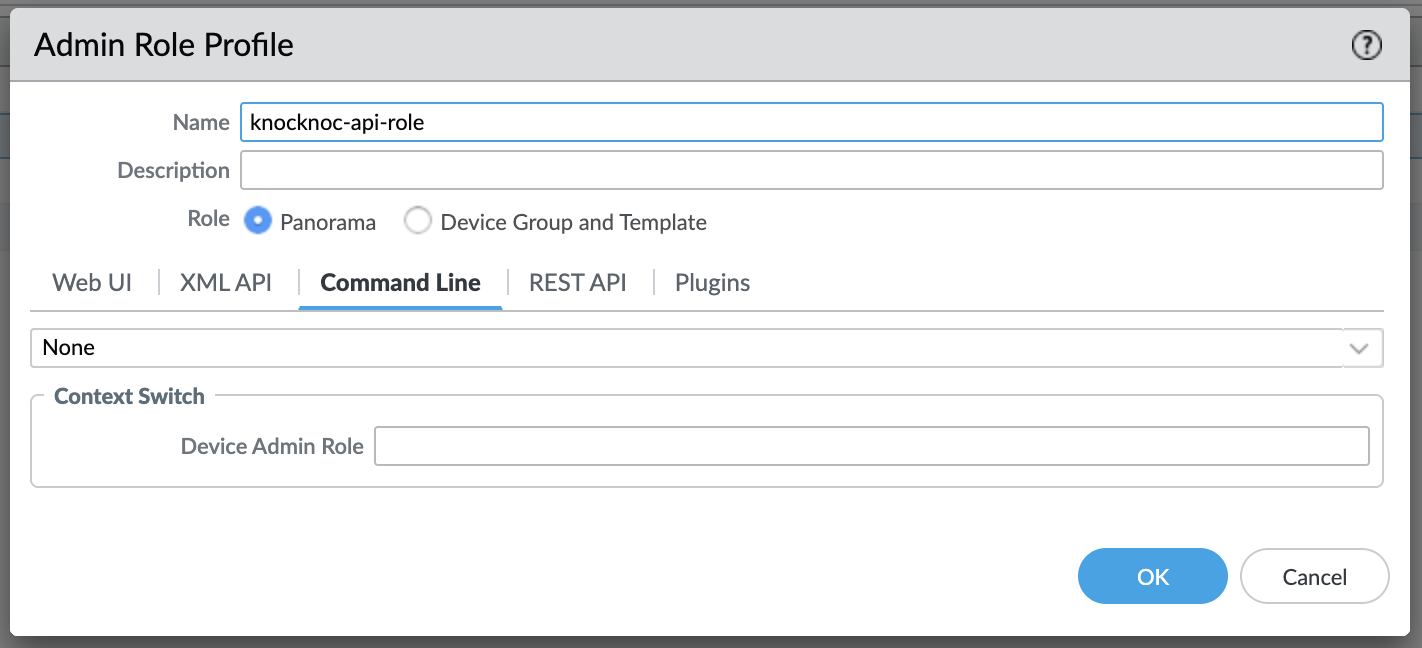
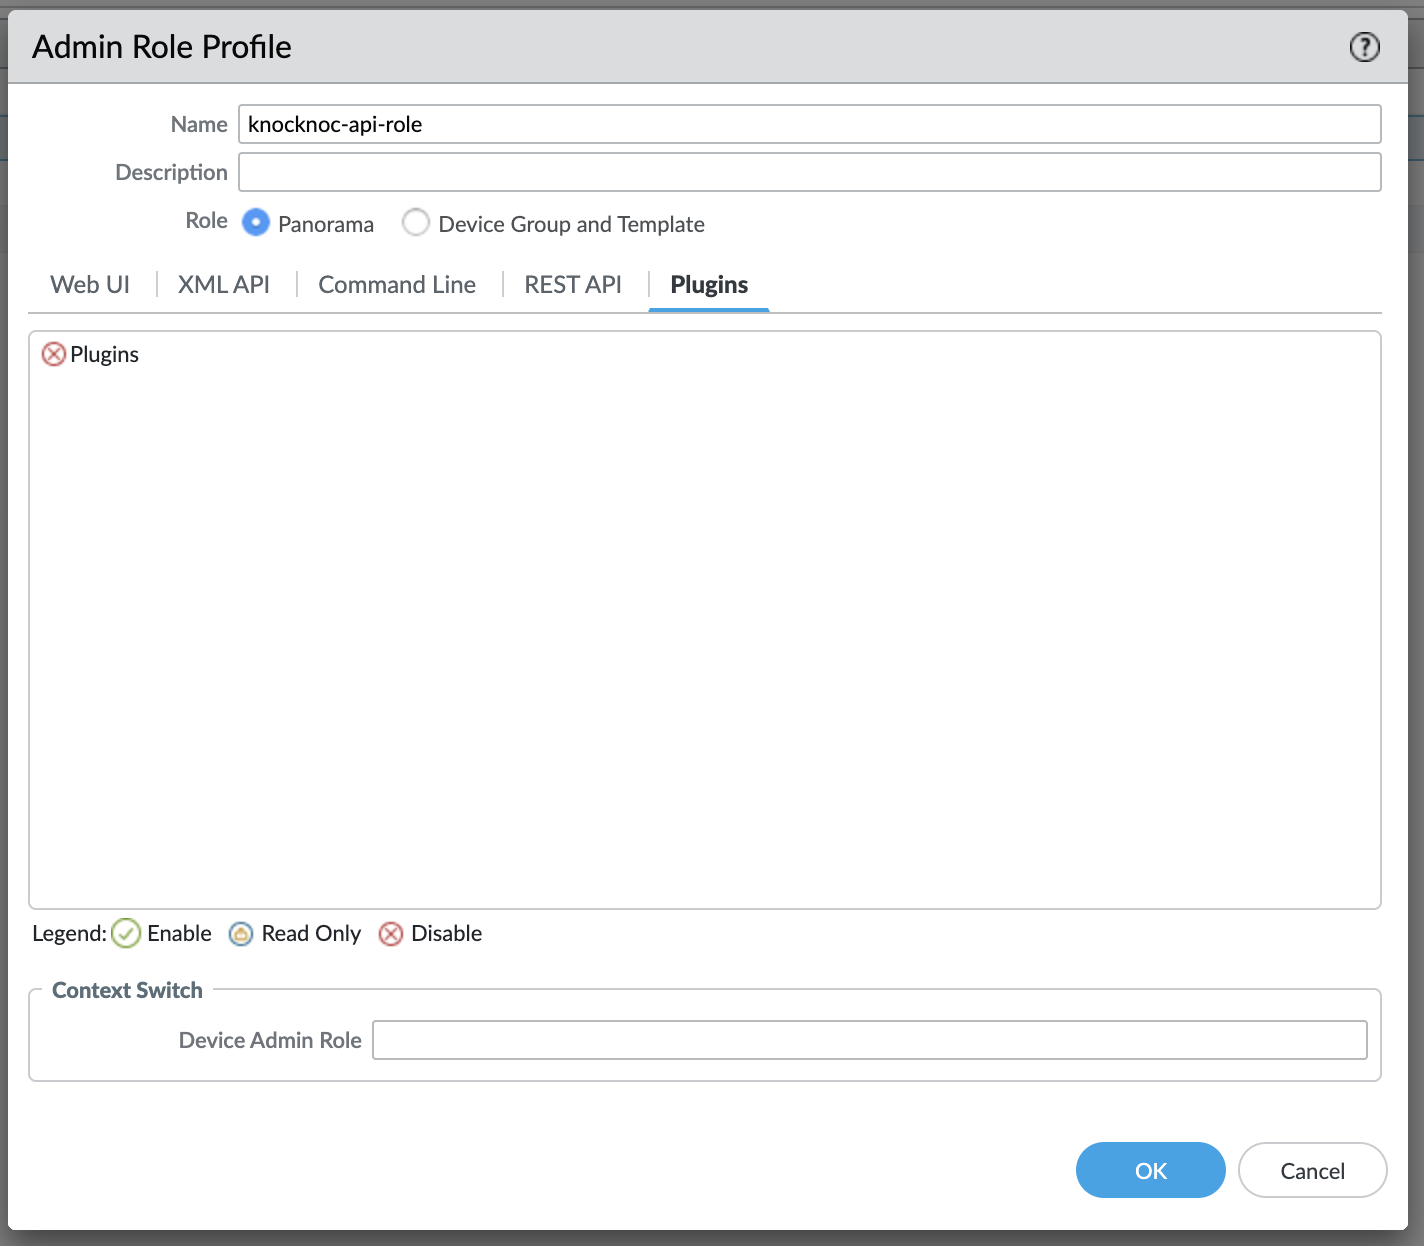
4. Create an API profile and API user
The API User role for the API key must have User-ID Agent in the 'XML API' section only.
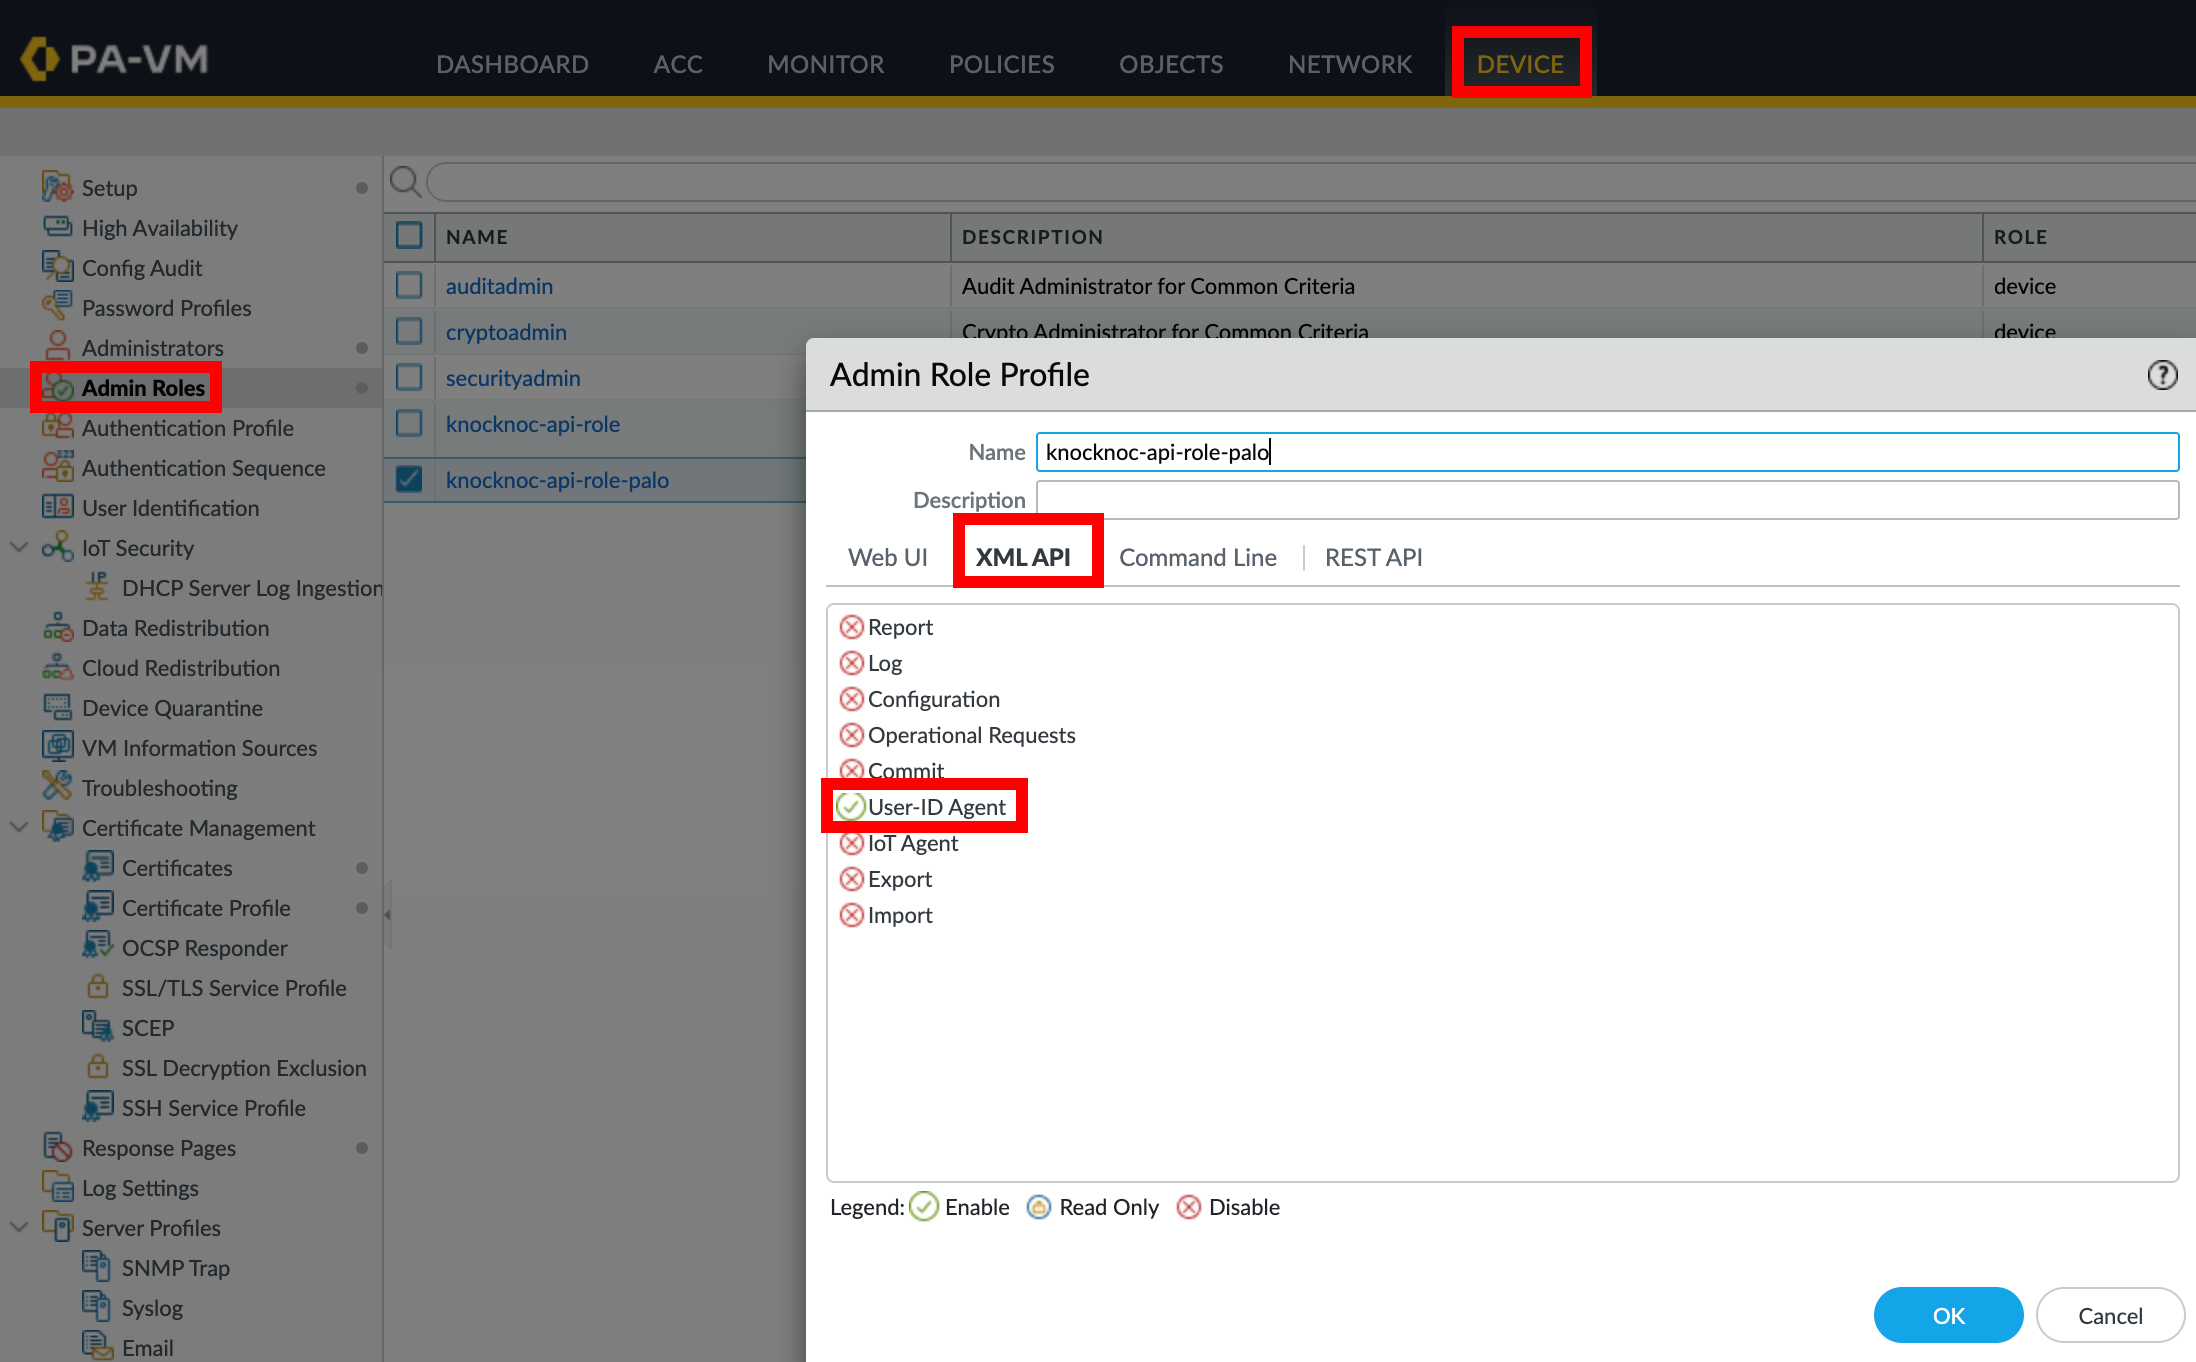
No other permissions are required for Active.
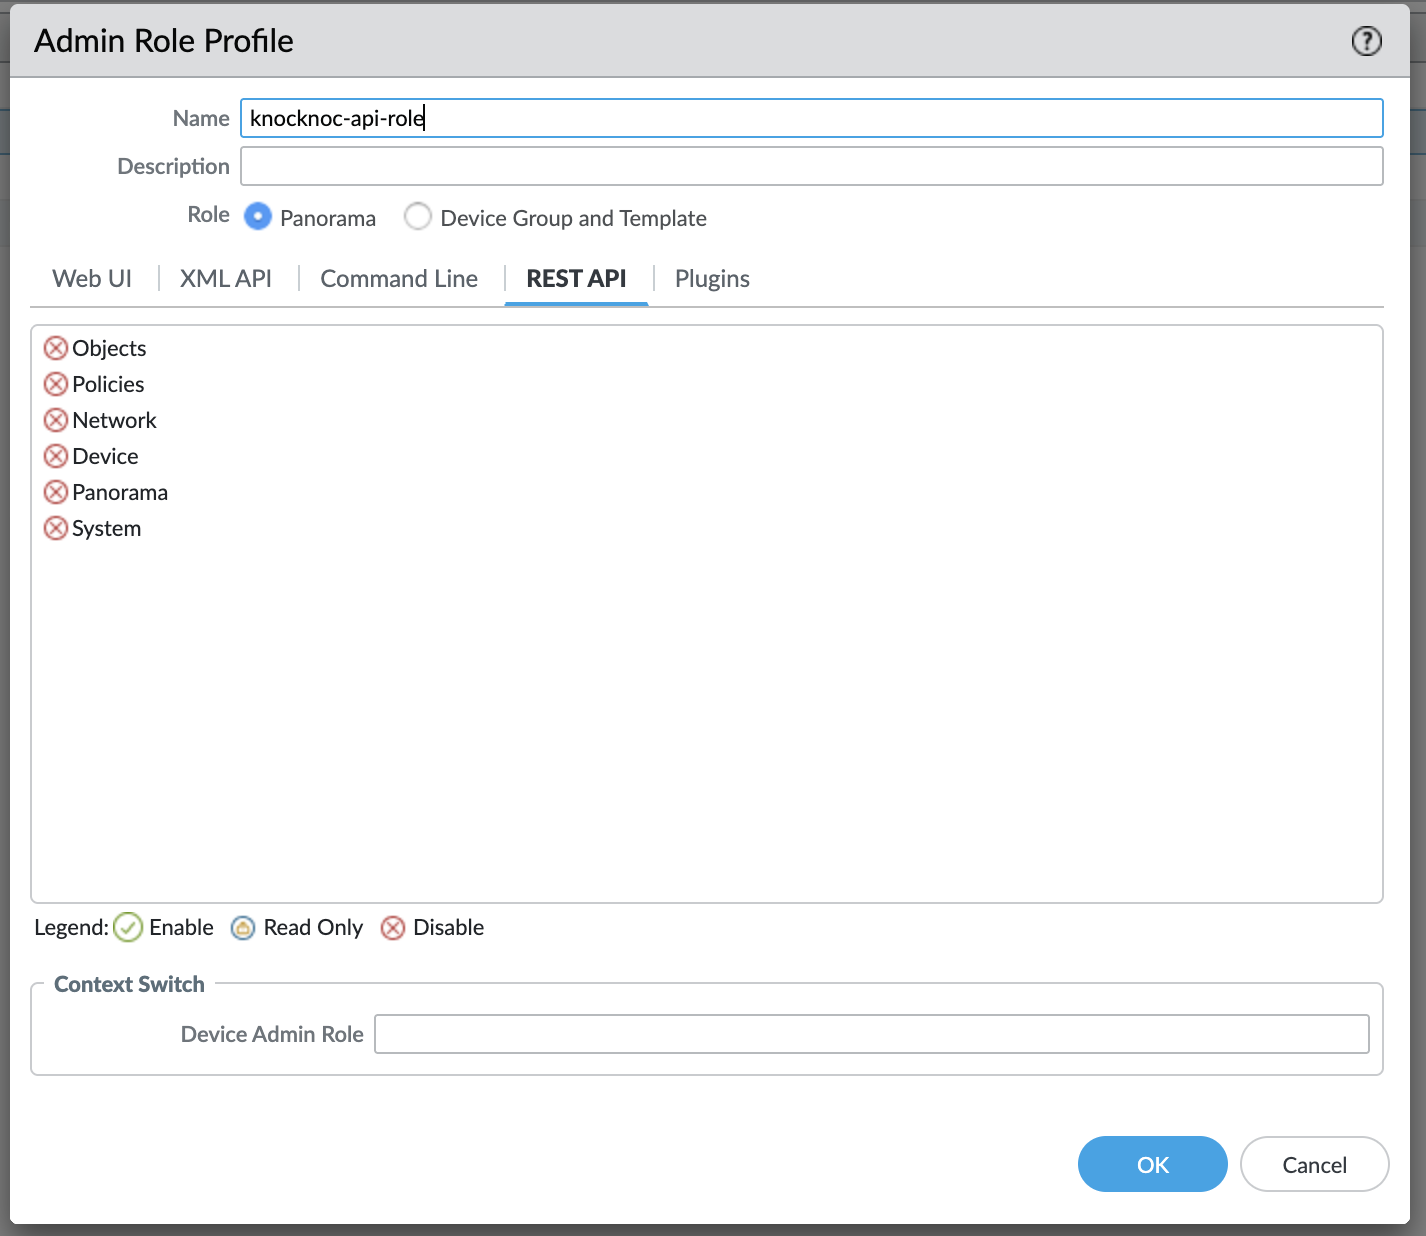
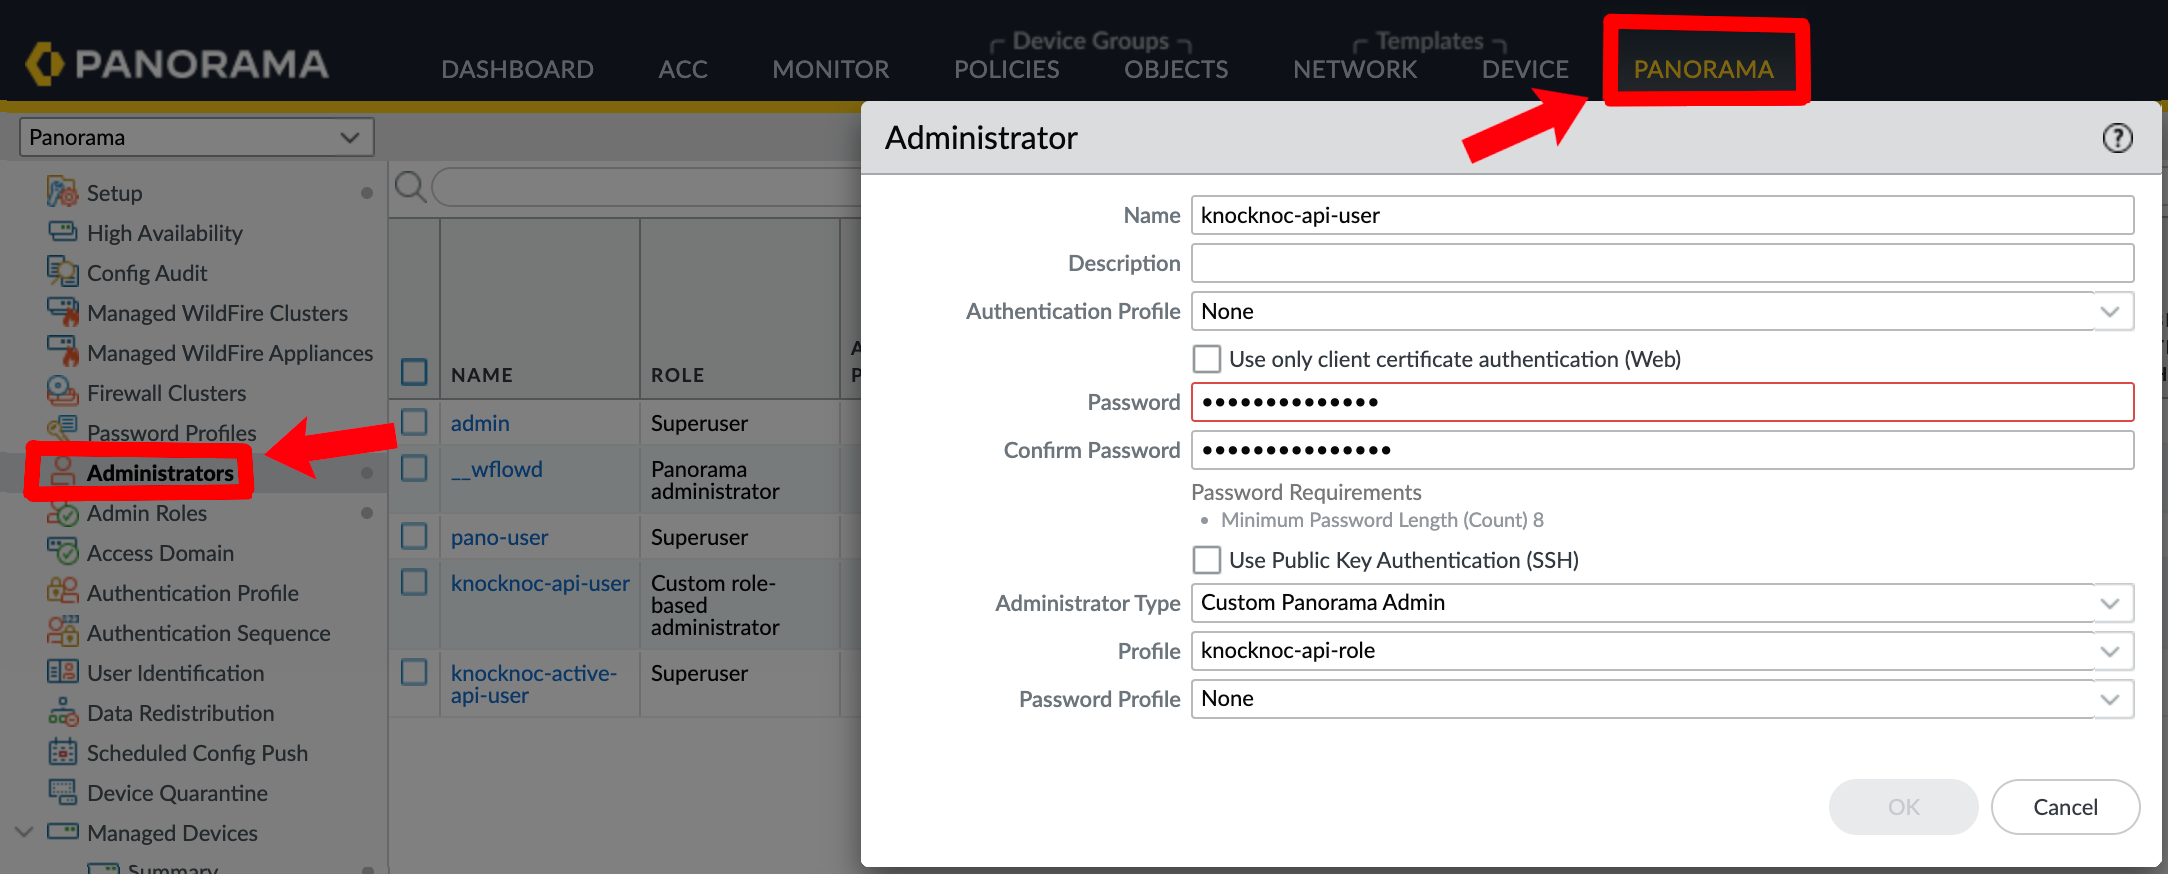
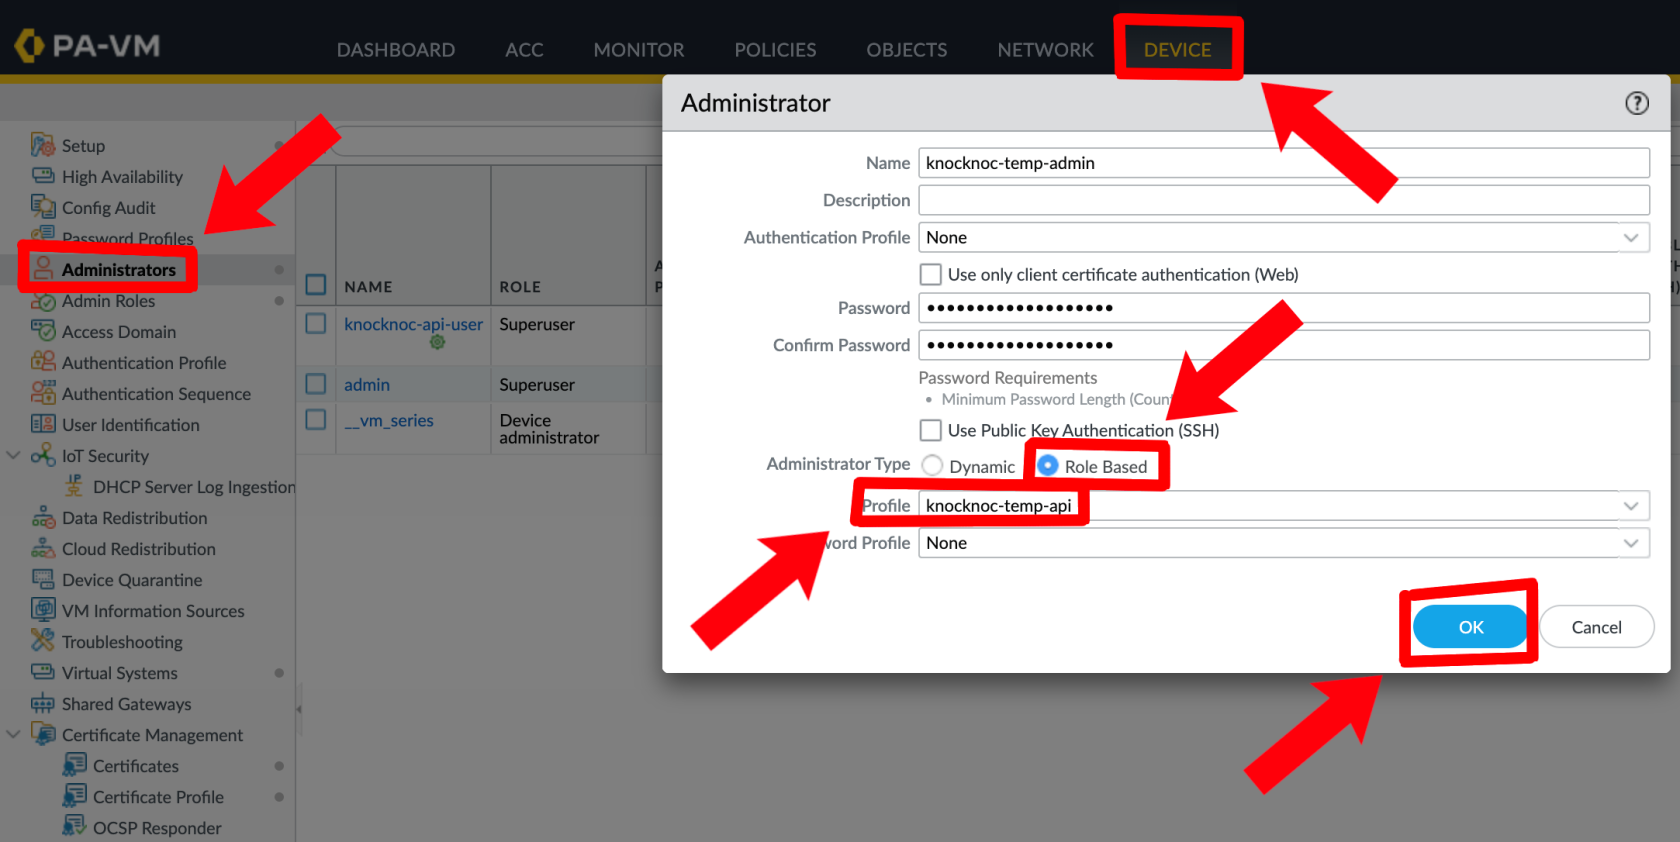
Create a user for the API key:
Panorama:
Palo Alto direct (no Panorama):
5. Generate an API Key (via Orchestration Agent)
Run the following command on an Orchestration Agent to generate an API key:
/opt/knocknoc-agent/knocker/knocker enable panosThis returns a base64-encoded API key.
You can also use curl against the PAN-OS keygen API, which is Palo Alto's suggested approach:
curl -H "Content-Type: application/x-www-form-urlencoded" -X POST \
  "https://<firewall-or-panorama>/api/?type=keygen" \
  -d 'user=<user>&password=<password>'
It will look something like this:
/opt/knocknoc-agent/knocker/knocker enable panos
Enabling backend panos on this machine.
Note: Some operations may require sudo rights.
PAN-OS Integration Setup
Please provide the following information:
PAN-OS Hostname or IP: 1.2.3.4
Enter Username: knocknoc-active-username
Enter Password:
Generating API key for user 'knocknoc-active-username' on host '1.2.3.4'...
Successfully retrieved API key.
API Key: LUFRPT12b1MwREtLZUxxxxxxxxxxxxxxxxxxxxxxxxxxxxxxxxxxxxxxxxxxxxxxxxxxxxxxxxxxxxxxxxxxxxxxxxxxxxxxxxxxxxxUE9PQ==
Please save this key securely. It will not be saved in the config.
You can use this key to authenticate API requests.
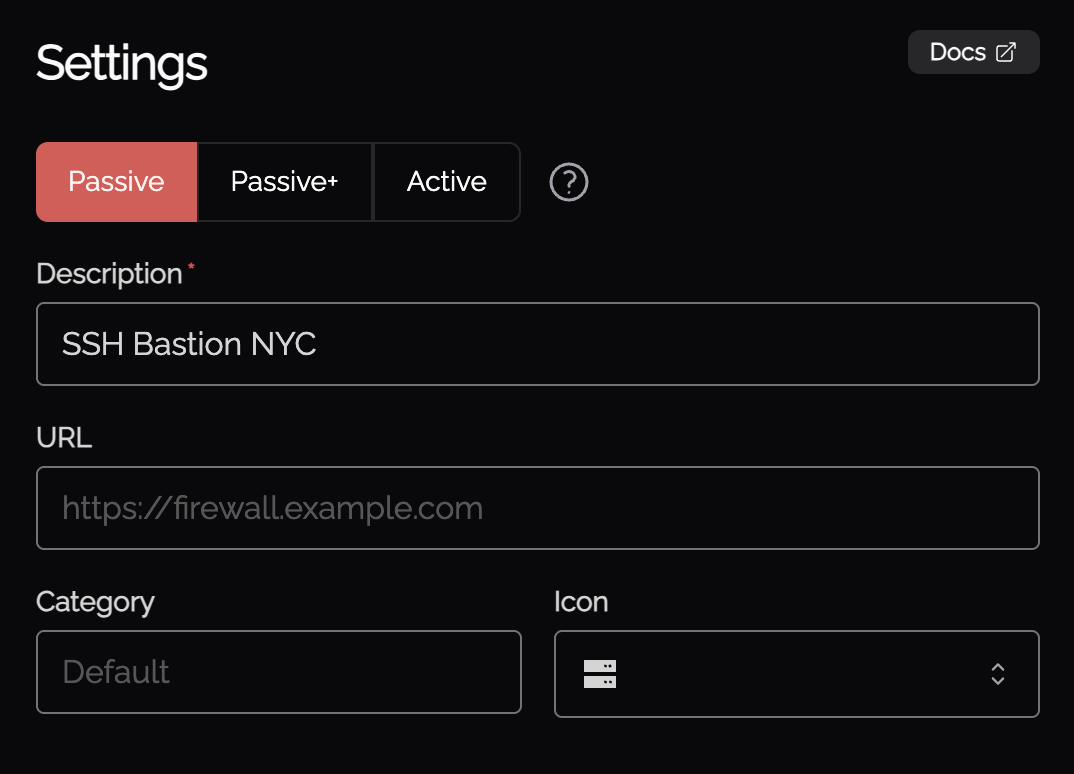
Knocknoc Configuration
- When creating a new Knoc Application, select Active as the Application Type
- Select Palo Alto as the vendor
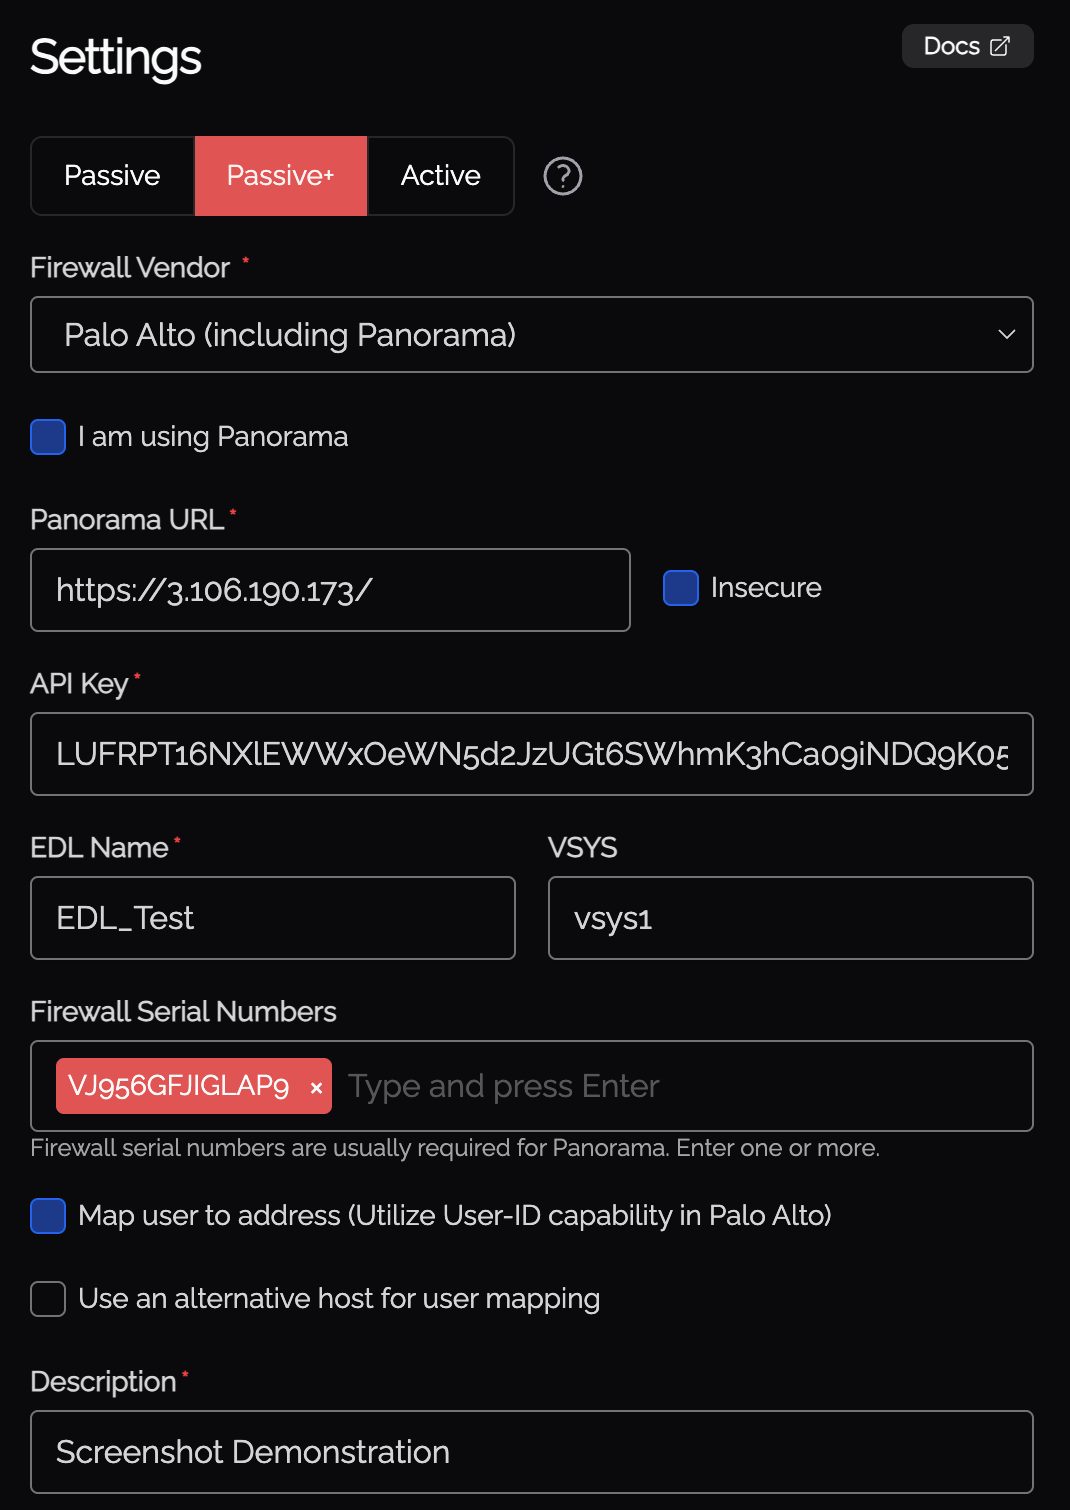
- Configure the backend settings:
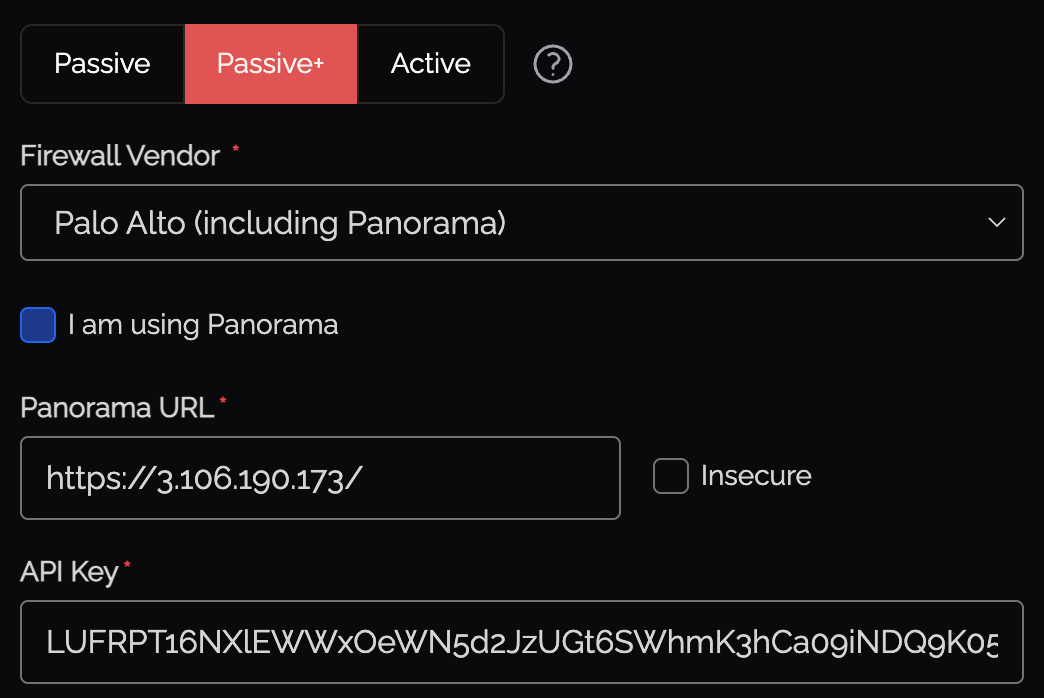
- I am using Panorama - Check if connecting through Panorama
- URL - The management URL of the firewall (e.g.,
https://192.168.1.1) - Insecure (skip TLS verification) - Check if using a self-signed certificate
- API Key - The API key generated above
- VSys - The virtual system (e.g.,
vsys1) if utilized - Device Group - The Panorama device group if utilized (if using Panorama and if utilized, not always required)
- Integration Method - Dynamic Address Group (DAG).
- Tag Name - The tag to register IPs with (must match your address group exactly, e.g.,
knocknoc-ssh) - Serial Numbers - Firewall serial numbers you want to push this to (for Panorama deployments)
- Map User - Optionally map the authenticated user identity to the IP via User-ID
Panorama with Serial Numbers
When managing firewalls through Panorama, tag registration commands are sent through Panorama to each specified firewall:
- Check I am using Panorama
- Set the Panorama Hostname to the Panorama management URL
- Configure the VSys for the target firewall
- Add one or more Serial Numbers for the managed firewalls you want to target
- The agent will send tag registration commands through Panorama to each specified firewall
You are done and ready to test!
Verifying & Testing
- Create a Knoc with Active mode (following the steps above)
- Assign the Knoc to a test user (login, or create a manual-grant/break-glass entry as an Admin)
- Log in to Knocknoc as that user. Observe the Knoc card for any warnings. Hover for error codes if errors appear.
- On the firewall managed by the Panorama (serial number) - visit Monitor -> Logs -> IP-Tag. Note the login, IP address and tag.
- Verify the IP appears in the address group membership (on the underlying firewall(s))
- Log the user out revoking the grant, and verify the IP is removed
Checklist
- User-ID enabled on the relevant zone(s)
- Address group created with correct tag match criteria (single quotes around the tag name)
- API key has User-ID Agent permissions
- Tag name in Knocknoc matches the address group match criteria exactly (case-sensitive)
- Security policy references the address group
- Serial numbers configured (if using Panorama)
- Commit and push completed (if using Panorama)
High-availability (not using Panorama)
For direct-to-firewall deployments with a high-availability (HA) pair, you can configure automatic failover.
Configuration
In the Knoc Application settings, expand the HA Failover section:
- Secondary Firewall URL - The management URL of the secondary firewall
- Secondary API Key - API key for the secondary firewall
- Skip TLS verification - Check if the secondary uses a self-signed certificate
How It Works
Before each operation (grant, revoke, or extend), the agent:
- Checks the primary firewall's HA state via the operational API
- If the primary is active - sends the command to the primary
- If the primary is passive or unreachable - automatically falls back to the secondary
- If both firewalls are unreachable or both are passive - reports an error
Note: HA failover is for direct-to-firewall deployments only. When using Panorama with serial numbers, Panorama manages device failover itself - do not configure HA failover in this case.
Passive+ Mode
Passive+ mode combines EDL polling with an active refresh signal. Firewalls retrieve IP address lists from a Knocknoc-hosted EDL, and the orchestration agent triggers EDL refreshes dynamically - reducing the effective latency from ~5 minutes to 0–2 seconds.
Knocknoc Configuration
- When creating a new Knoc Application, select Passive+ as the Application Type
- Select Palo Alto as the vendor
- Configure the backend settings:
- I am using Panorama - Check if connecting through Panorama
- Firewall Hostname (or Panorama Hostname) - The management URL
- API Key - API key for the orchestration agent
- EDL Name - The name of the External Dynamic List on the firewall
- VSys - The virtual system (e.g.,
vsys1) - Map User - Optionally map the authenticated user identity via User-ID
- Serial Numbers - Firewall serial numbers (if using Panorama)
API Key Generation
Run the following command on the orchestration agent to generate the API key:
/opt/knocknoc-agent/knocker/knocker enable panosThis returns a base64-encoded API key.
Required Permissions
Create a new custom role:
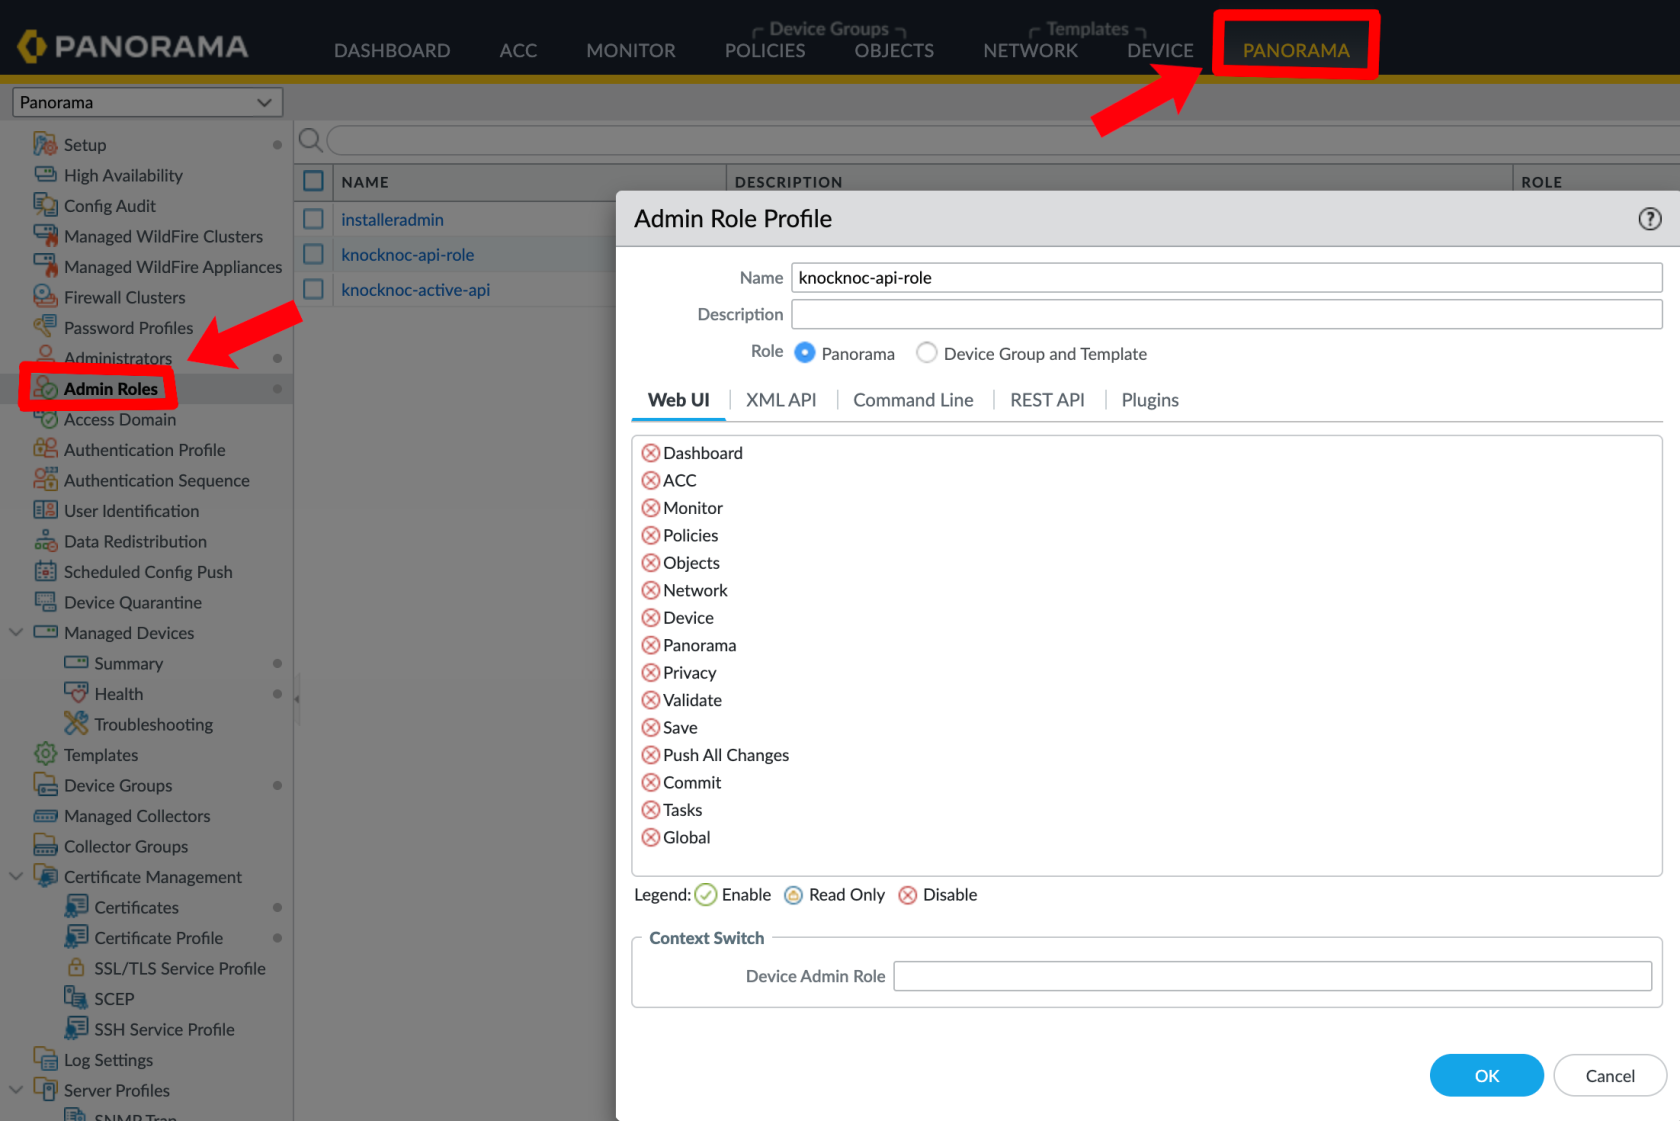
The role for the API key must have a few permissions.
- Operational Requests (for EDL refresh)
- User-ID Agent (optional, only if User-ID mapping is enabled)
Create an administrator for the API key, linked to this new Role.
Panorama:
Palo Alto:
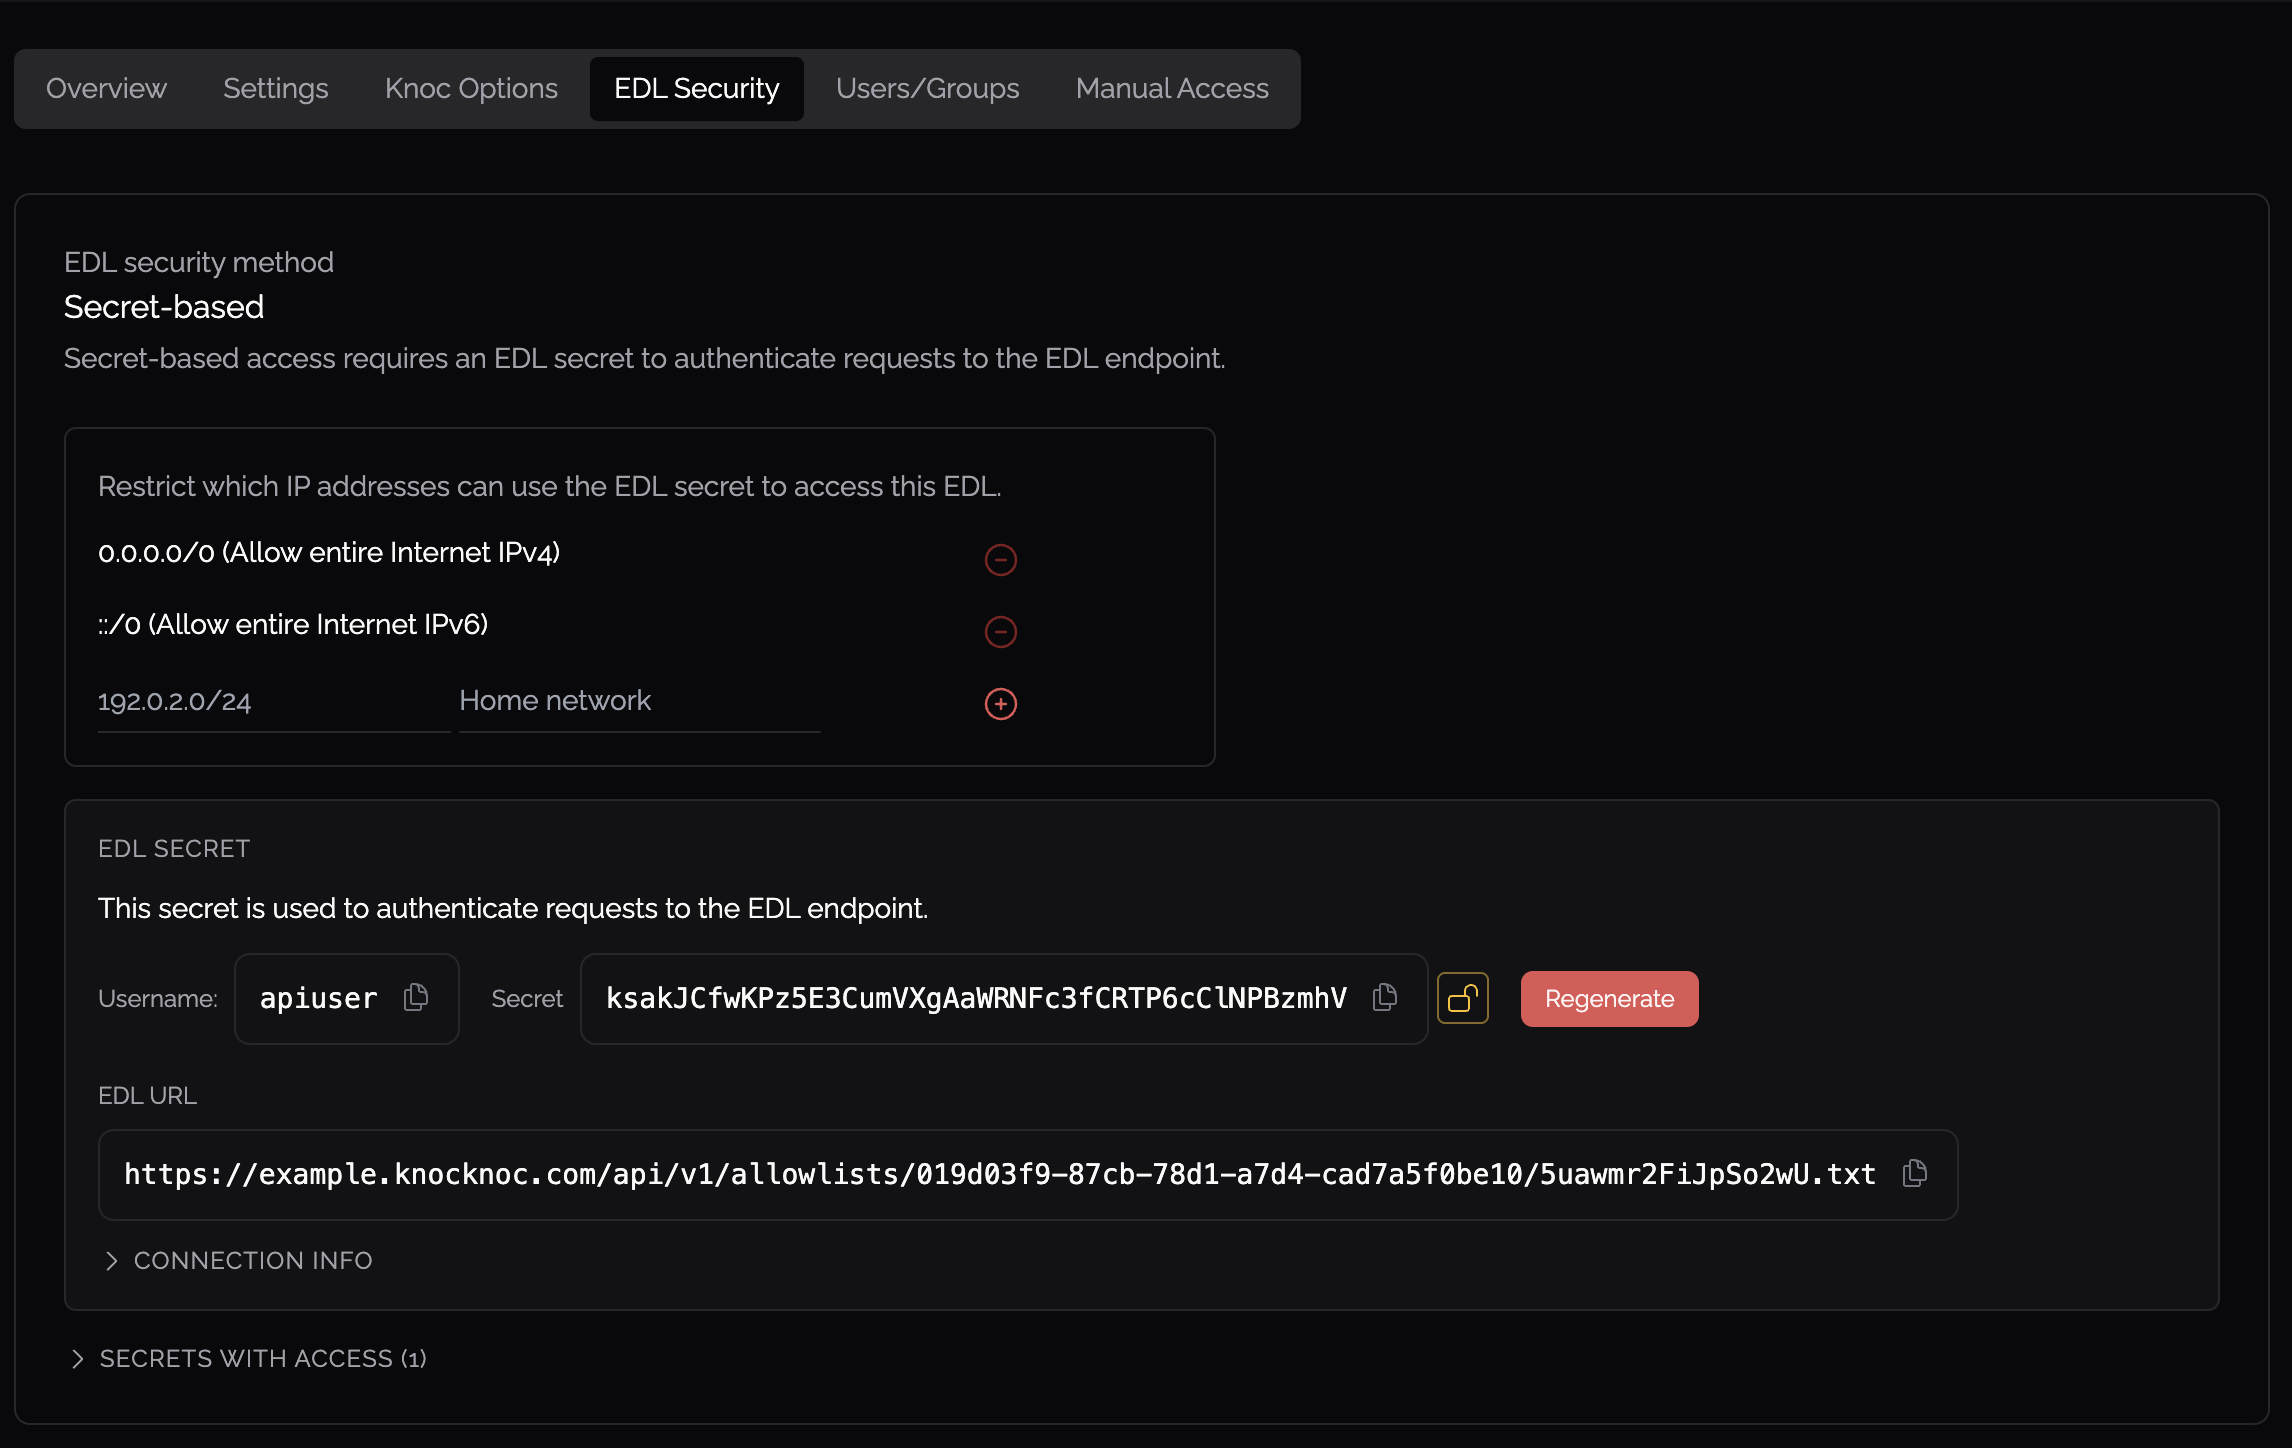
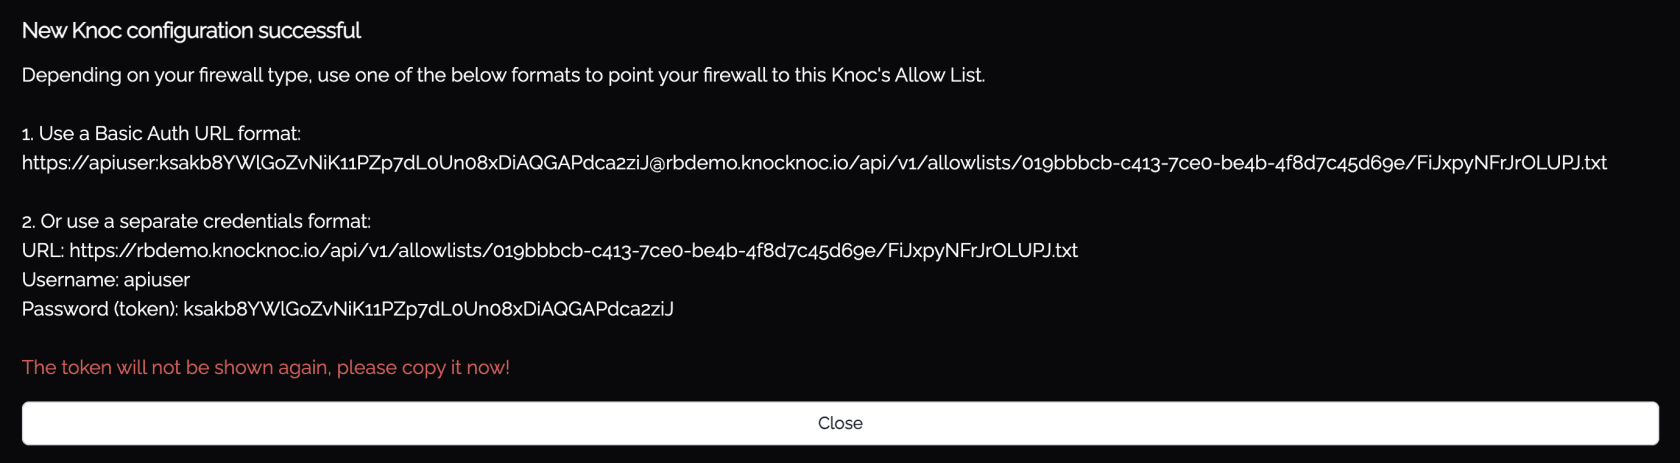
EDL Secret Configuration
- Create authentication credentials for firewall EDL retrieval in the Knocknoc admin portal
- Configure IP allowlisting to restrict which source addresses can retrieve the EDL
- Do not permit access from the entire internet - restrict to your firewall management IPs
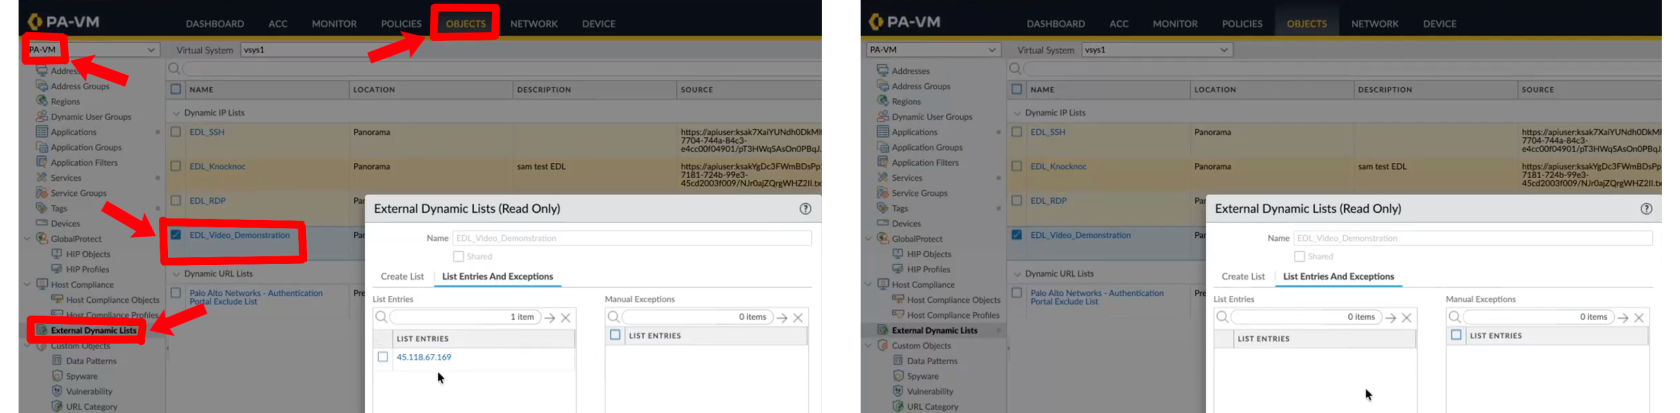
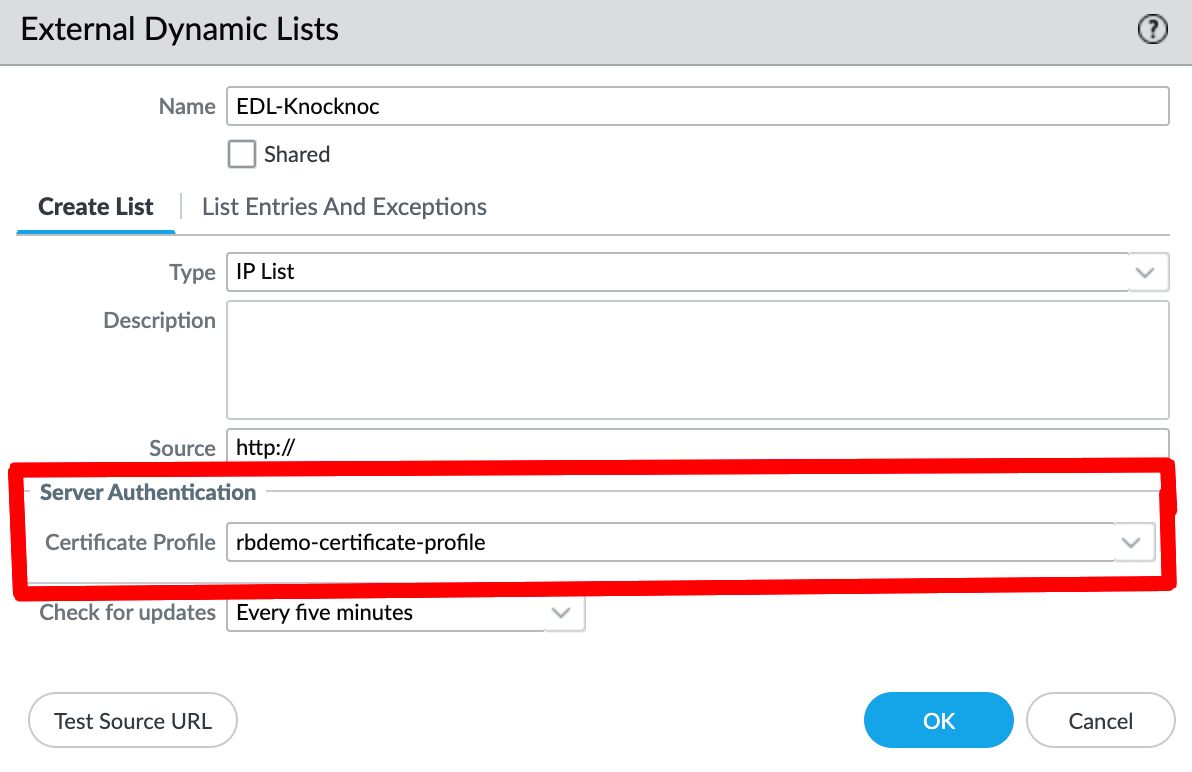
Firewall Configuration - External Dynamic List
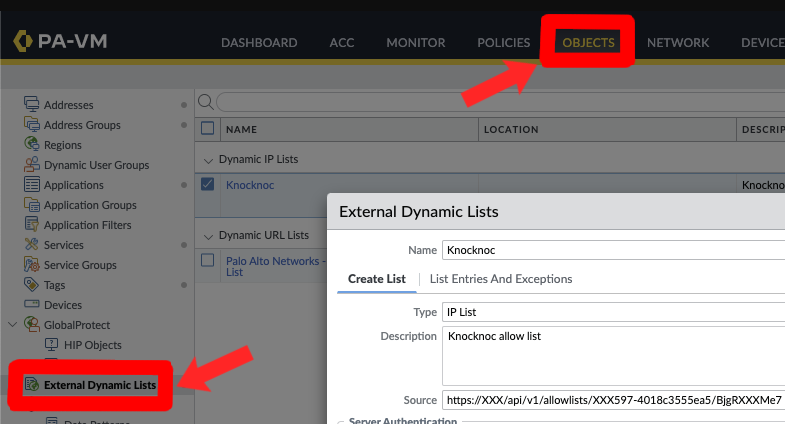
- Click Add to create a new list
- Configure:
- Name - A descriptive name (e.g.,
FirewallManagers,SSH) - Type - IP List
- Source - The Knocknoc EDL URL (use Basic Auth format)
- Name - A descriptive name (e.g.,
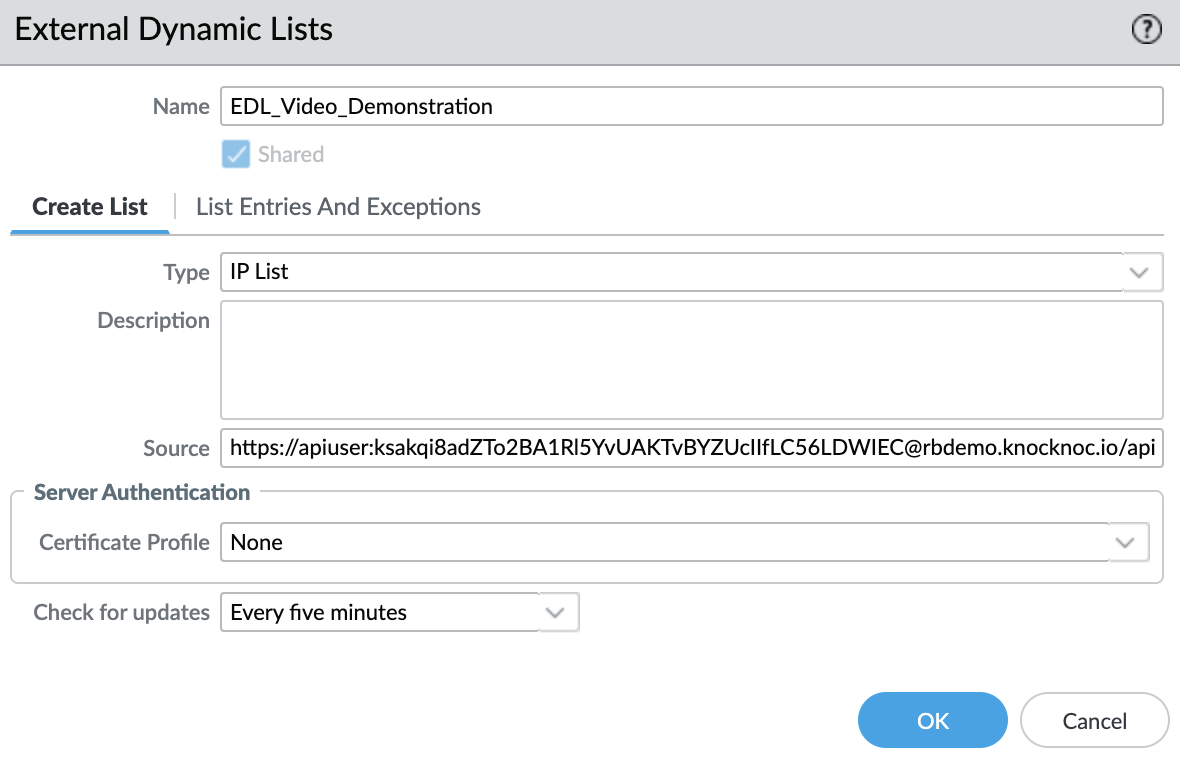
- If strict TLS validation is required, apply a Certificate Profile
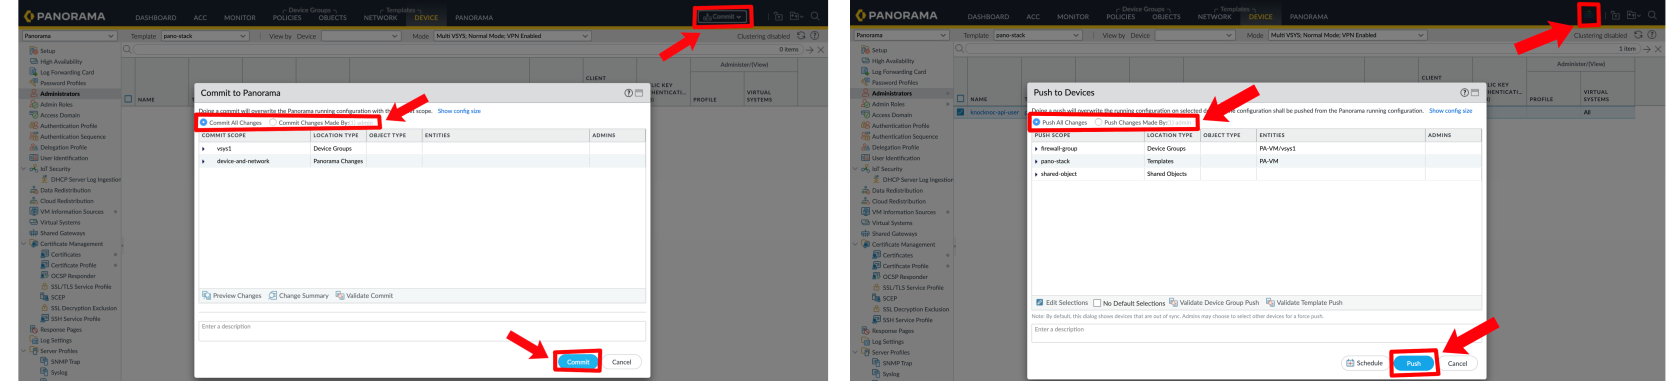
- Click OK, then Commit (and push if using Panorama)
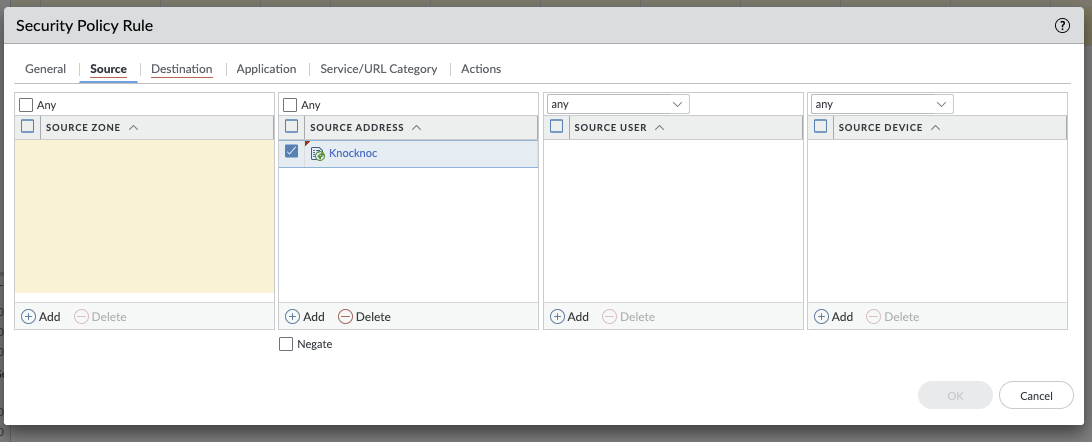
Security Policy
Reference the External Dynamic List in your security policy rules as a source address, enabling access control based on authenticated user sessions.
Testing
Link a user within Knocknoc and log in.
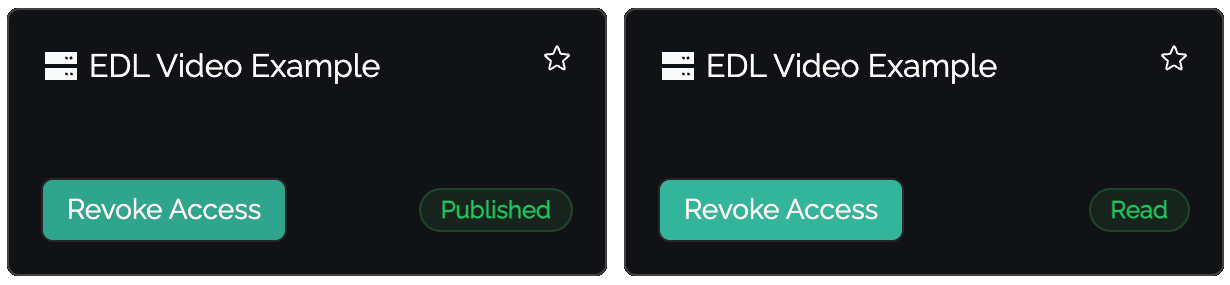
Status Indicators
- Published - IP address has been sent to the EDL, awaiting firewall consumption
- Read - Firewall has retrieved and accepted the entry
Verify on the Palo Alto device that IP changes are visible:
Passive+ Tuning
If you experience timing issues with EDL refreshes, the agent supports retry configuration:
PanosRetry = 16
PanosWait = 2PanosRetry- Number of retry attempts for EDL refreshPanosWait- Delay in seconds between retries
Passive+ Checklist
- Knoc Application configured with correct EDL name
- API key generated and has Operational Requests permission
- EDL created on firewall with correct source URL and credentials
- Security policy references the EDL
- EDL secret configured with IP allowlisting
- Commit and push completed (if using Panorama)
Passive Mode
Passive mode is the simplest integration - firewalls poll an EDL hosted by Knocknoc at their standard refresh interval (~5 minutes). No orchestration agent, API key, or active refresh signal is required.
Configuration
- When creating a new Knoc Application, select Passive as the Application Type
- Select Palo Alto as the vendor
- Configure the EDL name and credentials
Firewall Configuration
Follow the same External Dynamic List setup as Passive+ mode above, but without the orchestration agent or API key configuration.
Passive Checklist
- Knoc Application configured with correct EDL settings
- EDL created on firewall with correct source URL and credentials
- Security policy references the EDL
- Commit and push completed (if using Panorama)
Troubleshooting
Error Codes
The Knocknoc agent reports structured error codes when PAN-OS operations fail. You can find more details on resolving these issues here.
Common Issues
- Tag not appearing in address group - Ensure the tag name in Knocknoc matches the address group match criteria exactly (case-sensitive). The match criteria uses single quotes:
'tag-name'. - User-ID not enabled - The zone must have User Identification enabled for address group matching to work.
- API permission denied - Check that the admin role has the correct permissions for your chosen integration method.
- Panorama push required - After creating the address group, EDL, or security policy on Panorama, commit and push to devices.
- EDL not refreshing (Passive+) - Check agent logs for refresh errors. Verify the EDL name matches exactly.
- Published but not Read (Passive+/Passive) - The firewall hasn't polled the EDL yet. For Passive+, check the agent is triggering refreshes. For Passive, wait for the next poll interval.
Agent Diagnostics
- Review orchestration agent logs for error details
- Verify API key validity and role permissions
- Confirm firewall/Panorama connectivity from the agent host
- Check EDL configuration and device commits
Certificate Management
For strict HTTPS validation when firewalls retrieve EDLs, configure a CA certificate profile:
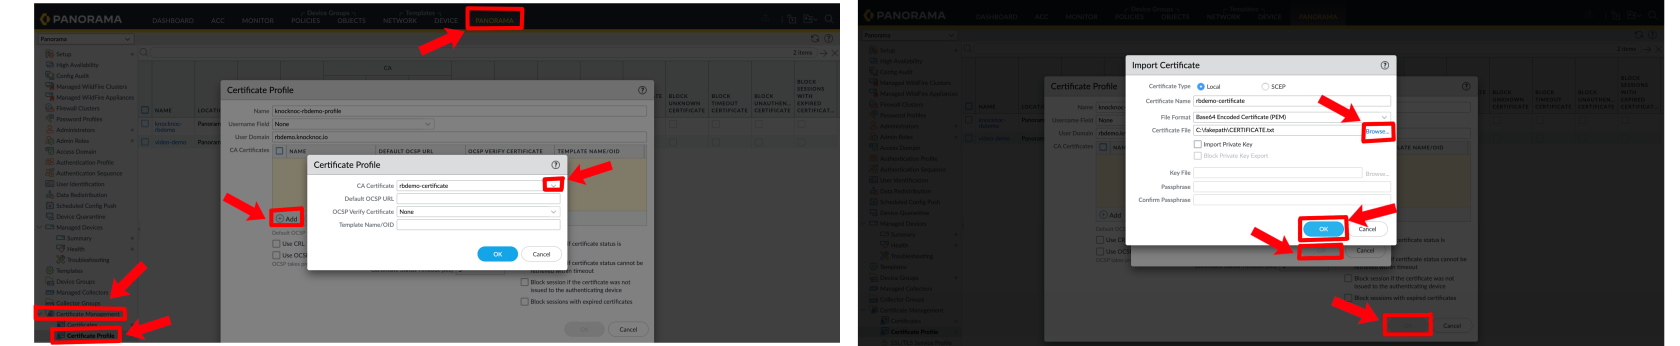
- Standalone Firewall: Navigate to Device > Certificate Management > Certificate Profiles
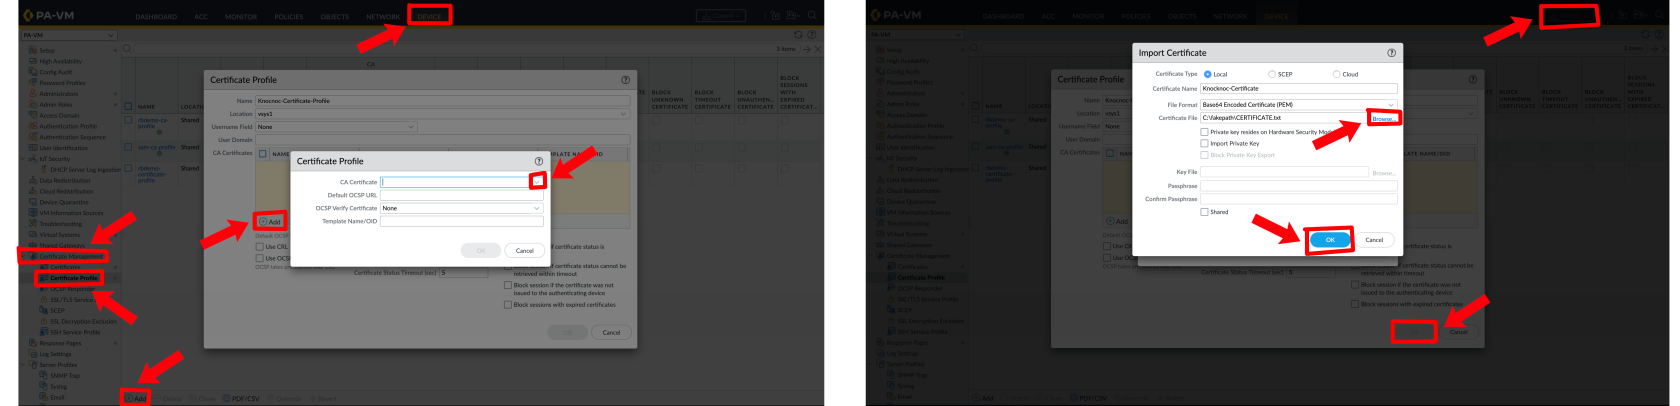
Reference the certificate profile in the EDL source configuration for enhanced security.
Still Having Issues?
We can help you out - contact us at [email protected].