
Linux Agent Installation
On a Linux host as Root, execute the below command to setup and install a Knocknoc Agent. You will be stepped through the process.
curl -sSL https://packages.knocknoc.io/setup/setup_knocknoc_agent.sh | bashThe installer runs on Debian, Ubuntu, Redhat, Oracle, Rocky and Amazon Linux. See below.
Requirements
The agent will attempt to connect to your Knocknoc server using https on port 443/TCP. This could be on the internet or internally within your own network.
The agent is currently supported on the following platforms:
- Debian 11, 12, 13 / Ubuntu 20, 22, 23, 24 and 25
- Oracle Linux 8.x / Red Hat EL7+ / CentOS 7+ / Red Hat derivatives like Rocky and AWS
- Debian ARM64 (e.g. Raspberry Pi)
- Docker on amd64 Linux
- Microsoft Windows (see more here)
- Coming soon: FreeBSD, OpenBSD - let us know if you need others.
For uncommon use cases we also have our Specialized Agent such as Solaris SPARC or HP-UX PA-RISC - contact our team for further details.
Follow the guide below to create an Agent within the platform (as an Admin) and then run the installer on the chosen/orchestrating machine.
Agent Installation
- Browse to https://your-knocknoc-server/admin and login with your admin user.
- Click on Agents then Create Agent.
- Enter a sensible name e.g. [AgentServerHostname].
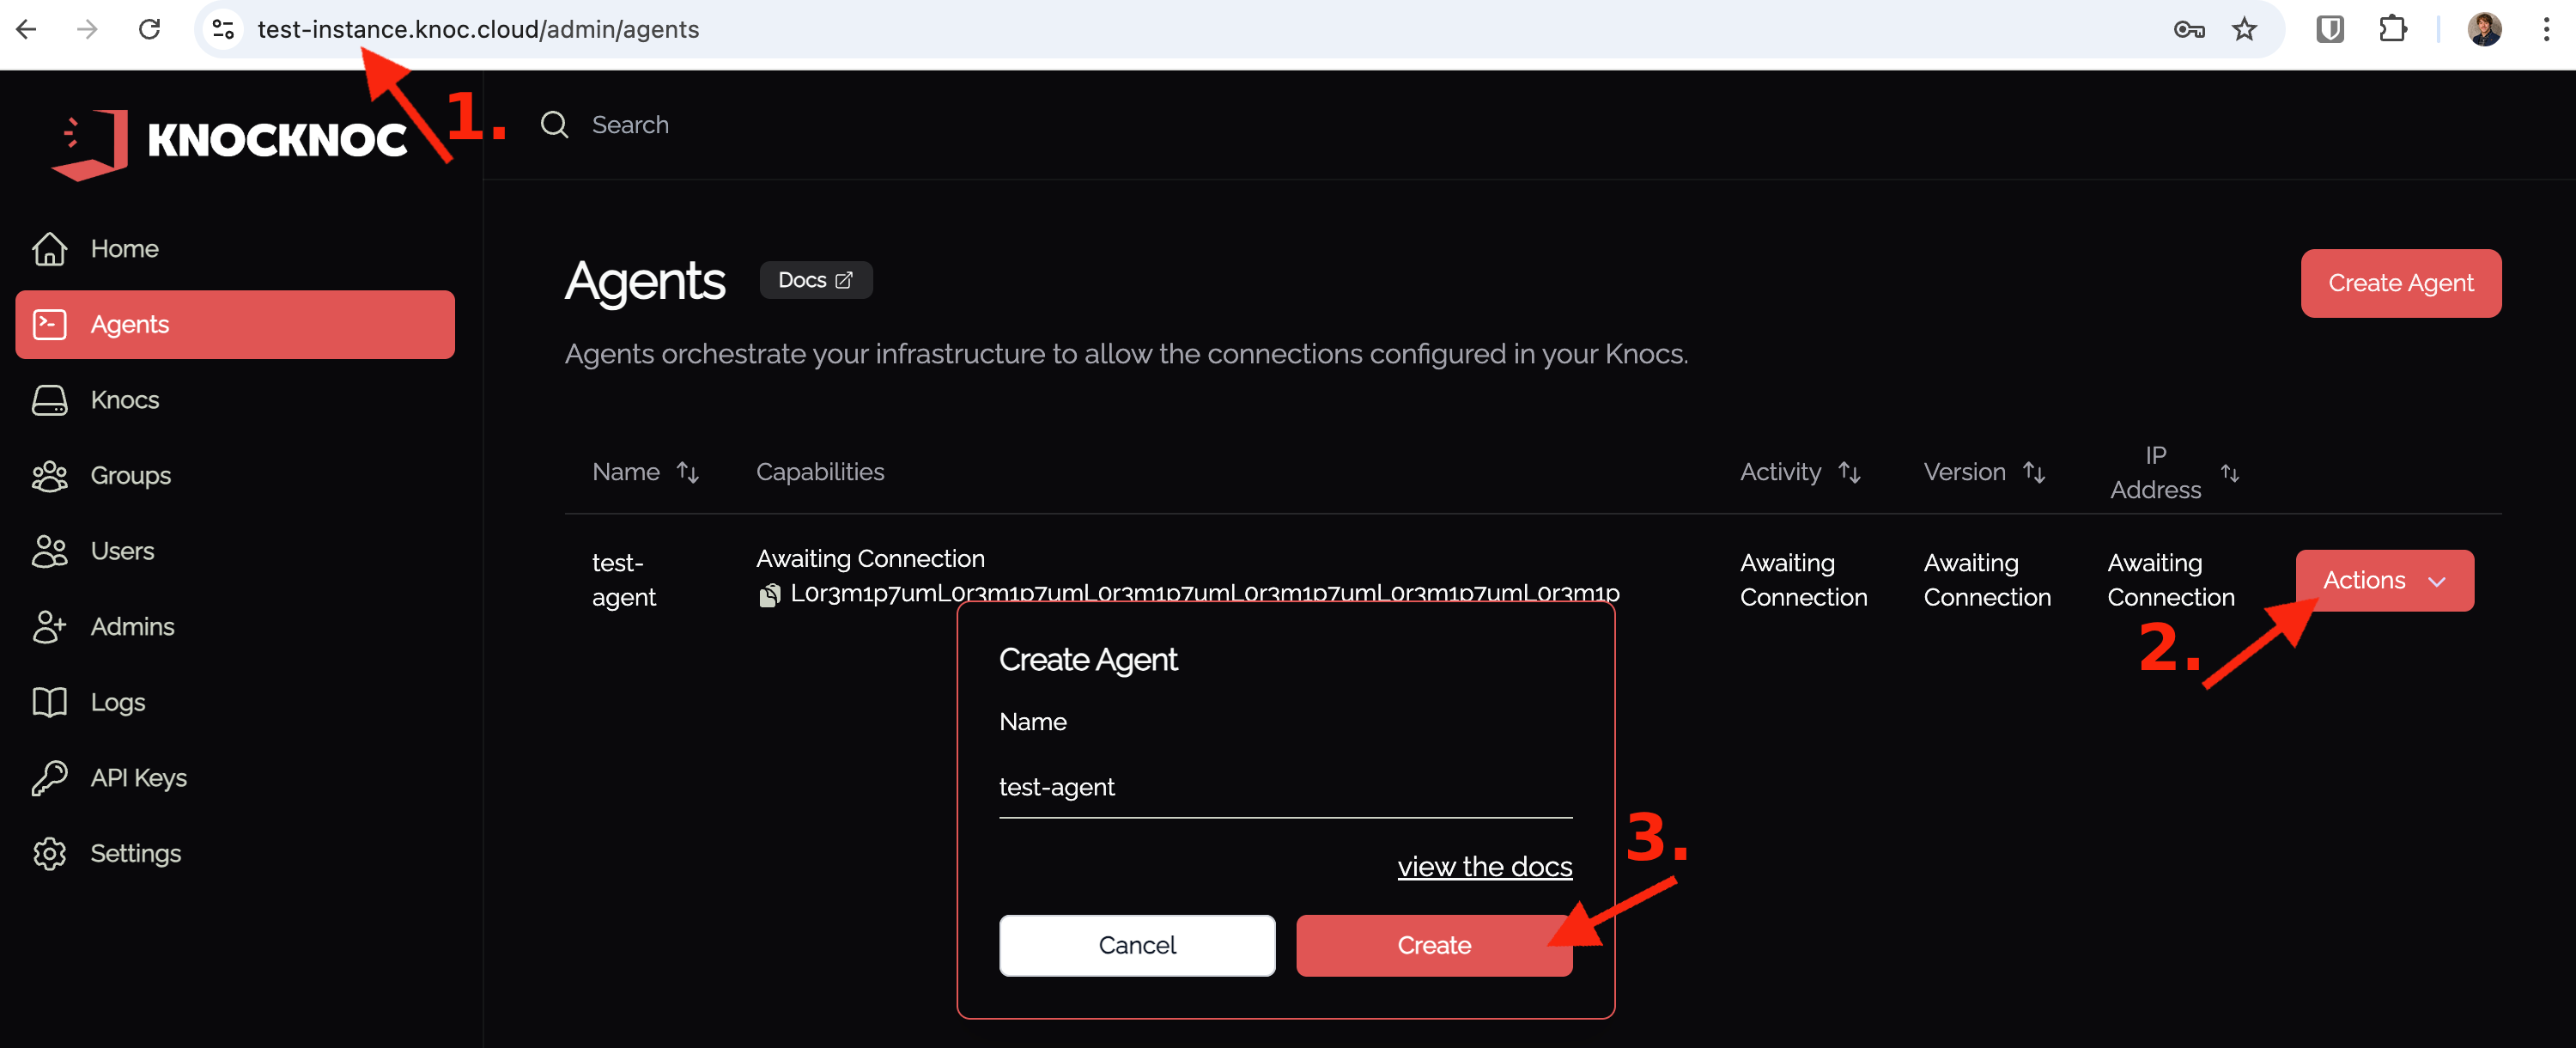
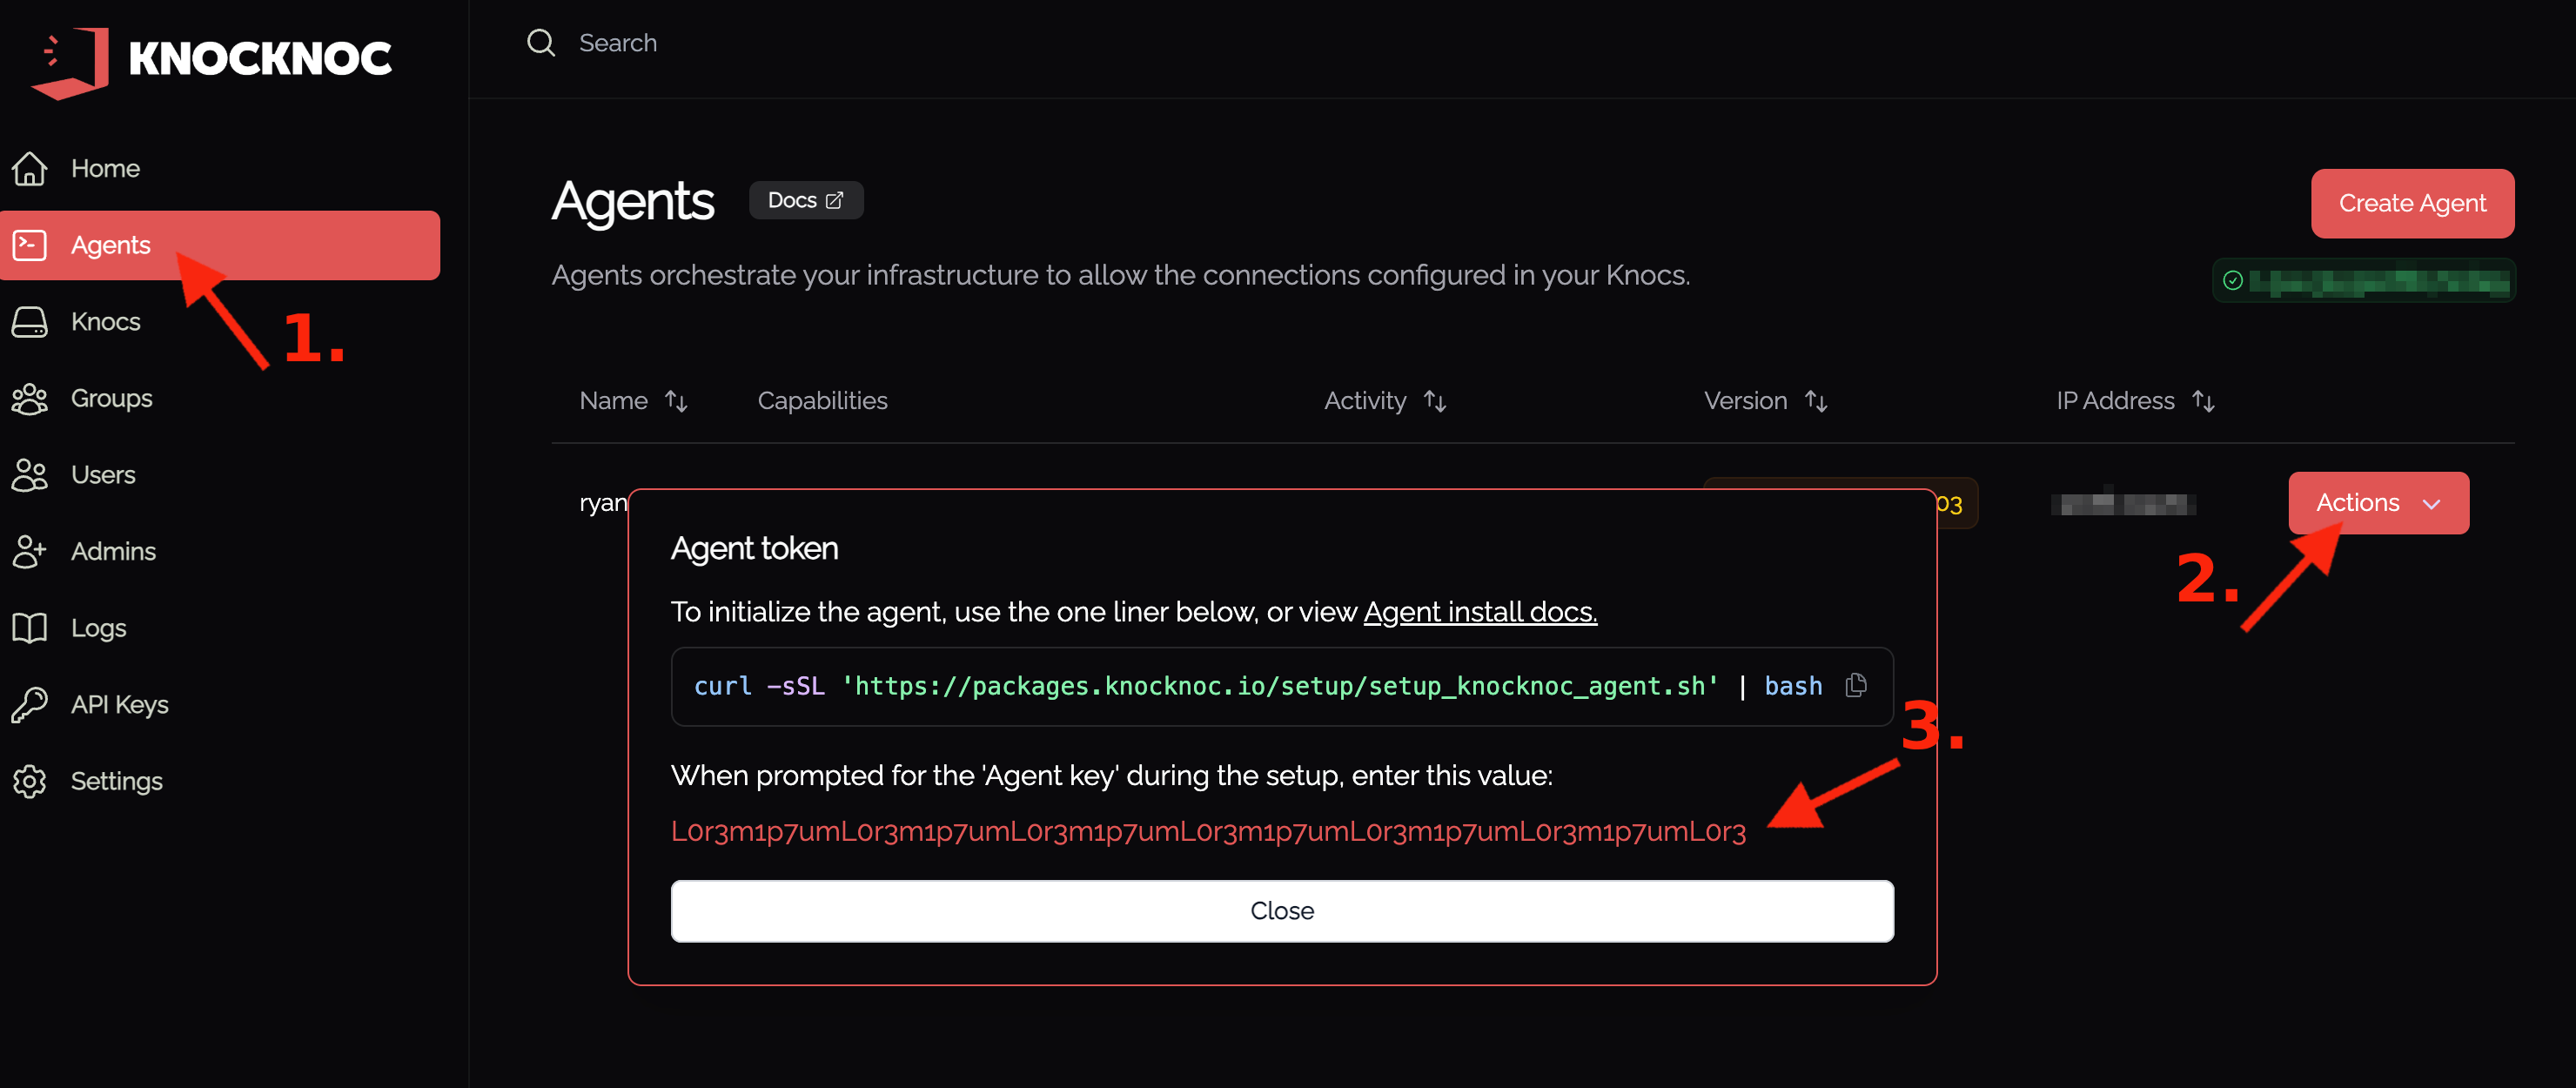
- Copy the token that is produced.
-
Log in to the server hosting the agent via the command line and become the root user. Ensure Linux host has: curl, sudo, systemctl, if your machine doesn't have these you can use apt-get install / yum to install them.
-
Run this command to install and configure the Agent.
curl -sSL https://packages.knocknoc.io/setup/setup_knocknoc_agent.sh | bash -
Accept the License Agreement.
-
Enter the hostname of your Knocknoc server (e.g., your-knocknoc-server). If you are using a non-standard port, provide that (e.g., your-server:8888). If this Agent is installed locally and defaults have been applied, use
127.0.0.1:8756Enter the hostname of the Knocknoc server Knocknoc server defaults to port 443. If your port differs, please append it to your hostname below. [Server hostname (demo.knocknoc.io, demo.knocknoc.io:8756): <YOUR RESPONSE HERE> Create an agent in the server linux-test.knoc.cloud/admin console and paste the key below. [Agent key: <YOUR RESPONSE HERE> [Do you have a valid certificate for linux-test.knoc.cloud (y/n)? <YOUR RESPONSE HERE> [Do you want custom-scripts enabled? (y/N)? <YOUR RESPONSE HERE> Configuration saved to /opt/knocknoc-agent/etc/knocknoc-agent.conf. Executing 'status' for all backends... - Paste the agent token from the Admin portal created earlier.
-
Confirm if you have a valid SSL certificate on your Knocknoc server. If you are using 127.0.0.1:8756, select No.
-
You can now start adding and configuring Knocs in the admin panel!
If you made a mistake, you can edit the config file
/opt/knocknoc-agent/etc/knocknoc-agent.confYou're done!
Log in to the Knocknoc web console and make use of your orchestration agent!
High-availability / multi-web configuration
The Agent should connect to each web node, to ensure no loss of responsiveness during a partial web/server outage event and to not miss an access grant.
Adjust your Agent configuration to point to both servers, as below:
#Hosts = [
#     { Host = "knocknoc1.example.com", Insecure = false },
#     { Host = "knocknoc2.example.com:8756", Insecure = false }
# ]


# single web node configuration
#Host = "knocknoc.example.com:8756"
#Insecure = false

# multi-web node configuration
#Hosts = [
#     { Host = "knocknoc1.example.com", Insecure = false },
#     { Host = "knocknoc2.example.com:8756", Insecure = false }
# ]
Multiple Agents on the same machine
You may wish to install multiple Agents on the same host, connecting to multiple Servers.
"Knocker" streamlines this process on the Agent machine (existing install), which initializes a separate service and configuration. Follow the steps below, after executing: sudo /opt/knocknoc-agent/knocker/knocker init my-agent-name
$ sudo /opt/knocknoc-agent/knocker/knocker init MY-AGENT-NAME
Initialising Knocknoc Agent

This will setup the agent to talk to the server so you can control backends on this machine

Enter the hostname of the Knocknoc server
Knocknoc server defaults to port 443. If your port differs, please append it to your hostname below.
Server hostname (demo.knocknoc.io, demo.knocknoc.io:8756): my-server.example.org
Create an agent in the server my-server.example.org/admin console and paste the key below.
Agent key: my-secret-key
Do you have a valid certificate for my-server.example.org (y/n)? y
Do you want custom-scripts enabled? (y/N)? n
Configuration saved to /opt/knocknoc-agent/instances/MY-AGENT-NAME/etc/knocknoc-agent.conf.
Created symlink /etc/systemd/system/multi-user.target.wants/[email protected] → /lib/systemd/system/[email protected].
If you're seeking high-availability modes follow the guide here, this scenario of >1 agents on the same machine is less common but nonetheless supported.
Knocknoc Agent in reverse-proxy mode
The Knocknoc Agent can operate as a reverse-proxy with Knocknoc integrated, to configure this follow the guide here.
This allows you to perform layer-7 filtering and access control, add single-use tokens for high-security situations, among other benefits. Knocknoc packages this for you, just enable the mode.
Knocknoc Agent behind an outbound proxy
To get knocknoc-agent working through a web proxy, add the proxy environment variable to the systemd unit file.
- Edit the systemd unit file.
sudo systemctl edit knocknoc-agent.service - Add this line under the [Service] section - you may need to add a section.
Environment="HTTPS_PROXY=http://proxyIPaddress:proxyport" - Reload the systemctl daemon
systemctl daemon-reload - Restart knocknoc-agent
systemctl restart knocknoc-agent
If you need a username/password, follow this format:
Environment="HTTPS_PROXY=https://username:password@proxyIPaddress:proxyport"Sometimes the @ needs to be encoded:
Environment="HTTPS_PROXY=https://username:password%40proxyIPaddress:proxyport"Other times it will be HTTP_PROXY not HTTPS_PROXY, depending on your environment.
Environment="HTTP_PROXY=https://username:password%40proxyIPaddress:proxyport"Agent registration keys & IoC
Agents can be deployed and initially integrated with the Knocknoc server using individual keys or shared keys. Server version 7.5.4 and Agent 1.6.1 or above is required.
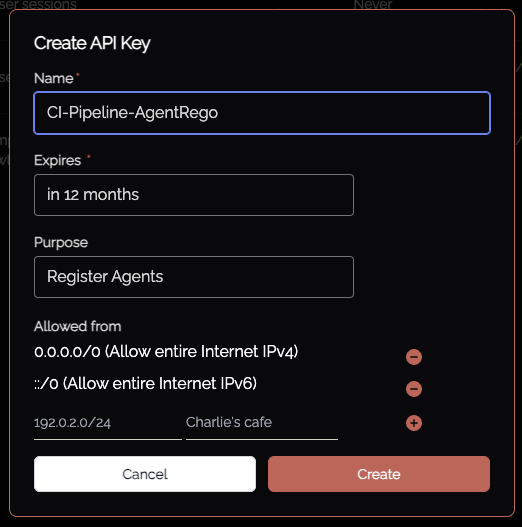
Individual per-agent keys are created (as above) through the Admin UI just-in-time, whereas shared keys are created and managed via the API Keys Admin functionality. Selecting "Register Agents" allows the creation of an API key which allows multiple agents to be registered against using that key. IP address restrictions are managed per API key, as shown below.
Instead of specifying the Token (or using the basic installer), the /opt/knocknoc-agent/knocknoc-agent.conf file should specify RegisterKey and Name fields:
RegisterKey = "<api key>"
Name = "Agent's Initial Name"

# Do *NOT* set a value for Token. Comment it out or remove entirely.
#Token = "xxxxx"

# other settings
LogLevel = "info" #trace
Insecure = false # when set to true, SSL/TLS is not CA verified
After registering successfully a "token" value will be created and stored in /opt/knocknoc-agent/var/token for future connections. The RegisterKey can be deleted, disabled or otherwise restricted (e.g., IP address sources) and the Agent will use its own token for ongoing trust.