
AWS WAF Ipset
Below is a concise guide for a sysadmin (or developer) to set up and configure AWS WAF with a custom HTML 403 response and integrate it with your update-aws-waf-ipset.sh script (which follows the argument order <ACTION> <ACL_NAME_OR_ID> <IP_ADDRESS>). This guide will show you how to embed the HTML snippet for the custom response body and where to configure it in AWS WAF.
AWS WAF Setup from Scratch
Create a WAF Web ACL (REGIONAL Scope)
- AWS Console → WAF & Shield → Web ACLs → Create web ACL
- Name: e.g.,
KnocknocWebACL - Scope: REGIONAL (for ALB)
- Region: Same as your ALB
- Default action: Block (so only specific IPs in your IP set are allowed)
- Logging (optional): Enable if you want to view WAF logs in CloudWatch Logs, S3, or Kinesis Firehose
- Create Web ACL
Create an IP Set
- WAF & Shield → IP sets → Create IP set
- Name: e.g.,
KnocknocIPSet - Scope: REGIONAL (same region as above)
- IP address version:
IPv4(commonly) - You can leave addresses empty for now and update via the script.
- Create IP set. Note the Name and ID (e.g.
ipset-abc12345).
Attach the Web ACL to Your ALB
- EC2 Console → Load Balancers
- Select your Application Load Balancer
- Under Description / “Edit attributes,” find AWS WAF Web ACL
- Edit → Select the Web ACL you created (e.g.,
KnocknocWebACL) - Save
Alternatively, you can map the ALB to the WAF rule on first setup.
Add a Rule to Use the IP Set (Block + Custom 403)
- Go to WAF & Shield → Web ACLs → click
KnocknocWebACL→ Rules tab - Add rules → Add my own rules and rule groups →
Regular rule - Name:
BlockIPsViaKnocknoc(for example) - IF → IP set → select the IP set you created (
KnocknocIPSet)- Match type:
Source IP
- Match type:
- Then → Action:
Block - Customize the response (expand “Customize the response” section):
- Response code:
403(Forbidden) - Response body (HTML snippet): Copy/paste the HTML below into the text box. Ensure you include the
<head>and<body>tags:
- Response code:
<head>
        <meta charset="UTF-8">
        <meta name="viewport" content="width=device-width, initial-scale=1.0">
        <title>Forbidden</title>
        <link rel="preconnect" href="https://fonts.googleapis.com">
        <link rel="preconnect" href="https://fonts.gstatic.com" crossorigin>
        <link href="https://fonts.googleapis.com/css2?family=Raleway:ital,wght@0,100..900;1,100..900&display=swap" rel="stylesheet">
        <style>
                body {
                        text-align: center;
                        background-color: #171717;
                        color: #ffffff;
                }
                .container {
                        margin: 60px 0;
                        padding: 60px;
                }
                h1 {
                        font-family: "Raleway", sans-serif;
                        font-optical-sizing: auto;
                        font-size: 4em;
                        font-weight: 300;
                        font-style: normal;
                }
                h2 {
                        font-family: "Raleway", sans-serif;
                        font-optical-sizing: auto;
                        font-size: 2em;
                        font-weight: 300;
                        font-style: normal;
                }
                span {
                        color: #35b59b;
                }
        </style>
</head>
<body>
        <div class="container">
                <h1>Access Denied.</h1>
                <h1>You must <span>Knoc</span> before you enter.</h1>
        </div>

        <svg id="Layer_1" data-name="Layer 1" xmlns="http://www.w3.org/2000/svg" width="300" height="300" viewBox="0 0 166.57 156.56">
                <defs>
                        <style>
                                .cls-1 {
                                        fill: none;
                                }
                                .cls-1, .cls-2 {
                                        stroke-width: 0px;
                                }
                                .cls-2 {
                                        fill: #35b59b;
                                }
                        </style>
                </defs>
                <g id="Layer_1-2" data-name="Layer 1">
                        <path class="cls-2" d="M166.57,119.18c0,4-2.29,5.09-5,6.28l-103.5,31.1L0,126.1l86-17.7c.36-.16.73-.3,1.11-.41,3.26-.87,4.2-.65,8.58,1l42,17.66.14-117.91L90.75.81V.24l75.77-.24.05,119.18Z"/>
                        <line class="cls-1" x1="55.63" y1="32.13" x2="41.78" y2="18.28"/>
                        <rect class="cls-2" x="44.57" y="15.4" width="8.27" height="19.59" transform="translate(-3.55 41.82) rotate(-45)"/>
                        <rect class="cls-2" x="29.03" y="46.02" width="18.27" height="8.27"/>
                        <line class="cls-1" x1="54.19" y1="67.14" x2="40.34" y2="79.15"/>
                        <rect class="cls-2" x="38.1" y="69.01" width="18.34" height="8.27" transform="translate(-36.37 48.85) rotate(-40.93)"/>
                </g>
        </svg>
        <div class="container">

                <h2>It can take around 30 seconds for access to be granted.</h2>
        </div>
</body>
- Click Add rule → Save.
Now, any IP address added to KnocknocIPSet will see this custom 403 HTML page when trying to access your ALB.
IAM Permissions (Minimal)
Attach a policy allowing:
- ListIPSets (
wafv2:ListIPSets) - GetIPSet (
wafv2:GetIPSet) - UpdateIPSet (
wafv2:UpdateIPSet)
…for your Knocknoc user or an IAM role. Example snippet:
{
    "Version": "2012-10-17",
    "Statement": [
        {
            "Sid": "AllowListingAllIPSets",
            "Effect": "Allow",
            "Action": [
                "wafv2:ListIPSets"
            ],
            "Resource": "*"
        },
        {
            "Sid": "AllowGetUpdateSpecificIPSet",
            "Effect": "Allow",
            "Action": [
                "wafv2:GetIPSet",
                "wafv2:UpdateIPSet"
            ],
            "Resource": "<INSERT YOUR ARN HERE>"
        }
    ]
}
Substitute your region, account ID, and IP set details.
Configure Knocknoc to Update the WAF IP set
Within Knocknoc, you can set up a Backend (or integration) that calls your script:
- Command:
/opt/knocknoc-agent/scripts/update-aws-waf-ipset.sh
You will need a Knocknoc Agent installed somewhere that has access to the internet to update the AWS api. You will need to run:
/opt/knocknoc-agent/knocker/knocker enable awsThen you can add a Backend in the Knocknoc Admin panel:
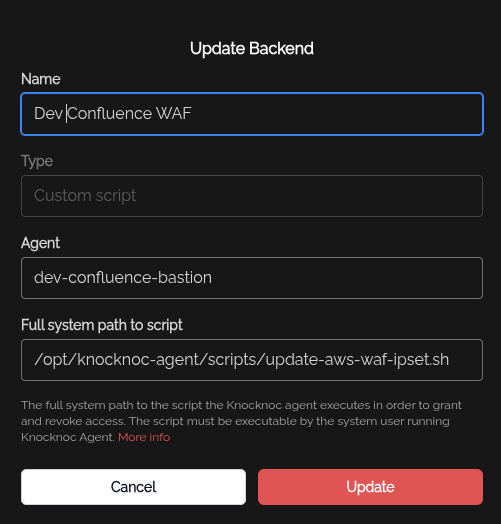
The script location may change depending on if you have copied it to a different location. If you customize the scripts, it's useful to move them so future updates don't overwrite them.
Then add an ACL, mapping the IP set ID to the Backend you created above.
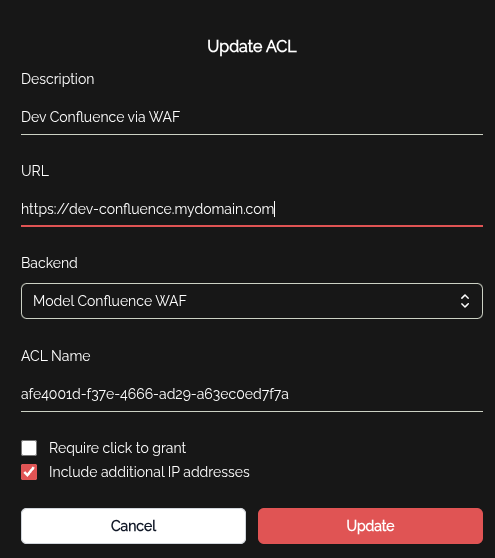
Then simply include this ACL in the relevant Knocknoc Group, and users in that group will be granted access.
Final Notes
- Propagation Delay: Expect about 30–60 seconds for WAF changes to take effect.
- Testing: Confirm by hitting the ALB from the allowed IP after an “add” (should see normal access) or from a removed IP (should see the HTML 403).
- Minimal IAM Policy: Provide only
wafv2:ListIPSets,wafv2:GetIPSet, andwafv2:UpdateIPSetfor the specific IP set ARN. - Logging: If you enabled WAF logging, you can watch CloudWatch Logs for real-time evidence that the IP was blocked (action=BLOCK) or allowed.
You are now set to manage IP-based allowing (with a custom 403 HTML page) on your ALB using AWS WAF and your update-aws-waf-ipset.sh script!