
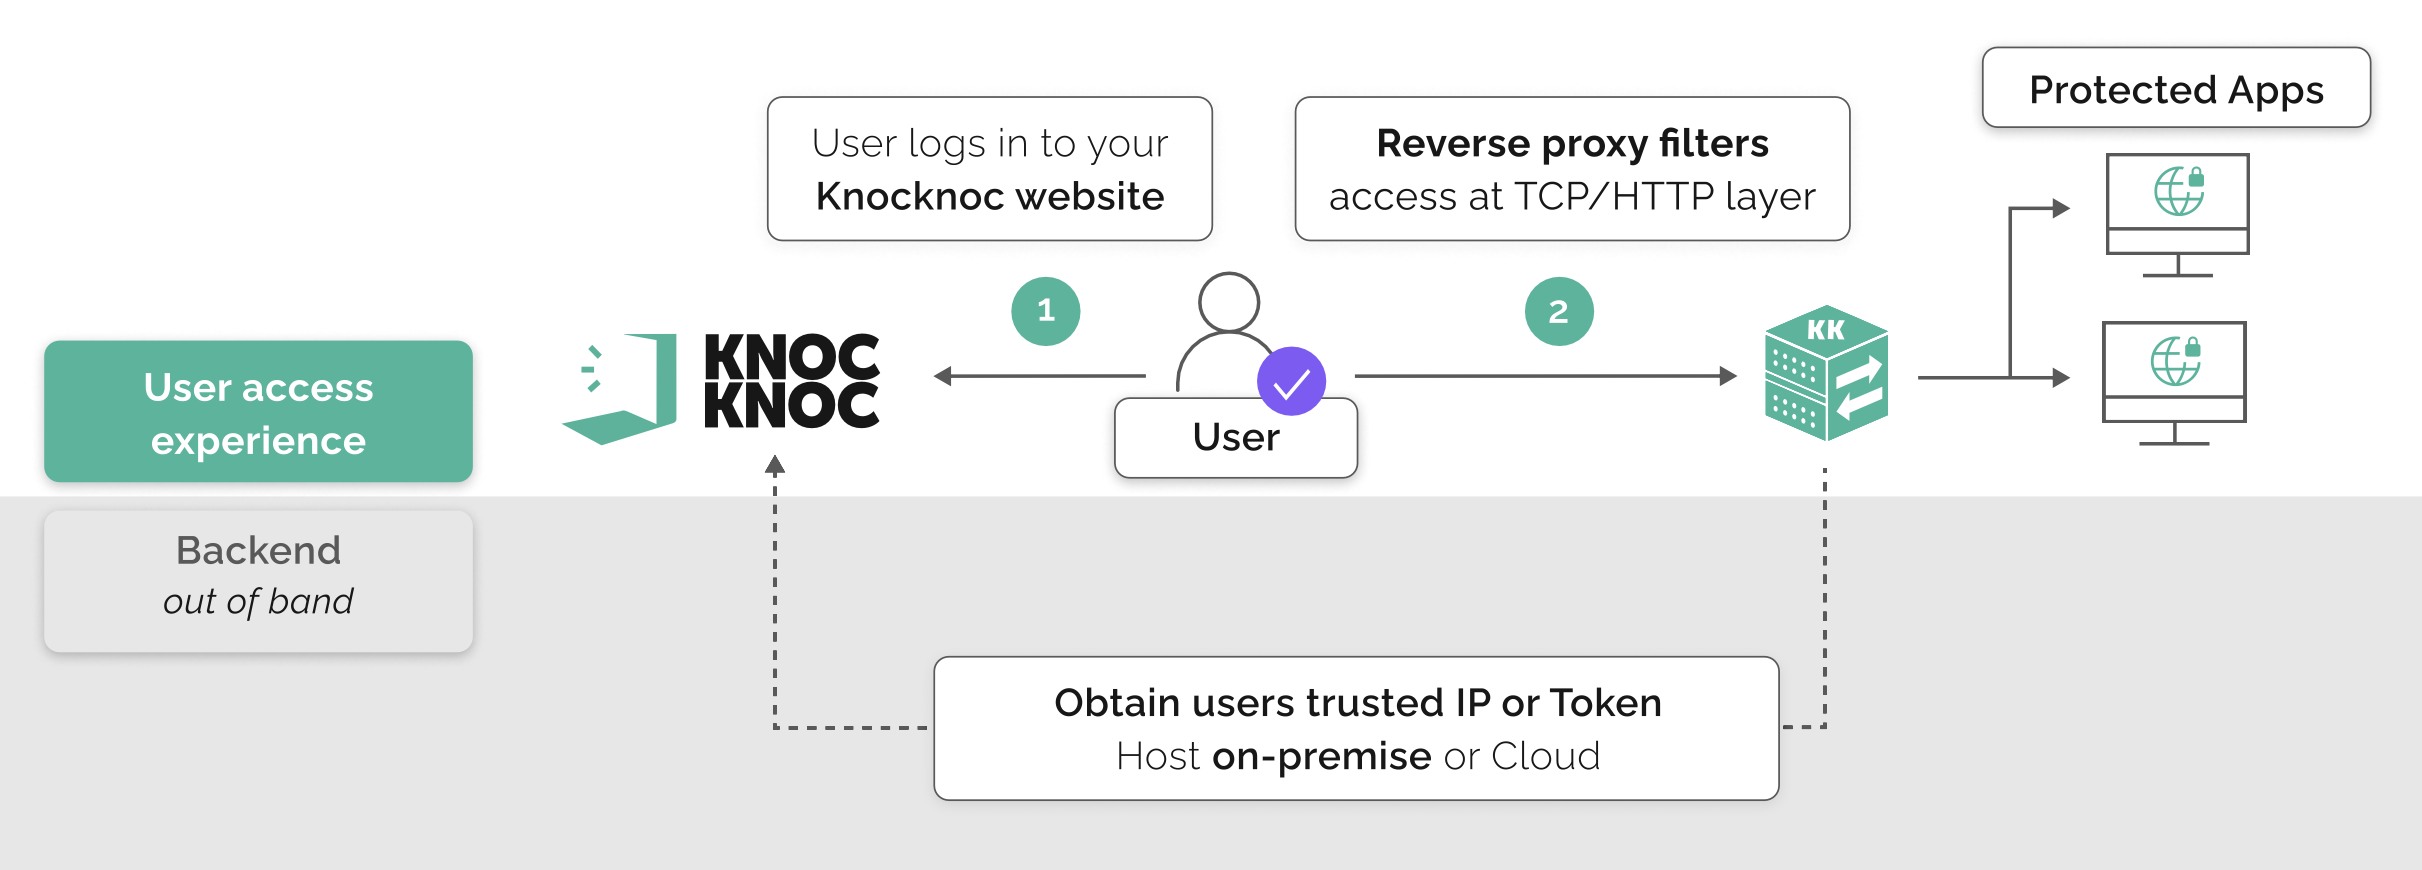
Knocknoc Reverse Proxy
The Knocknoc orchestration Agent - which is deployed alongside managed infrastructure (not on desktops) - can be converted to an in-line reverse proxy, providing access control at layer-7 (HTTP/HTTPs) or layer-3 for TCP, linked to Knocknoc.
This allows the centralized authentication to be consumed and applied to on-premises reverse proxies, protecting your most sensitive or legacy web applications, HTTP/HTTPs interfaces or TCP endpoints of any port/service, adding MFA or SAML/IdP policies without introducing a cloud service nor exposing your systems externally.
This guide describes the process for converting the Agent to reverse-proxy mode, then configuring it in Knocknoc.
Requirements
The agent reverse proxy mode is currently supported on the following platforms:
- Debian 11+
- Ubuntu 20+
- Debian ARM64 (e.g. Raspberry Pi)
Follow the guide below to create an Agent within the platform (as an Admin) and then run the installer on the chosen/orchestrating machine.
Example architecture
A layer-7 controllable reverse identity-aware-proxy can be created, leveraging the Knocknoc Agent, orchestrated and managed by your centralized Knocknoc server, linked to your identity platform.
Hosted on-premises, in-cloud or a deep internal network - completely in your control.
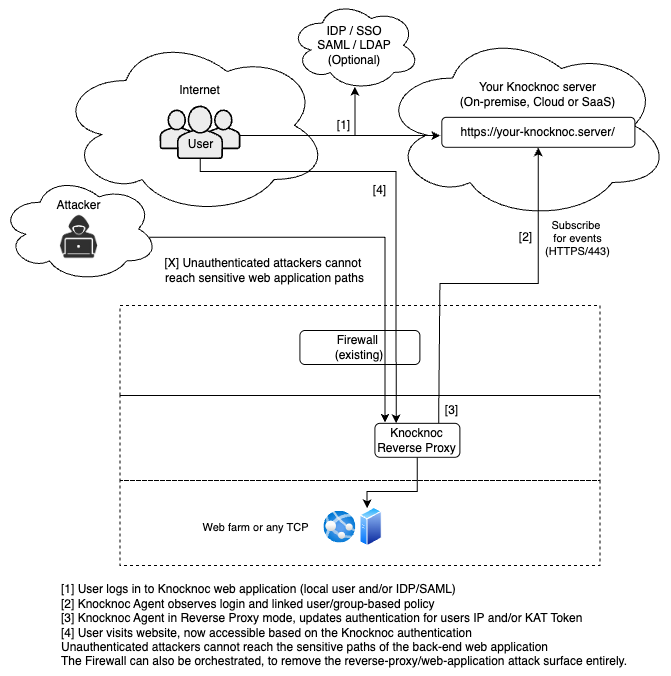
Additionally, the entire web attack surface can be removed via orchestrating an existing firewall, as below:
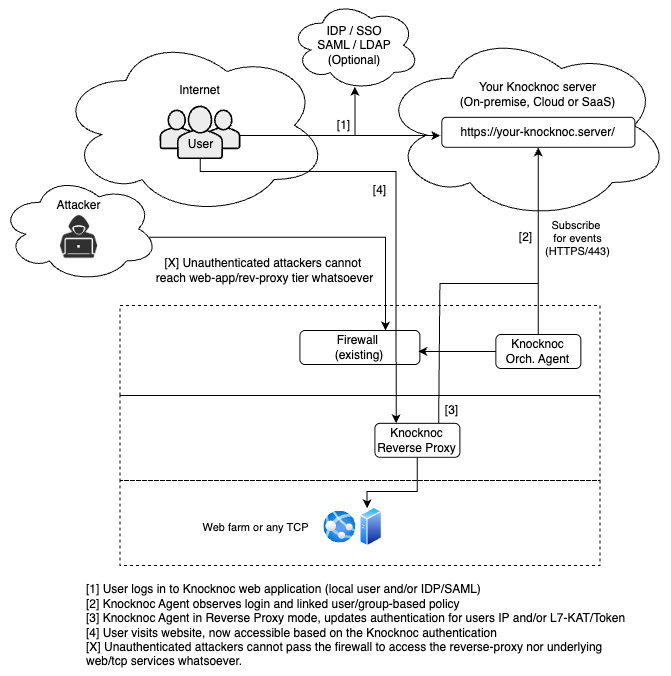
This can be deployed in-line with internal assets to carve up networks and systems, without introducing another firewall or changing routing/internal network architectures.
Enabling Agent reverse-proxy mode
Ensure your Agent is updated, use your operating system package manager to update/upgrade.
If you want to use the Let's Encrypt functionality you will need a domain name/FQDN mapped to the IP address of the Agent, along with inbound port 80 access.
- Log in to the server running the Agent
- Run '/opt/knocknoc-agent/knocker/knocker enable reverseproxy'
- Follow the steps (see below example for reference)
- Log in to your Knocknoc Server and configure the Knoc, using 101 as the ACL ID
- Tweak your /etc/haproxy/haproxy.cfg to suit your needs
The below example uses the IP address, which can be internal or external, and generates a self-signed certificate.
# /opt/knocknoc-agent/knocker/knocker enable reverseproxy
Enabling backend reverseproxy on this machine.
Note: Some operations may require sudo rights.
Knocker: reverseproxy enable (HAProxy v3; Debian/Ubuntu only)
Checking prerequisites (curl, dnsutils)…


This configures the Knocknoc Agent to operate as a reverse-proxy, it allows secure
authenticated control of HTTP/S or TCP port forwarding, linked to your Knocknoc server.

To configure the reverse proxy for HTTPS, assume the below diagram

+-----------+         +----------------+          +-----------+
|   CLIENT  |-------->|   This Agent   |--------->|  SERVER   |
|  10.0.1.5 |         |  ReverseProxy  |          | 10.0.2.10 |
+-----------+         +----------------+          +-----------+
      |                       |		       		|
      |------ DOMAIN:443----->|-- INT_SERVER:INT_PORT ->|

We need to collect:
1. DOMAIN       - hostname/IP/FQDN mapped to the external address of this Agent, eg: www-protected.example.com
2. INT_SERVER   - internal server hostname/IP to send authorized traffic to, eg: 10.0.2.10 or www.example.com
3. INT_PORT     - internal port on the internal server to proxy authorized traffic to, eg: 443

This turns the Agent in to a reverse proxy, complete with Knocknoc authentication control protecting the internal server.


What is the DOMAIN (FQDN or IP address): www-protected.example.com
What is the INT_SERVER (hostname or IP address) [www-test.internal]: 192.168.100.67
What is the INT_PORT [443]:
Connect to INT_SERVER:INT_PORT using https? (y/N): y
Which TLS mode would you like to use?
  1) Self signed certificate
  2) Let's Encrypt
 (default: 1): 1
Also configure a raw TCP port forward? (y/N): n

HAProxy has been enabled for knocknoc-agent. Please restart HAProxy for changes to take effect.

... install happens

✅ Reverse proxy deployed
   - Domain:   www-protected.example.com
   - Server:   192.168.100.67:443 (upstream TLS: yes)
   - Config:   /etc/haproxy/haproxy.cfg
   - Cert PEM: /etc/haproxy/certs/www-protected.example.com.pem

Next steps:
  • Log into your Knocknoc server to configure/create your Knoc
  • Select "Identity aware proxy"
  • Enter ACL ID "101" in the Knoc configuration
  • Visit https://www-protected.example.com before and after logging in to Knocknoc as an end-user to enjoy the security.
The below example shows the Let's Encrypt option used, whereby a domain name mapped to the Agents IP address is required, along with inbound port 80 to the Agent server to obtain the SSL certificate.
# /opt/knocknoc-agent/knocker/knocker enable reverseproxy
Enabling backend reverseproxy on this machine.
Note: Some operations may require sudo rights.
Knocker: reverseproxy enable (HAProxy v3; Debian/Ubuntu only)
Checking prerequisites (curl, dnsutils)…


This configures the Knocknoc Agent to operate as a reverse-proxy, it allows secure
authenticated control of HTTP/S or TCP port forwarding, linked to your Knocknoc server.

To configure the reverse proxy for HTTPS, assume the below diagram

+-----------+         +----------------+          +-----------+
|   CLIENT  |-------->|   This Agent   |--------->|  SERVER   |
|  10.0.1.5 |         |  ReverseProxy  |          | 10.0.2.10 |
+-----------+         +----------------+          +-----------+
      |                       |		       		|
      |------ DOMAIN:443----->|-- INT_SERVER:INT_PORT ->|

We need to collect:
1. DOMAIN       - hostname/IP/FQDN mapped to the external address of this Agent, eg: www-protected.example.com
2. INT_SERVER   - internal server hostname/IP to send authorized traffic to, eg: 10.0.2.10 or www.example.com
3. INT_PORT     - internal port on the internal server to proxy authorized traffic to, eg: 443

This turns the Agent in to a reverse proxy, complete with Knocknoc authentication control protecting the internal server.


What is the DOMAIN (FQDN or IP address): www-protected.knoc.io
What is the INT_SERVER (hostname or IP address) [www-test.internal]: www.knocknoc.io
What is the INT_PORT [443]:
Connect to INT_SERVER:INT_PORT using https? (y/N): y
Which TLS mode would you like to use?
  1) Self signed certificate
  2) Let's Encrypt
 (default: 1): 2
Email for Let's Encrypt (expiry notices): [email protected]
[knocker] LE preflight: determining public IPv4…
[knocker] LE preflight: resolving A records for www-protected.knoc.io…
[knocker] LE preflight: domain A records = [170.64.158.239], host public IPv4 = 170.64.158.239
[knocker] LE preflight OK: www-protected.knoc.io -> 170.64.158.239

Also configure a raw TCP port forward? (y/N): n

... installation occurs ...

Saving debug log to /var/log/letsencrypt/letsencrypt.log
Account registered.
Requesting a certificate for www-protected.knoc.io

Successfully received certificate.
Certificate is saved at: /etc/letsencrypt/live/www-protected.knoc.io/fullchain.pem
Key is saved at:         /etc/letsencrypt/live/www-protected.knoc.io/privkey.pem
This certificate expires on 2026-01-05.
These files will be updated when the certificate renews.
Certbot has set up a scheduled task to automatically renew this certificate in the background.

- - - - - - - - - - - - - - - - - - - - - - - - - - - - - - - - - - - - - - - -
If you like Certbot, please consider supporting our work by:
 * Donating to ISRG / Let's Encrypt:   https://letsencrypt.org/donate
 * Donating to EFF:                    https://eff.org/donate-le
- - - - - - - - - - - - - - - - - - - - - - - - - - - - - - - - - - - - - - - -
Synchronizing state of haproxy.service with SysV service script with /usr/lib/systemd/systemd-sysv-install.
Executing: /usr/lib/systemd/systemd-sysv-install enable haproxy
Enabling HAProxy for knocknoc-agent...

HAProxy has been enabled for knocknoc-agent. Please restart HAProxy for changes to take effect.

✅ Reverse proxy deployed
   - Domain:   www-protected.knoc.io
   - Server:   www.knocknoc.io:443 (upstream TLS: yes)
   - Config:   /etc/haproxy/haproxy.cfg
   - Cert PEM: /etc/haproxy/certs/www-protected.knoc.io.pem

Next steps:
  • Log into your Knocknoc server to configure/create your Knoc
  • Select "Identity aware proxy"
  • Enter ACL ID "101" in the Knoc configuration
  • Visit https://www-protected.knoc.io before and after logging in to Knocknoc as an end-user to enjoy the security.