
Moving your Knocknoc server
Draft, not published. Visible to Editors and Admins only.
This guide explains how to move Knocknoc to a new machine. For example, you might be replacing old hardware, or moving to a different data center or cloud provider. If the server's address changes, it also explains how to point your agents, users and identity provider at the new one.
To move only the database, for example onto a dedicated database server or a managed service, see Migrating the database instead.
If your server still uses SQLite, move it to PostgreSQL first, as described in Moving from SQLite to PostgreSQL. You can tell which one you have from /opt/knocknoc/etc/knocknoc.conf. It has a DBURL line for PostgreSQL, or a DBFile line for SQLite.
Planning the move
A Knocknoc deployment has three parts. The server is the web app that your users and admins sign in to. It keeps its data in a PostgreSQL database. One or more agents make the access changes on your firewalls and other systems. A standard install puts all three on one machine.
Which parts you're moving decides which steps you need:
| If you're moving | Follow |
|---|---|
| A standard install, with the database on the same machine, to a new machine | Moving the server to a new machine |
| A web node that connects to a separate database server or a managed service | Replacing a web node |
| Only the database, for example to a dedicated server, a managed service or a newer version of PostgreSQL | Migrating the database |
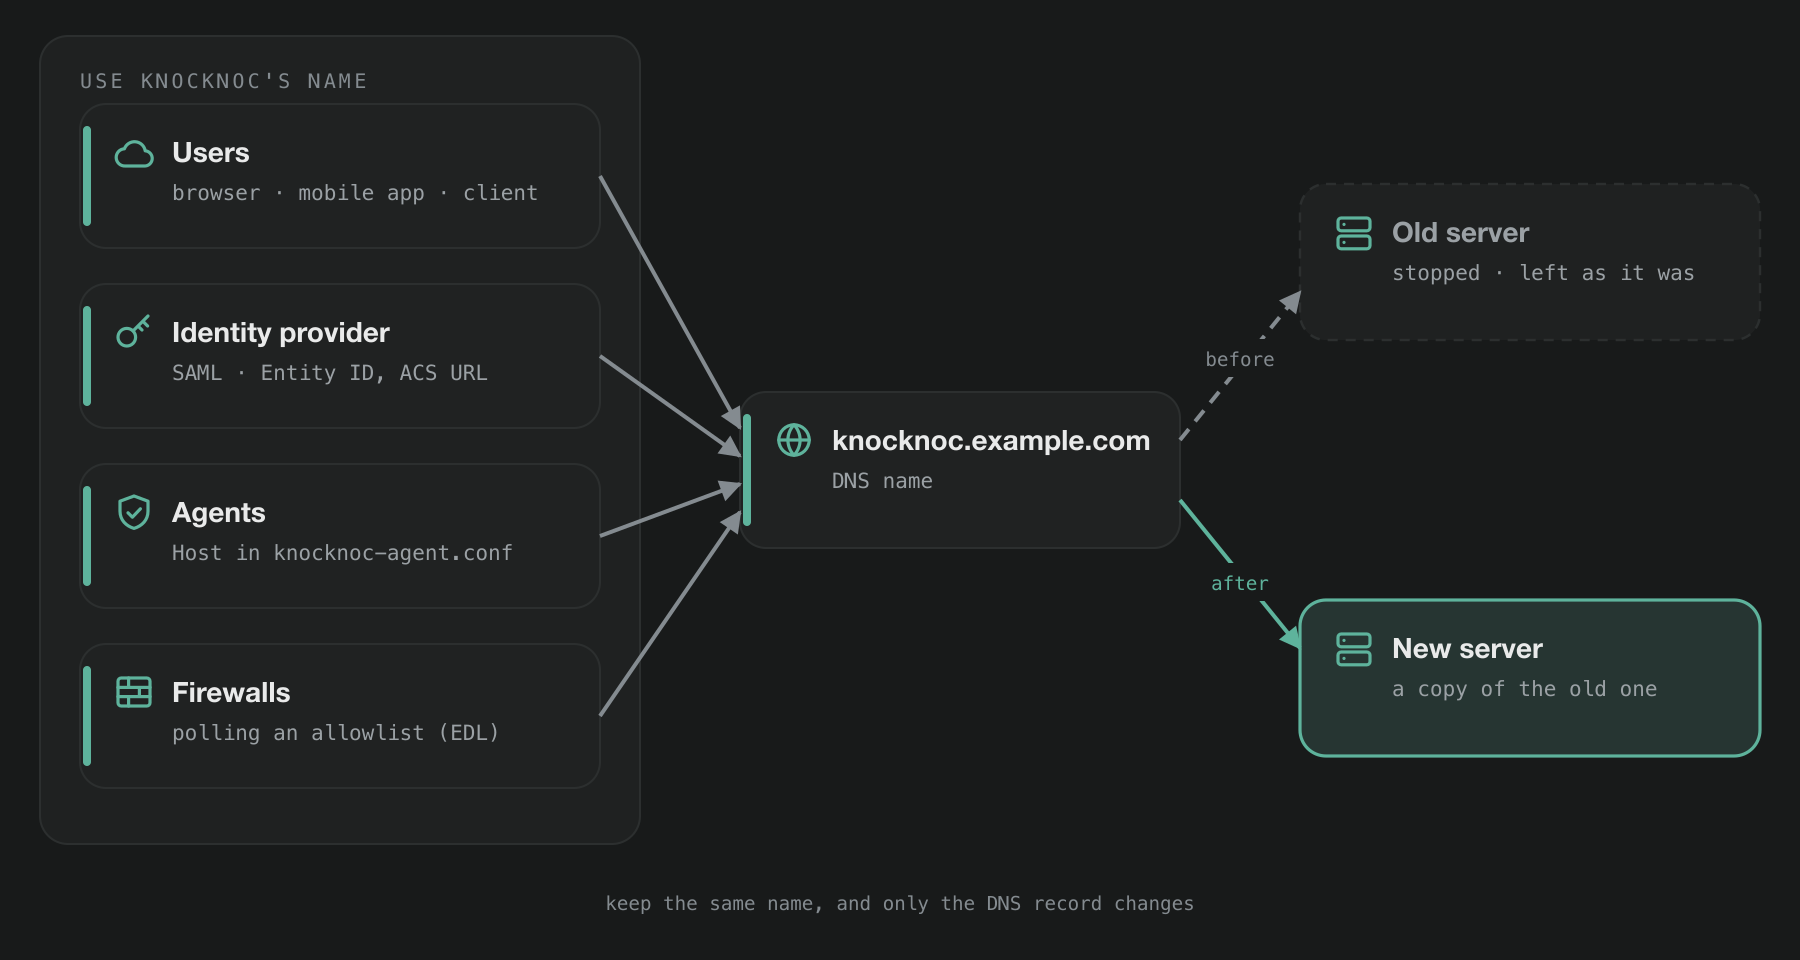
Your users, agents and identity provider all use Knocknoc's address, and so do any firewalls that poll an allowlist from it. If they use a DNS name such as knocknoc.example.com, the easiest way to move is to keep that name and point it at the new server. They then carry on working without any changes. If the name changes, or anything connects by IP address, see Pointing everything at the new server.
Before you start
- Update the old server to the latest release beforehand, as described in Updates and upgrades. The setup script installs the latest release on the new machine, so both then run the same version. Don't do this during the same maintenance window as the move. If something goes wrong, it's then easier to tell which change caused it.
- Use the same or a newer major version of PostgreSQL on the new machine. Moving to an older version isn't supported, even if the copy loads without an error. The setup script installs the operating system's own PostgreSQL, so check which version that is. For example, on RHEL, Rocky and Alma 9 it's PostgreSQL 13, which is older than the version on Debian 12 or Ubuntu 24.04.
- Take a backup first, as described on the Backups page.
- If your users and agents reach Knocknoc by a DNS name, lower the TTL on its record to 300 seconds or less, a day before the move. When you change the record, the new address then reaches everyone quickly.
- Pick a quiet time, and let your users know when Knocknoc will be unavailable.
Moving the server to a new machine
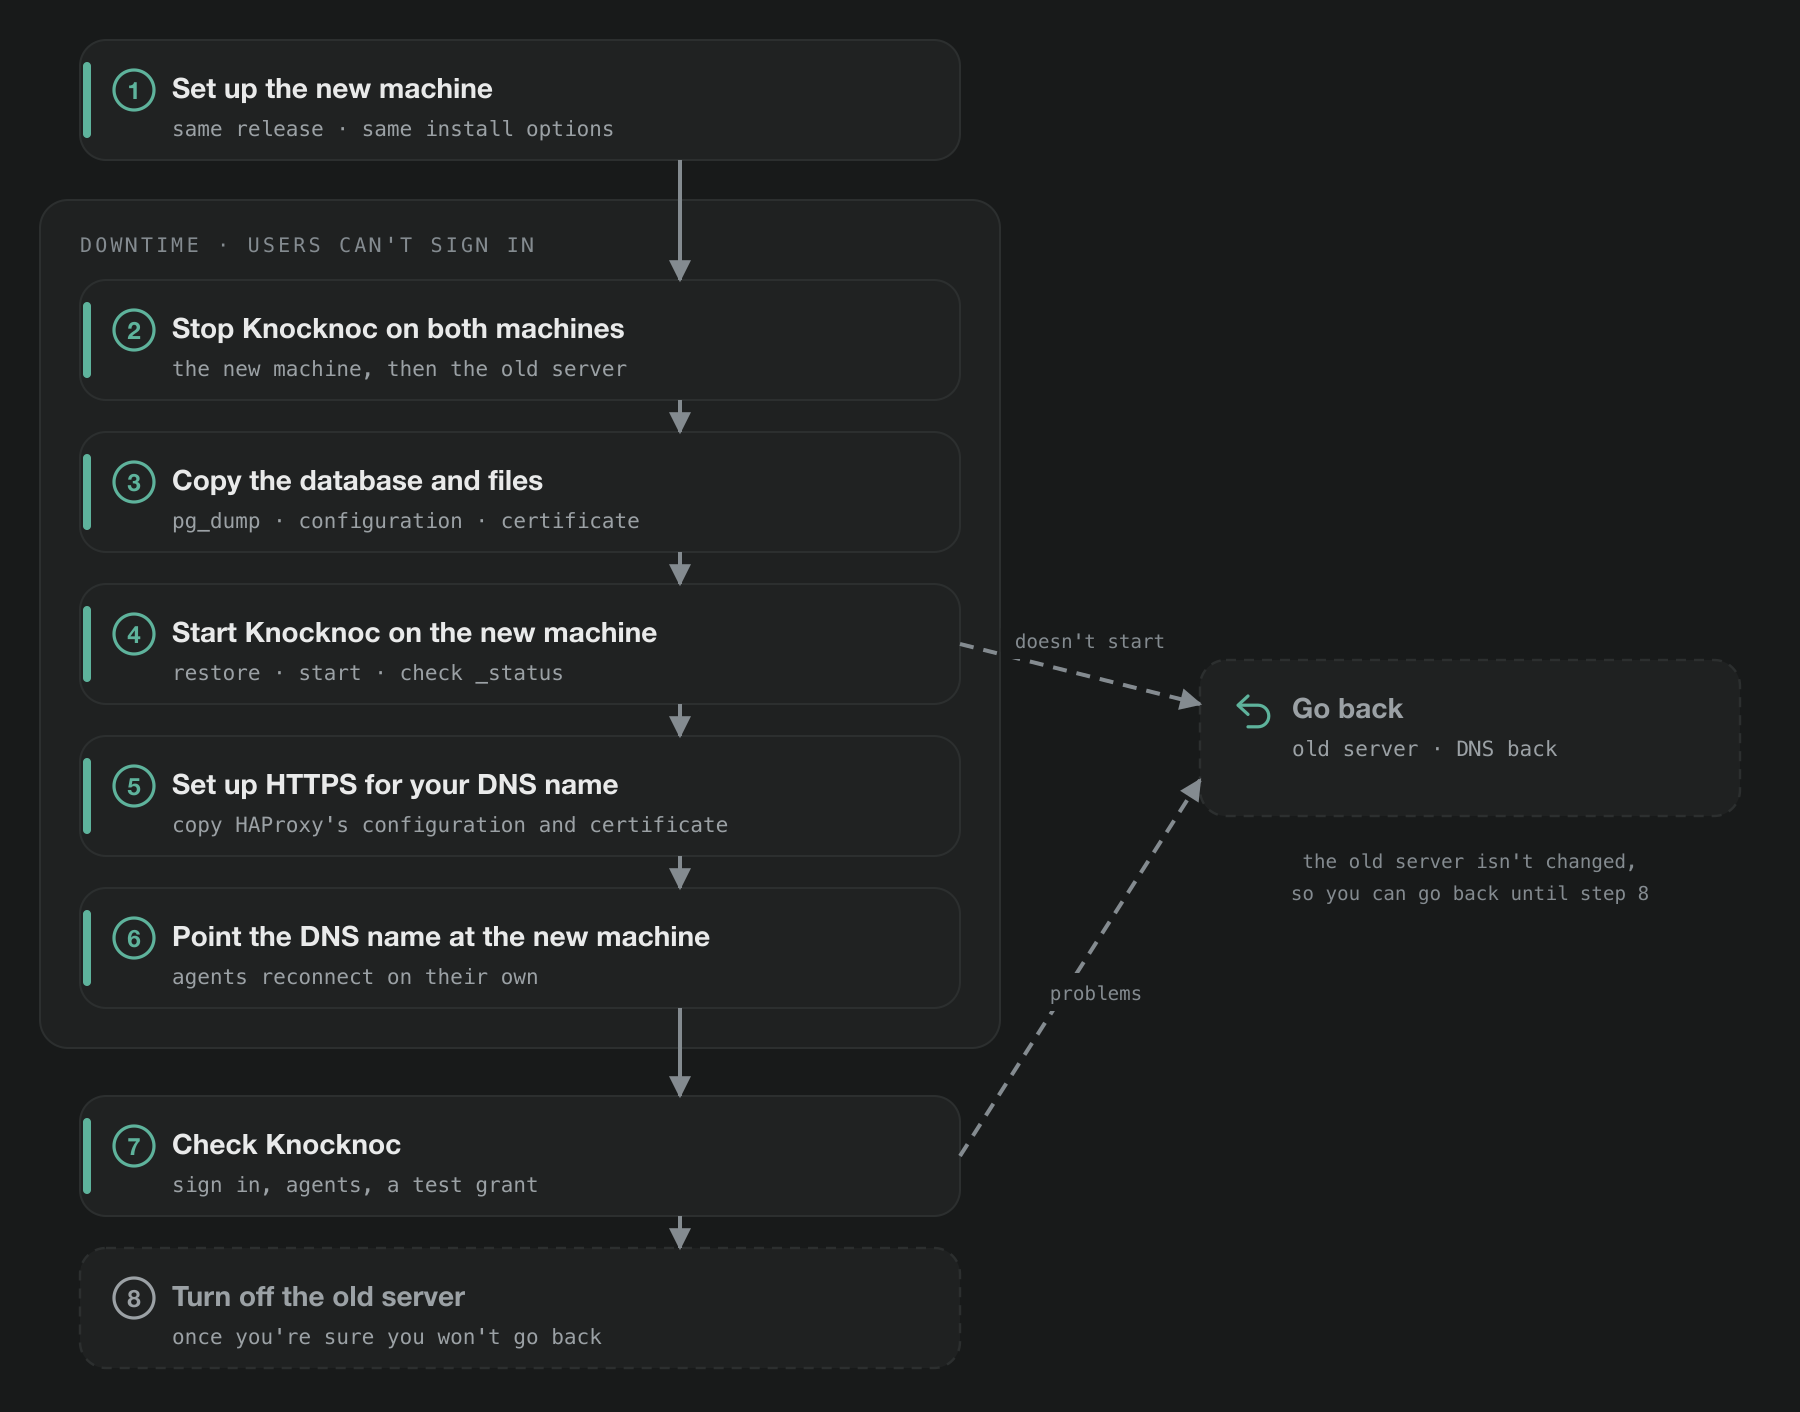
These steps move a standard install, with Knocknoc and its database on the same machine, to a new machine. You copy the database, configuration and certificates across, start Knocknoc on the new machine, and then point your DNS name at it.
The old server isn't changed, so you can go back to it until you turn it off. While Knocknoc is stopped, users can't sign in or request access. Any access they already have stays in place.
If your web nodes connect to a separate database server or a managed service, the database doesn't need to move. See Replacing a web node instead.
1. Set up the new machine
Install Knocknoc on the new machine with the setup script, as described in Server installation (on premise). Choose the same options as on the old server. For a standard install, that's a local PostgreSQL database, and HAProxy on port 443. If the old server also runs an agent, install one on the new machine too.
You don't need to set anything up in the new server's admin portal. Its database is replaced with a copy of the old one in step 4.
The new machine needs the same network access as the old one. Your users and agents must be able to reach it on port 443, and it needs to reach https://licensing.knocknoc.io.
2. Stop Knocknoc on both machines
On the new machine, stop Knocknoc, and the agent if you installed one:
sudo systemctl stop knocknoc
sudo systemctl stop knocknoc-agent
Then run the same commands on the old server. Stopping the old agent means only one copy of it runs once you've moved it. Users can't sign in from this point until Knocknoc is running on the new machine.
If there's no agent on a machine, the second command says that knocknoc-agent.service isn't loaded. You can ignore this.
3. Copy the database and files
On the old server, save a copy of the database, and of Knocknoc's configuration and certificate. These are the same files that the Backups page backs up, apart from HAProxy's, which you copy in step 5. The copies contain passwords and keys, so umask 077 makes them readable only by you.
cd /tmp
umask 077
sudo -u knocknoc pg_dump -Fc knocknoc > ~/knocknoc-move.dump
sudo tar -czf - -C / opt/knocknoc/etc opt/knocknoc/var/knocknoc.crt opt/knocknoc/var/knocknoc.key \
  > ~/knocknoc-move-files.tar.gz
If the old server runs an agent, save its files as well:
umask 077
sudo tar -czf - -C / opt/knocknoc-agent/etc opt/knocknoc-agent/var > ~/knocknoc-move-agent.tar.gz
The agent's files include the keys it uses to read the passwords and API keys that Knocknoc stores for your firewalls and other systems. Without them, Knocknoc won't accept the agent on the new machine, and you'd have to set the agent up again and enter those credentials again.
If the agent runs scripts of your own through the Custom Script integration, copy them to the new machine as well, to the same paths. They aren't part of the agent's files.
Copy the files to your home directory on the new machine, for example with scp. Use the new machine's address:
scp ~/knocknoc-move* 203.0.113.20:4. Start Knocknoc on the new machine
On the new machine, put the configuration and certificate in place, and replace the new server's database with the copy:
cd /tmp
sudo tar -xzf ~/knocknoc-move-files.tar.gz -C /
sudo chown -R knocknoc:knocknoc /opt/knocknoc
sudo -u postgres dropdb knocknoc
sudo -u postgres createdb -O knocknoc knocknoc
sudo -u knocknoc pg_restore --no-owner --no-privileges --exit-on-error --single-transaction \
  -d knocknoc < ~/knocknoc-move.dump
If you copied an agent, put its files in place too:
sudo tar -xzf ~/knocknoc-move-agent.tar.gz -C /
sudo chown -R knocknoc-agent:knocknoc-agent /opt/knocknoc-agent
If HTTPAddr or TrustedForwarders in /opt/knocknoc/etc/knocknoc.conf include the old server's IP addresses, change them to the new machine's. Then start Knocknoc:
sudo systemctl start knocknocGive Knocknoc a few seconds to start, then check that this prints ready:
curl -sk https://127.0.0.1:8756/_statusIf you copied an agent, start it:
sudo systemctl start knocknoc-agentWhen Knocknoc first starts on the new machine, it activates your license for that machine. Check that this worked. The log should show LicenseKeyValidationSuccessful:
sudo journalctl -u knocknoc | grep -i licenseIf it doesn't, see The license isn't active on the new machine.
5. Set up HTTPS for your DNS name
The setup script gave HAProxy on the new machine a self-signed certificate for the machine's IP address, and HAProxy only answers requests for that address. If your users and agents reach Knocknoc by a DNS name, copy HAProxy's configuration and certificate from the old server.
On the old server, find the certificate file on HAProxy's bind line:
grep -E '^\s*bind .* crt ' /etc/haproxy/haproxy.cfgSave the configuration and that certificate file, and copy them to the new machine. Use the path from the bind line, without the / at the start:
umask 077
sudo tar -czf - -C / etc/haproxy/haproxy.cfg etc/ssl/private/knocknoc.example.com.pem \
  > ~/knocknoc-move-haproxy.tar.gz
scp ~/knocknoc-move-haproxy.tar.gz 203.0.113.20:
On the new machine, put them in place and restart HAProxy:
sudo tar -xzf ~/knocknoc-move-haproxy.tar.gz -C /
sudo systemctl restart haproxy
This works whether the certificate is from Let's Encrypt, one you installed yourself, or self-signed. A Let's Encrypt certificate copied this way stays valid until it expires, which is at most 90 days. To renew it from the new machine, run this after step 6, once the name points at the new machine:
sudo /opt/knocknoc/bin/knocknoc --app-delivery-controllerIt may describe the copied certificate as self-signed. When it offers to upgrade to a Let's Encrypt certificate, answer yes, enter your DNS name, and choose the DNS Plugin or Manual DNS method. The Standalone HTTP method doesn't work while HAProxy is running, because HAProxy is using port 80. See Let's Encrypt for how each method checks that you own the name.
If a separate load balancer or reverse proxy handles HTTPS in front of Knocknoc, you don't need to change anything here. In step 6, point it at the new machine.
If your users and agents reach Knocknoc by its IP address instead, skip this step. The new machine has a different address, so see Pointing everything at the new server.
6. Point the DNS name at the new machine
Change the DNS record for your Knocknoc server, for example knocknoc.example.com, to the new machine's IP address. Users and agents reach the new server as the change reaches them, which can take as long as the record's TTL. Agents reconnect on their own.
If the name is changing as well, or anything connects to the old server by IP address, see Pointing everything at the new server.
7. Check Knocknoc
Log in to the admin portal and run through the checks in Checking that a restore worked on the Backups page. These include checking that each agent has been seen recently. If an agent hasn't reconnected after a few minutes, see An agent is offline after the move.
The agent you moved from the old server keeps its old name, which is usually the old machine's host name. To rename it, open Agents in the admin portal, select the agent and change its name.
8. Turn off the old server
On the old server, stop Knocknoc and the agent from starting again when the machine restarts:
sudo systemctl disable knocknoc knocknoc-agentKeep the old machine until you're sure you won't need to go back to it. A week or two of normal use is usually enough.
Before you remove it, release its license activation, so that it's free for another machine. On the old server, run:
sudo /opt/knocknoc/bin/knocknoc -unset-licenseThis also removes the license key from the old server's own database, which you're no longer using. If the old server is a web node that shares its database with other nodes, follow Replacing a web node instead, because this command removes the license from every node.
The copies in your home directory on both machines contain passwords and keys. Once you're happy with the move, delete them, or move them to wherever you keep your backups.
Going back to the old server
If something isn't working, you can go back to the old server at any time before you remove it. On the new machine, stop Knocknoc and the agent:
sudo systemctl stop knocknoc
sudo systemctl stop knocknoc-agent
On the old server, start them again, then point the DNS name back at it:
sudo systemctl enable --now knocknoc
sudo systemctl enable --now knocknoc-agent
Any changes made on the new server, such as new users, changed settings or new access history, aren't copied back. They won't be on the old server when you go back.
Replacing a web node
If your web nodes connect to a separate database server or a managed service, the database stays where it is. To move a web node to a new machine, add the new machine as an extra web node, then remove the old one. If you have other web nodes behind a load balancer, they keep serving users while you do this.
-
Allow the new machine to connect to the database. On your own PostgreSQL server, add its address to
pg_hba.confand the firewall, as described in On your own PostgreSQL server on the Migrating the database page. If the database is on a web node that shares it withknocker exposedb, runsudo /opt/knocknoc/knocker/knocker exposedb --addon that node, as described in Setting up multiple web nodes. On a managed service, add the address to the provider's firewall rules. -
Install Knocknoc on the new machine as an extra web node, as described in Setting up multiple web nodes. When the setup script asks for the installation mode, choose Advanced. Then, for the database configuration, choose Web node only, and enter the connection string from
DBURLon the old node. Don't add the new node to your load balancer yet. -
If you uploaded a certificate for the old node in Settings, copy it to the new node. On the old node, run:
umask 077
sudo tar -czf - -C / opt/knocknoc/var/knocknoc.crt opt/knocknoc/var/knocknoc.key > ~/knocknoc-node-files.tar.gz
Copy the file to the new node, then run this on the new node:
sudo tar -xzf ~/knocknoc-node-files.tar.gz -C /
sudo chown knocknoc:knocknoc /opt/knocknoc/var/knocknoc.crt /opt/knocknoc/var/knocknoc.key
sudo systemctl restart knocknoc
If the old node runs HAProxy for your DNS name, set it up on the new node as well, as described in step 5 of Moving the server.
Don't copy the rest of
/opt/knocknoc/etc. It holds the node's own identity, and two running nodes can't share it. -
Take the old node out of service and release its license activation, so that the new node can use it. A node without an active license lets users sign in, but doesn't grant them any access, so do this before the new node takes any traffic.
Take the old node out of your load balancer and your agents'
Hosts. Then stop Knocknoc on it, and stop it starting again when the machine restarts:sudo systemctl disable --now knocknocThen, on the old node, release its activation. Do this while the old node can still reach the database:
sudo /opt/knocknoc/bin/knocknoc -unset-licenseBecause the nodes share a database, this also removes the license key from all of them. Put it back straight away by running this on any of the other nodes, with your license key from the Licensing Portal:
sudo /opt/knocknoc/bin/knocknoc -set-license key/your-license-keyThen restart Knocknoc on the new node, so that it activates the license for its machine:
sudo systemctl restart knocknocCheck the new node's log for
LicenseKeyValidationSuccessful:sudo journalctl -u knocknoc | grep -i license -
In the admin portal, open Support and check that the new node is listed under Servers as Serving (see High availability). Then add it to your load balancer, or point the DNS name at it. If your agents list each web node in
Hosts, add the new node there too (see Agents below). -
Remove the old node's address from the database server's
pg_hba.confand firewall. If you share the database withknocker exposedb, runsudo /opt/knocknoc/knocker/knocker exposedb --removeon that node instead. On a managed service, remove it from the provider's firewall rules.The old node shows as Offline under Servers. You can remove it from the list with Forget server.
Pointing everything at the new server
If you kept the same DNS name, your agents, users and identity provider follow it to the new server by themselves, and so do devices that poll an allowlist. Check for anything that uses the old server's IP address instead, or only accepts connections from it:
- the Public URL in Settings > Authentication. Knocknoc fills it in from the address an admin first logs in at, so it may be the old server's IP address. If it is, change it to the DNS name (see Public URL and single sign-on)
- agents with an IP address in
HostorHosts(see Agents below) - firewall rules in front of the server that allow HTTPS to the old address
- systems that Knocknoc connects to which only accept its old address, such as a separate database server, an LDAP directory or a log collector.
If the name has changed, work through each of the sections below.
Public URL and single sign-on
In the admin portal, go to Settings > Authentication and change the Public URL to the new address, for example https://knocknoc-new.example.com. Knocknoc uses this address for single sign-on, and for the access links users send to agents and companions.
If your admins sign in with SAML, they can't sign in under the new name until the Public URL is changed. In that case, change it on the server instead, then restart Knocknoc. If you have more than one web node, restart Knocknoc on each of them:
sudo /opt/knocknoc/bin/knocknoc -set-public-url https://knocknoc-new.example.com
sudo systemctl restart knocknoc
If you use SAML, update the Knocknoc app in your identity provider with the new addresses, for both user and admin sign-in. The Entity ID and ACS URL both start with the server's address. Once you've saved the new Public URL, each provider's settings in Settings > Authentication show its new Metadata / Entity ID and Reply URL (ACS). If you have more than one identity provider for users, update each of them. Then check each one with Test SAML (see Testing your SAML configuration).
TLS certificate
The server needs a certificate for its new name. If Knocknoc set up HAProxy on the server, run this on the server:
sudo /opt/knocknoc/bin/knocknoc --app-delivery-controllerIf it offers to upgrade to a Let's Encrypt certificate, answer yes. If it asks whether to overwrite the existing configuration instead, answer yes and choose Custom. Then enter the new name, and choose Let's Encrypt with the DNS Plugin or Manual DNS method. Both work before the new name points at the server. The Standalone HTTP method doesn't work while HAProxy is running, because HAProxy is using port 80. See Let's Encrypt for how each method works.
From then on, HAProxy only answers requests for the new name, so anything still using the old name can't connect. Update your agents straight afterwards.
If you use your own certificate, get one for the new name and install it where the old one was, in HAProxy or your load balancer.
Agents
Each agent's configuration file names the server it connects to, in Host, or in Hosts if it connects to several web nodes. On every agent, change the old address to the new one, then restart the agent:
| Platform | Configuration file | Restart with |
|---|---|---|
| Linux | /opt/knocknoc-agent/etc/knocknoc-agent.conf | sudo systemctl restart knocknoc-agent |
Linux, extra agents added with knocker init | /opt/knocknoc-agent/instances/<name>/etc/knocknoc-agent.conf | sudo systemctl restart knocknoc-agent@<name> |
| Windows | C:\Program Files (x86)\Knocknoc-Agent\knocknoc-agent.conf | sc stop KnocknocAgent, then sc start KnocknocAgent, from an elevated prompt |
| OpenBSD | /etc/knocknoc-agent/knocknoc-agent.conf | rcctl restart knocknoc_agent, as root |
Give the name on its own, without https://, or the agent can't connect. Add :port only if the server doesn't use port 443. The agent keeps its token and keys, so it doesn't need to be registered again.
Allowlists (EDLs)
Firewalls and other devices that poll an allowlist from Knocknoc (see Allowlist (EDLs)) have the server's address in the list's URL. On each device, change the address in the URL to the new one. The rest of the URL, and the list's secret, stay the same.
Users and apps
- Tell your users the new address, so they can update their bookmarks.
- In the Knocknoc mobile app, users choose Change Server on the sign-in screen and enter the new address. If they had saved their login behind Face ID, Touch ID or a fingerprint, the app asks them to set this up again.
- Scripts that use the Knocknoc client (scriptable login) have the address in
ServerUrl, in their config file or on the command line. Change it there. - If your access-denied pages send users to Knocknoc, as described in Redirecting Users, change the address in them too. On an agent set up as a reverse proxy, this page is
/etc/haproxy/403.httpon the agent's machine. - Agentic access and companion links that were handed out before the change contain the old address. Users need to create new ones.
Troubleshooting
An agent is offline after the move
Check the address in the agent's configuration file (see Agents). Then, on the agent's machine, check that the server's name points at the new machine, and that the agent can reach it. The second command should print ready:
getent hosts knocknoc.example.com
curl -s https://knocknoc.example.com/_status
An agent tries again at least once a minute, so once the name points at the new machine, it should reconnect on its own. If both commands look right and it still hasn't, restart the agent.
pg_restore: error: unsupported version in file header
The full message looks like pg_restore: error: unsupported version (1.15) in file header. It means the new machine's PostgreSQL is older than the old server's, so it can't load the copy. Nothing was loaded, and the old server hasn't changed. Start Knocknoc on the old server again, as described in Going back to the old server. Then set up the new machine with an operating system whose PostgreSQL is the same version as the old server's, or newer.
The license isn't active on the new machine
Knocknoc activates your license for each machine it runs on, which needs access to https://licensing.knocknoc.io. To see what happened, check the log:
sudo journalctl -u knocknoc | grep -i licenseIf the new machine can't reach the licensing server, check its firewall and any outbound proxy, as described in Server installation (on premise).
If the log says machine activation limit exceeded, your license has reached its limit of machines. Release the old server's activation as described in step 8, then restart Knocknoc on the new machine. For a web node, follow step 4 of Replacing a web node. If the old machine no longer exists, so you can't run the command on it, contact [email protected] and we'll release its activation.
Until the license is active, you can't change settings such as the Public URL in the admin portal. You can set the Public URL from the command line instead, then restart Knocknoc:
sudo /opt/knocknoc/bin/knocknoc -set-public-url https://knocknoc-new.example.com
sudo systemctl restart knocknoc
Single sign-on fails after the address changed
Check that the Public URL in Settings is the address your users sign in at, and that your identity provider has the new Entity ID and ACS URL (see Public URL and single sign-on). Until both are updated, your identity provider usually shows an error such as Invalid Request instead of its sign-in page, or reports a problem with the reply URL, ACS URL or audience.
Still Having Issues?
We can help you out, contact us at [email protected].