
Fastly
Knocknoc integrates with Fastly to control which source IPs an edge service lets through. The integration writes entries into an existing Fastly ACL on a service's active version. The orchestration is performed by a Knocknoc orchestration Agent which is subscribed to the central Knocknoc Server.
As users authenticate to Knocknoc and grants expire, the agent adds and removes ACL entries for their IPs. ACL entries are versionless: once the ACL container is attached to an active service version, an entry write takes effect immediately, with no new version to activate. There is no feed to host and nothing to redeploy.
1,000 entries per ACL. Fastly caps an ACL at 1,000 entries and documents no self-service way to raise it. That is the ceiling on concurrent grants for one Knoc. Validate integration reports the current count, the agent logs a warning past 800, and a grant that hits the cap fails with agent error #FSTL153.
Step 1: Note the Service ID
- Sign in to the Fastly control panel and open the service you want to protect.
- Copy the Service ID from the service's page. It is around 22 letters and digits, not the service name.
Step 2: Create the API token
Create the token straight after signing in. Only a superuser can create an automation token, and only while the session is in Fastly's sudo mode, which lasts five minutes from signing in. Take longer and the create fails with
you must POST /sudo to access this endpoint, in which case sign out, sign back in, and go straight to the token page. An account with SSO or MFA enforced cannot create automation tokens at all, so use a personal token with the same scope there instead.
- In the Fastly control panel, open Account > API tokens > Account tokens, and create a token with these settings:
| Field | Value |
|---|---|
| Name | knocknoc |
| Type | Automation token |
| Role | Engineer |
| TLS management | Off |
| Scope | Global API access (global) |
| Access | The service that holds the ACL |
| Expiration | Never expire |
- Copy it. Fastly shows the token once.
- Prefer a token dedicated to Knocknoc, so its rate budget is not shared with your own automation and access can be revoked on its own.
Step 3: Create the ACL
- In the control panel, open the service and click Clone to edit. An active version is locked, so this is what gives you a draft to change.
- Open Access control lists in the left-hand menu and create an ACL (for example
knocknoc_jit_allow). Leave it empty. - Activate the version. An ACL only takes entries once its container is attached to an active version, and Knocknoc resolves the ACL by name on the active version.
Fastly's validator reports Unused acl until something consults the ACL, so expect that warning here. Step 4 is what clears it. An ACL nothing references holds entries but gates no traffic.
Dedicate one ACL to each Knoc. Knocknoc only touches the entries it created (it stamps a
knocknoc:comment on each one), so an entry you add by hand is left alone on revoke and flush. Two Knocs sharing one ACL still draw on the same 1,000-entry budget, and static entries you add come out of it too.
Step 4: Reference the ACL in Your Service
Knocknoc does not create the rule that consults the ACL. Reference it from the service so its entries control access.
VCL services. The rule lives in the versioned configuration, so unlike ACL entries this needs a new draft version. Click Clone to edit, open VCL > VCL snippets, and choose Regular as the type. Fill in the rest:
| Field | Value |
|---|---|
| Name | knocknoc-gate |
| Placement | Within subroutine |
| Subroutine | recv (vcl_recv) |
| Priority | 100 |
| VCL | if (!(client.ip ~ knocknoc_jit_allow)) { error 403 "Forbidden"; } |
Then activate the new version.
Compute services. A Compute service reads its ACLs from your application code, so entries only gate traffic if the app looks the ACL up on every request. Confirm that lookup is deployed before you rely on a Knoc against a Compute service. Validate integration reports the service type and warns when it is Compute, but it cannot verify what your app does.
Step 5: Deploy the Knocknoc Agent
Deploy the Knocknoc orchestration agent on a server with outbound HTTPS (TCP 443) access to api.fastly.com. See Agent installation for the platform-specific install steps (Linux, Windows, OpenBSD).
Step 6: Create the Knoc in Knocknoc
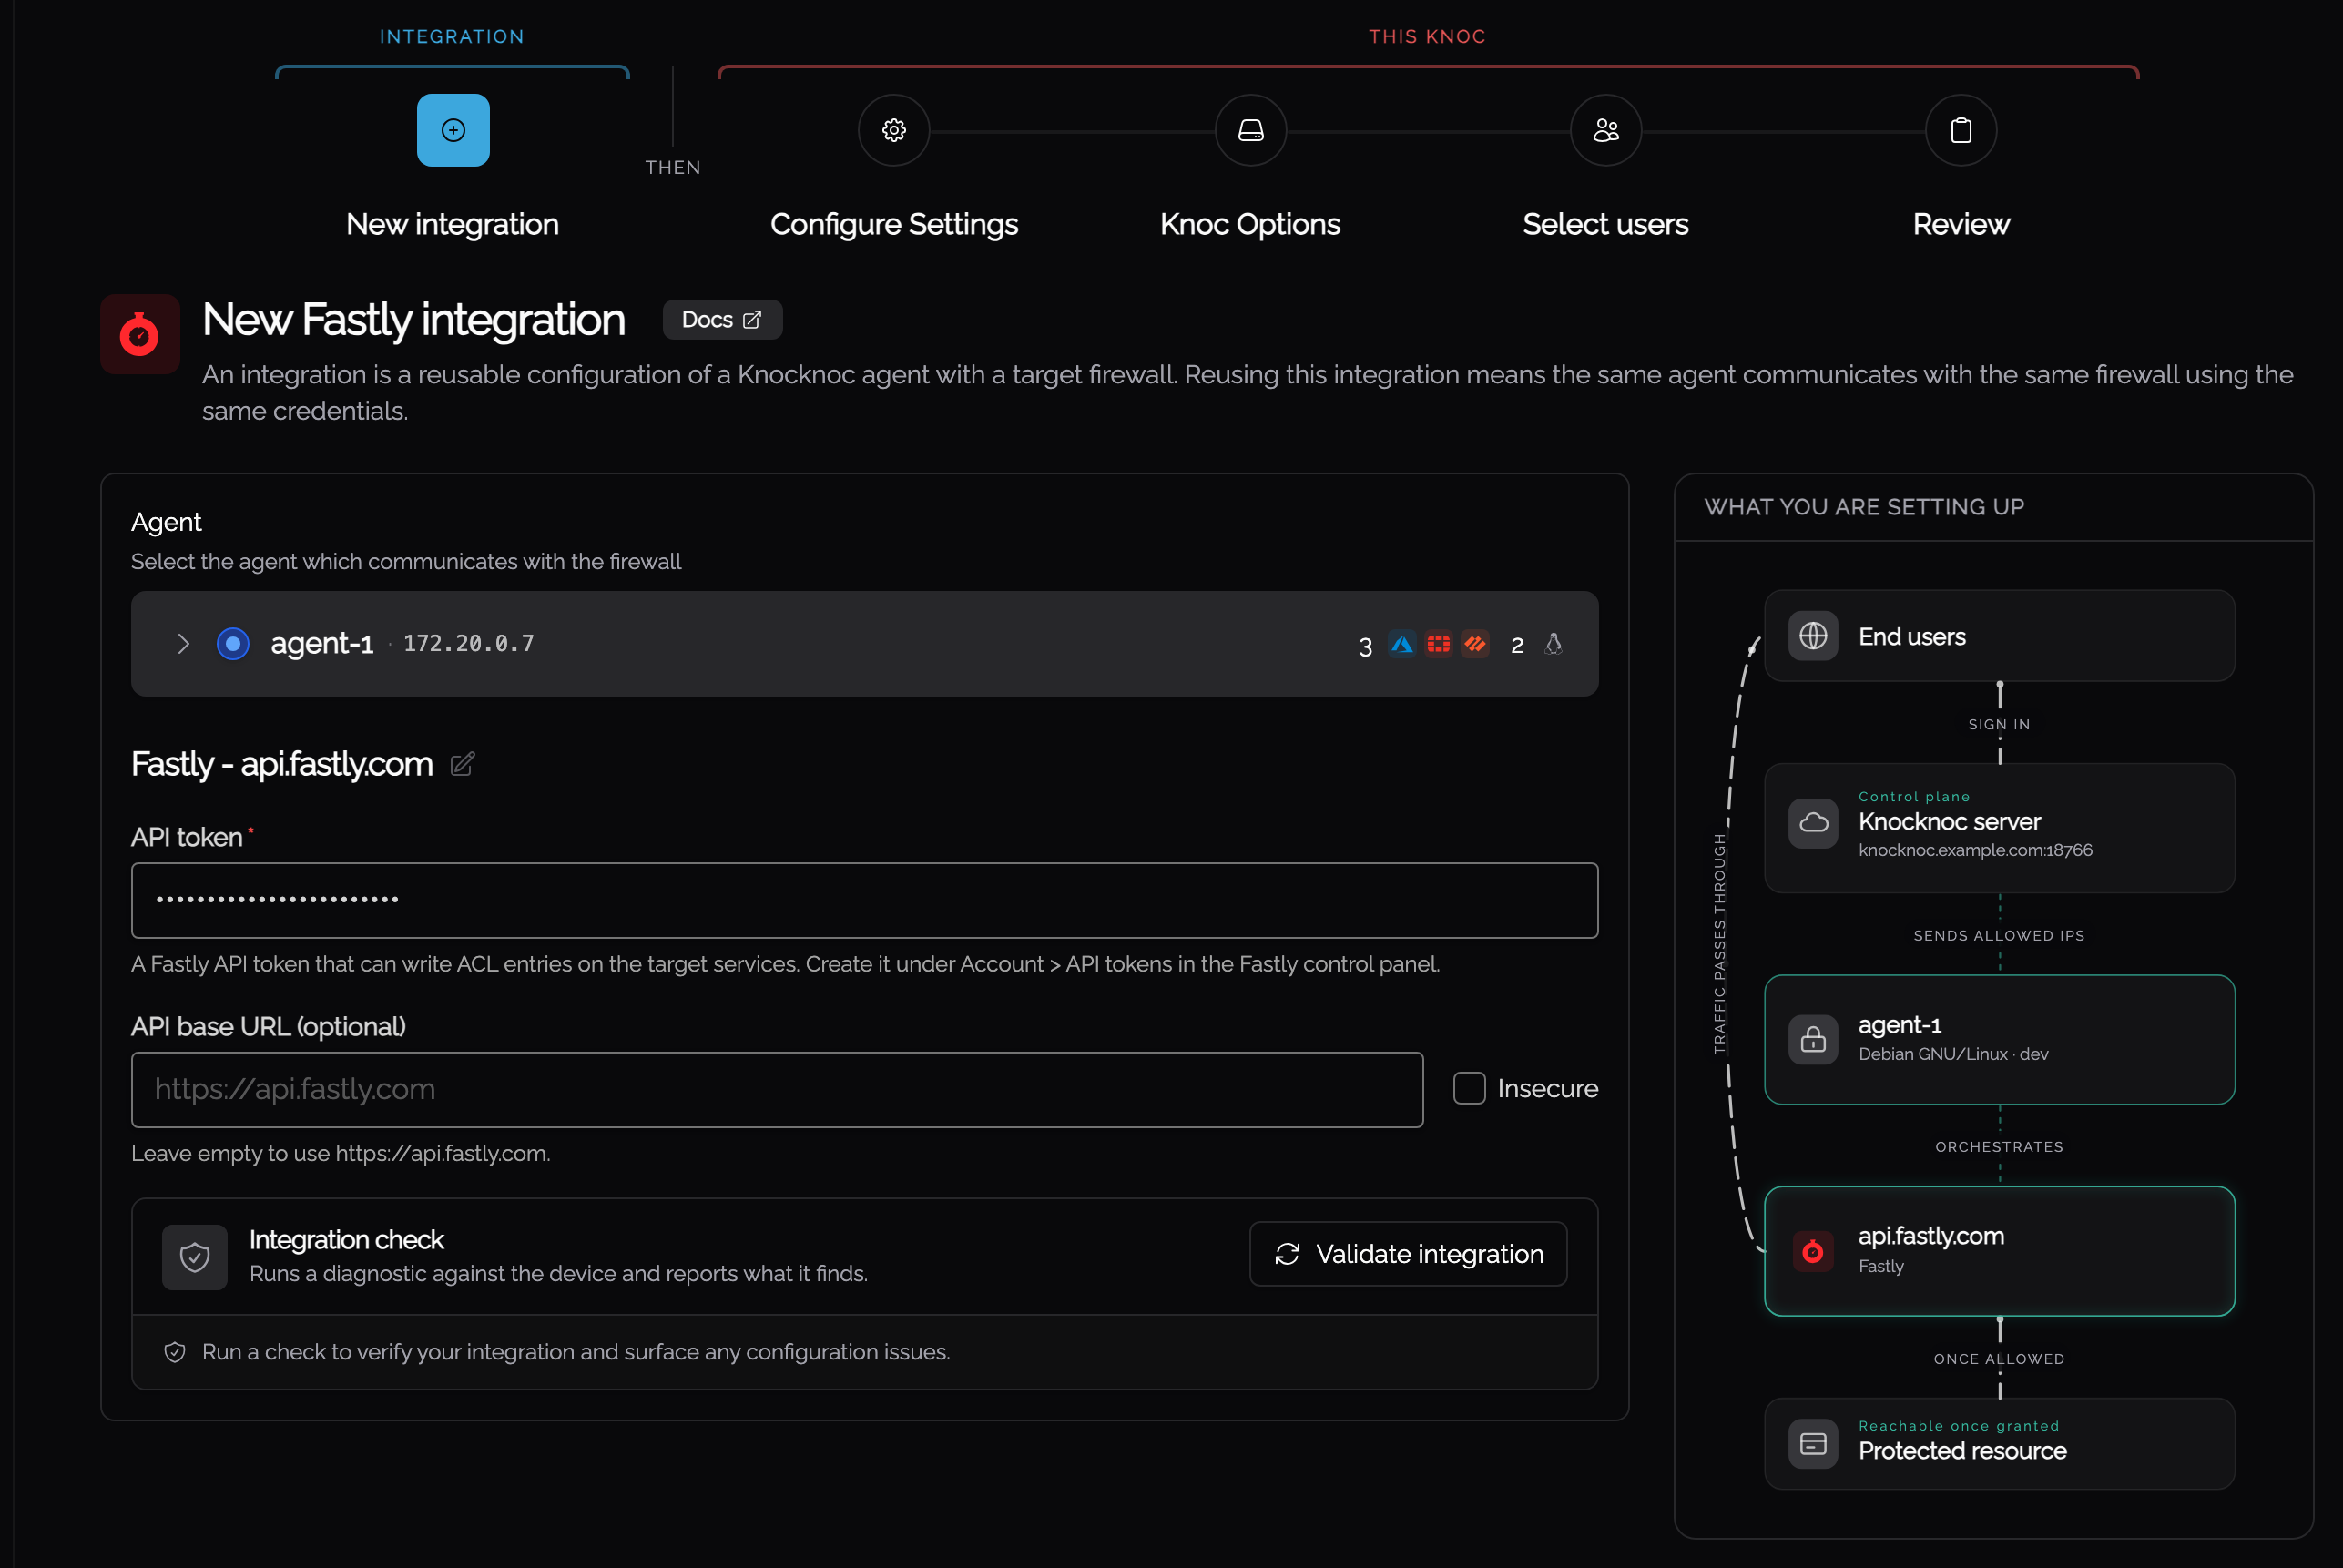
- On Knocs, choose New, then pick Fastly under Reverse proxy.
- Choose the agent from Step 5, then give the integration the API token from Step 2. Leave API base URL blank unless you need to point at something other than
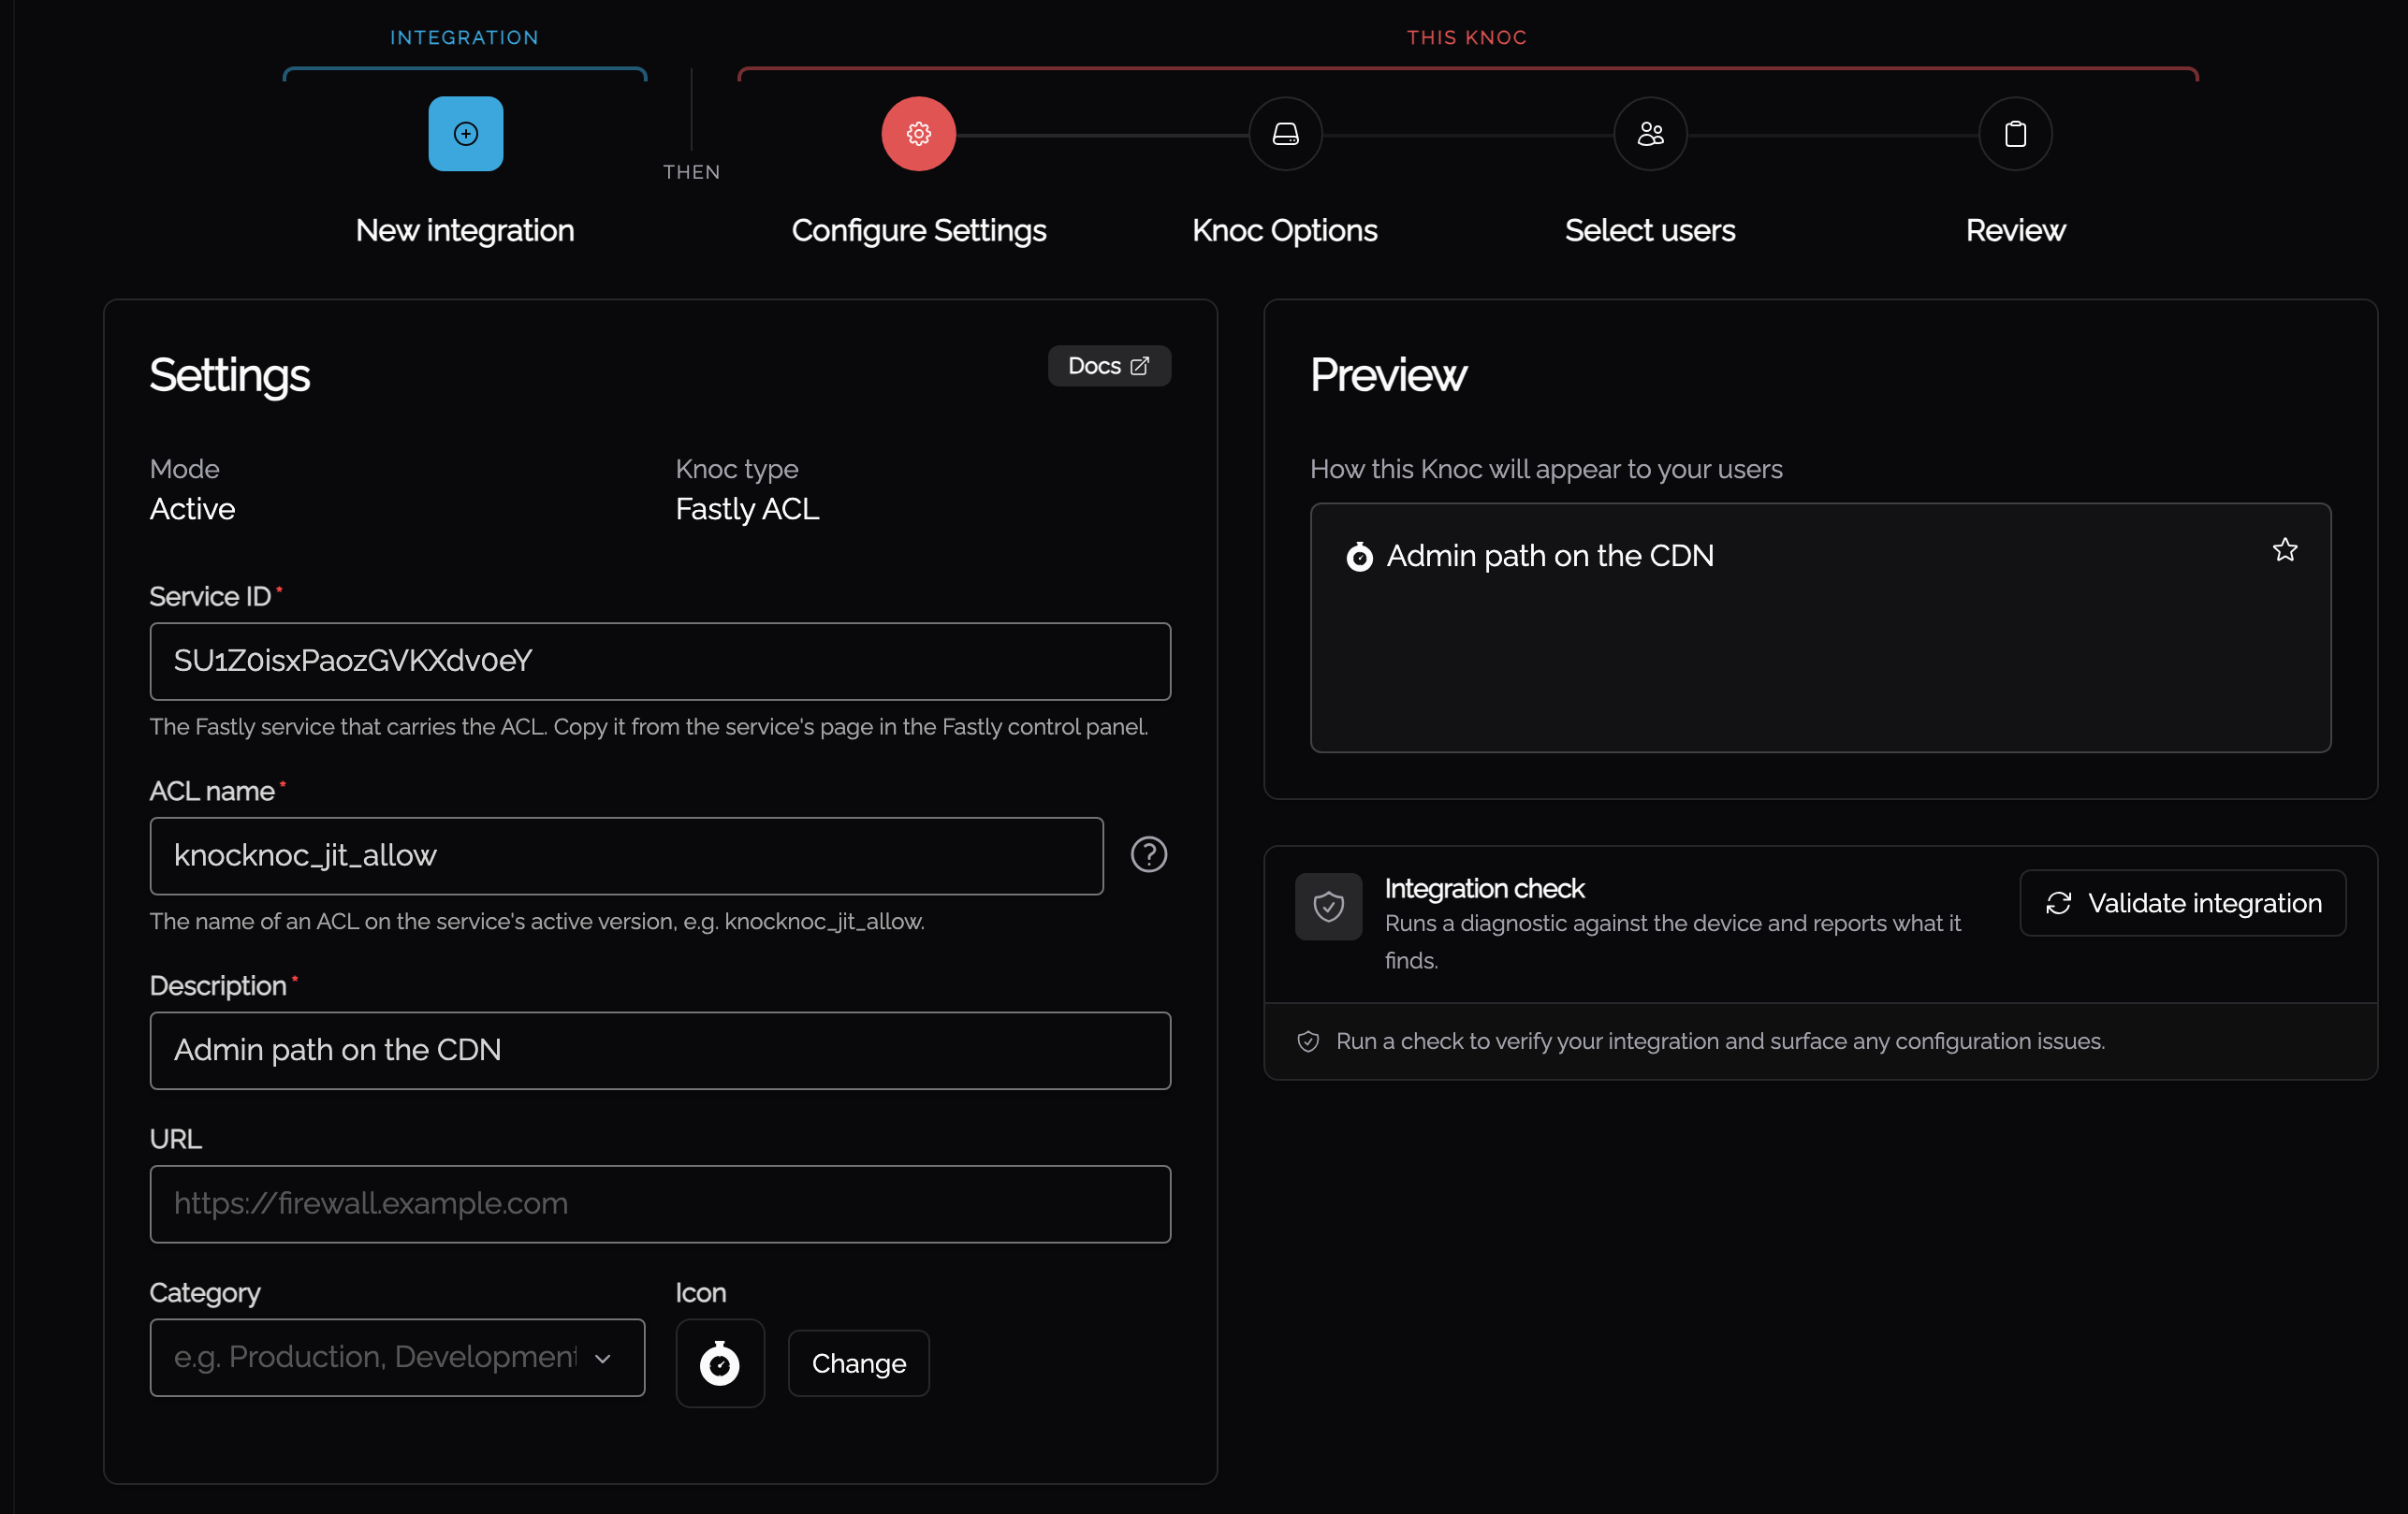
https://api.fastly.com. - On Configure Settings, give the knoc its Service ID and ACL name.
| Field | Value |
|---|---|
| API token | The token from Step 2. |
| API base URL | Optional. Leave blank to use https://api.fastly.com. An override must be a scheme and host with no path, since Knocknoc adds the API path itself. |
| Insecure | Optional. Skips TLS certificate verification. Leave off for the public API, and enable only for a proxy that presents a self-signed certificate. |
| Service ID | The service ID from Step 1. |
| ACL name | The name of the ACL from Step 3, as it appears on the active version. Cloning to edit in Step 4 activates a later version, and the ACL carries over to it. |
Step 7: Validate, Assign Users, and Test
- Click Validate integration on the integration step. It checks that the API is reachable and the token can read the service, checks the token's scope allows writing ACL entries, reports whether the service is VCL or Compute, confirms the ACL exists on the active version, and reports how much of the 1,000-entry budget is in use
- Assign users and/or groups to the Knoc
- Log in as a test user via the Knocknoc portal
- In the control panel, open the ACL under Access control lists and confirm an entry for the user's IP appears, with a comment starting
knocknoc: - Confirm access through the Fastly-protected path works, and that the entry is removed on logout or grant expiry
Allowing One Grant Through Several Services
One Fastly API token usually reaches every service in the account, but each ACL belongs to one service. To let a single grant through more than one service, add one Knoc per service, each naming its own Service ID and ACL name. The wizard stores the token you paste with the Knoc rather than sharing one credential record, so a token rotation has to be applied to each of them. Each target is written independently, so one failing service does not roll back the others, and only that Knoc reports the failure.
Troubleshooting
Validate integration runs five read-only checks. A failing check shows an agent error code that links straight to the matching troubleshooting page.
An authentication failure (agent error #FSTL001) means the token is invalid or was revoked. The token-scope check reads the token's own record and fails with #FSTL002 when its scope is read-only, since grants would fail later. Fastly does not return a scope for every credential, and where it cannot the check is skipped rather than failed, so the first grant is what proves write access.
If validation passes but granted IPs never take effect, check that the ACL is referenced from the active version's VCL (or from your Compute app), and that no earlier rule in the request path already denies the traffic.
If a revoke leaves an address allowed, look for an entry without a knocknoc: comment. Knocknoc never removes an entry it did not create, so a static entry for the same address keeps allowing it.
If the entry does carry the knocknoc: comment, check the Knoc's recent errors. A revoke that failed, for example because the ACL was renamed or deleted, reports its error code there and is retried later. Removing the entry by hand ends the access immediately.
Error codes
The Knocknoc agent reports structured error codes when Fastly operations fail. You can find more details on resolving these issues here.
Fastly Documentation References
- ACL entries API: entry create, update, delete and bulk endpoints
- ACL container API: creating and attaching an ACL to a service version
- Working with ACLs: using an ACL from VCL
- API tokens: token scopes and management