
Fortinet
Knocknoc orchestrates Fortinet FortiGate firewalls - directly or via FortiManager - to dynamically control network access by adding or removing IP addresses from lists, which are then used in whatever Firewall rule you like. The orchestration is performed by a Knocknoc orchestration Agent which is subscribed to the central Knocknoc Server.
The Fortinet ecosystem allows for multiple integration modes, depending on your network architecture, topology, Fortinet products in use and how quickly access changes need to propagate. A high-volume internet facing environment may suit Passive+ mode best, with an air-gap network benefitting from the one-way nature of Passive mode, with another more suited to Active orchestration directly connected to a Fortigate firewall rather than instructions propagating via a FortiManager.
Which Mode Should I Use?
If you have a FortiManager - use Passive+.
If you do not have a FortiManager, use Active or Passive+.
Alternative if you want a data-diode style approach, using Passive is best, however the refresh/polling period for users access could be up to 60 seconds from login, unlike the Passive+ or Active modes where this is near real time.
Comparison of operating modes
|
FortiGate firewall(s) Without FortiManager |
FortiManager Managing firewalls |
Passive mode | |||
|---|---|---|---|---|---|
| Mode | Passive+ | Polling mode | |||
| Main difference | Orchestration agent talks to the firewall (internal) | Firewall talks outbound to the Knocknoc Server | Firewall talks outbound to the Knocknoc Server | Does not remove pre-auth exposure | Simple, but polling period affects user experience |
| What it controls | Firewall IP list | Firewall IP list | Firewall IP list | Trusted Host IP restrictions | Firewall IP list |
| Propagation time | Near real-time | 1–2 seconds | 1–2 seconds | Near real-time | Poll interval (minimum 60 seconds) |
| Requires agent | Yes | Yes | Yes | Yes | No |
Option 1 - Active mode
This is the fastest and most direct option. Best for Fortinet/Fortigates, but if you want a FortiManager you need to use option 2 below.
Deploy an Orchestration Agent
Passive+ and Active require an Orchestration Agent to be deployed. This interacts with the Fortinet/Fortimanager device after obtaining instructions from the Knocknoc Server via an outbound subscription to the server. This should be deployed before following the below process. This Agent can be re-used for multiple configurations and devices. Read more here.
Step 1 - Create the Knoc in Knocknoc (Active)
- Select the Firewalls / Appliances Knoc type, choosing "Active"
- FortiGate (Direct): Add FortiGate URL, Insecure (if needed)
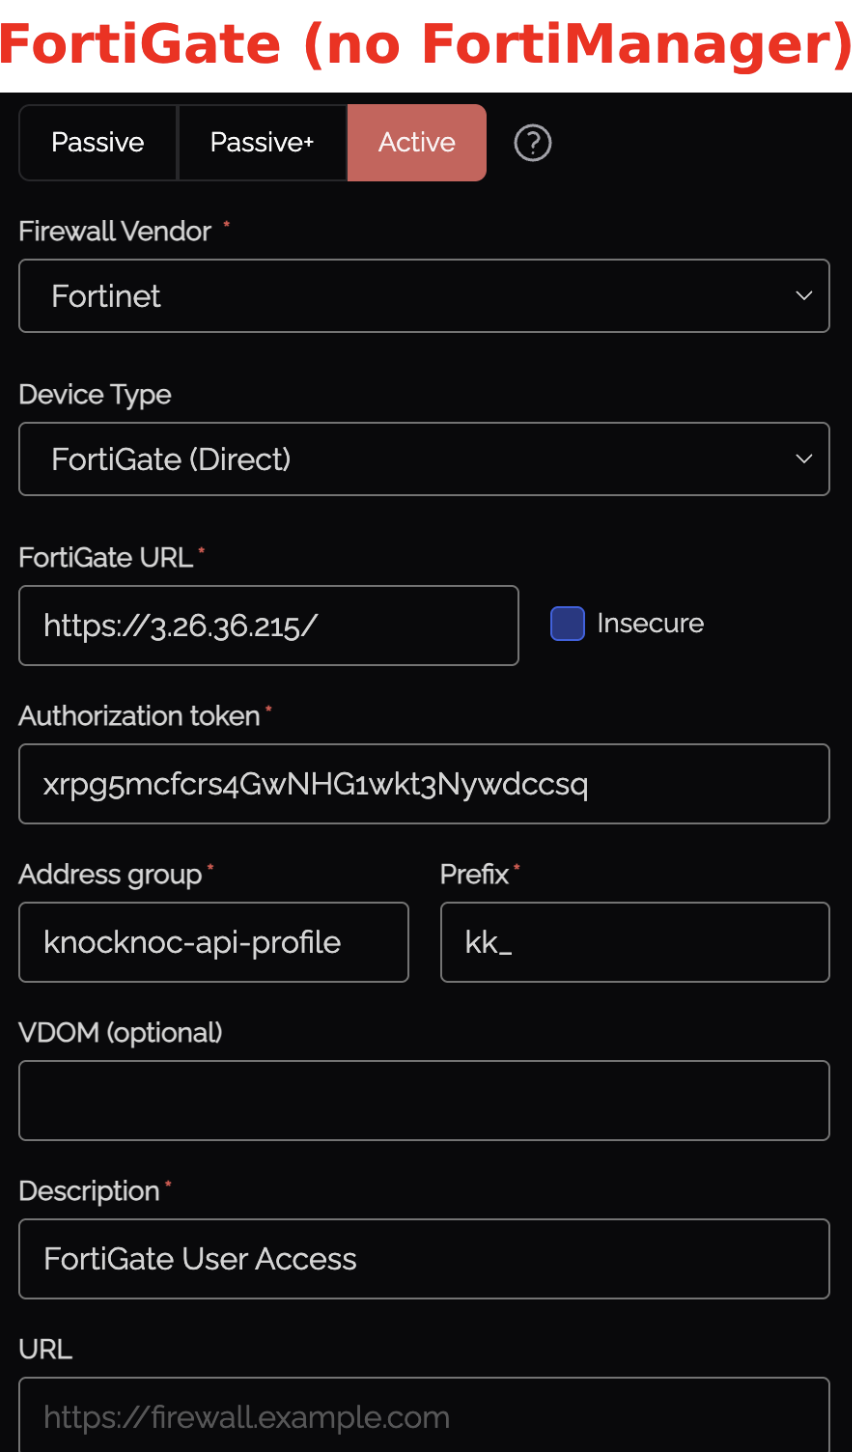
- Here's some context of what we're adding throughout this Active option
| Field | Description |
|---|---|
| FortiGate | The URL of your device (e.g., https://fw.example.com or https://fmg.example.com) |
| Insecure | Check if the certificate is not signed by a trusted CA |
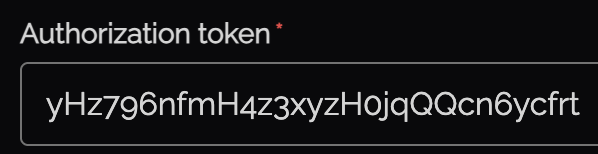
| Authorization token | The API key from the API user (Step 3) |
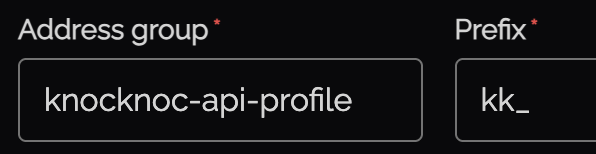
| Address group | Must match the address group name exactly |
| Prefix | Prefix for address object names (default: kk_) |
| VDOM | Optional (blank = root) |
- We'll start off by grabbing our FortiGate URL and adding it to the config
![]()
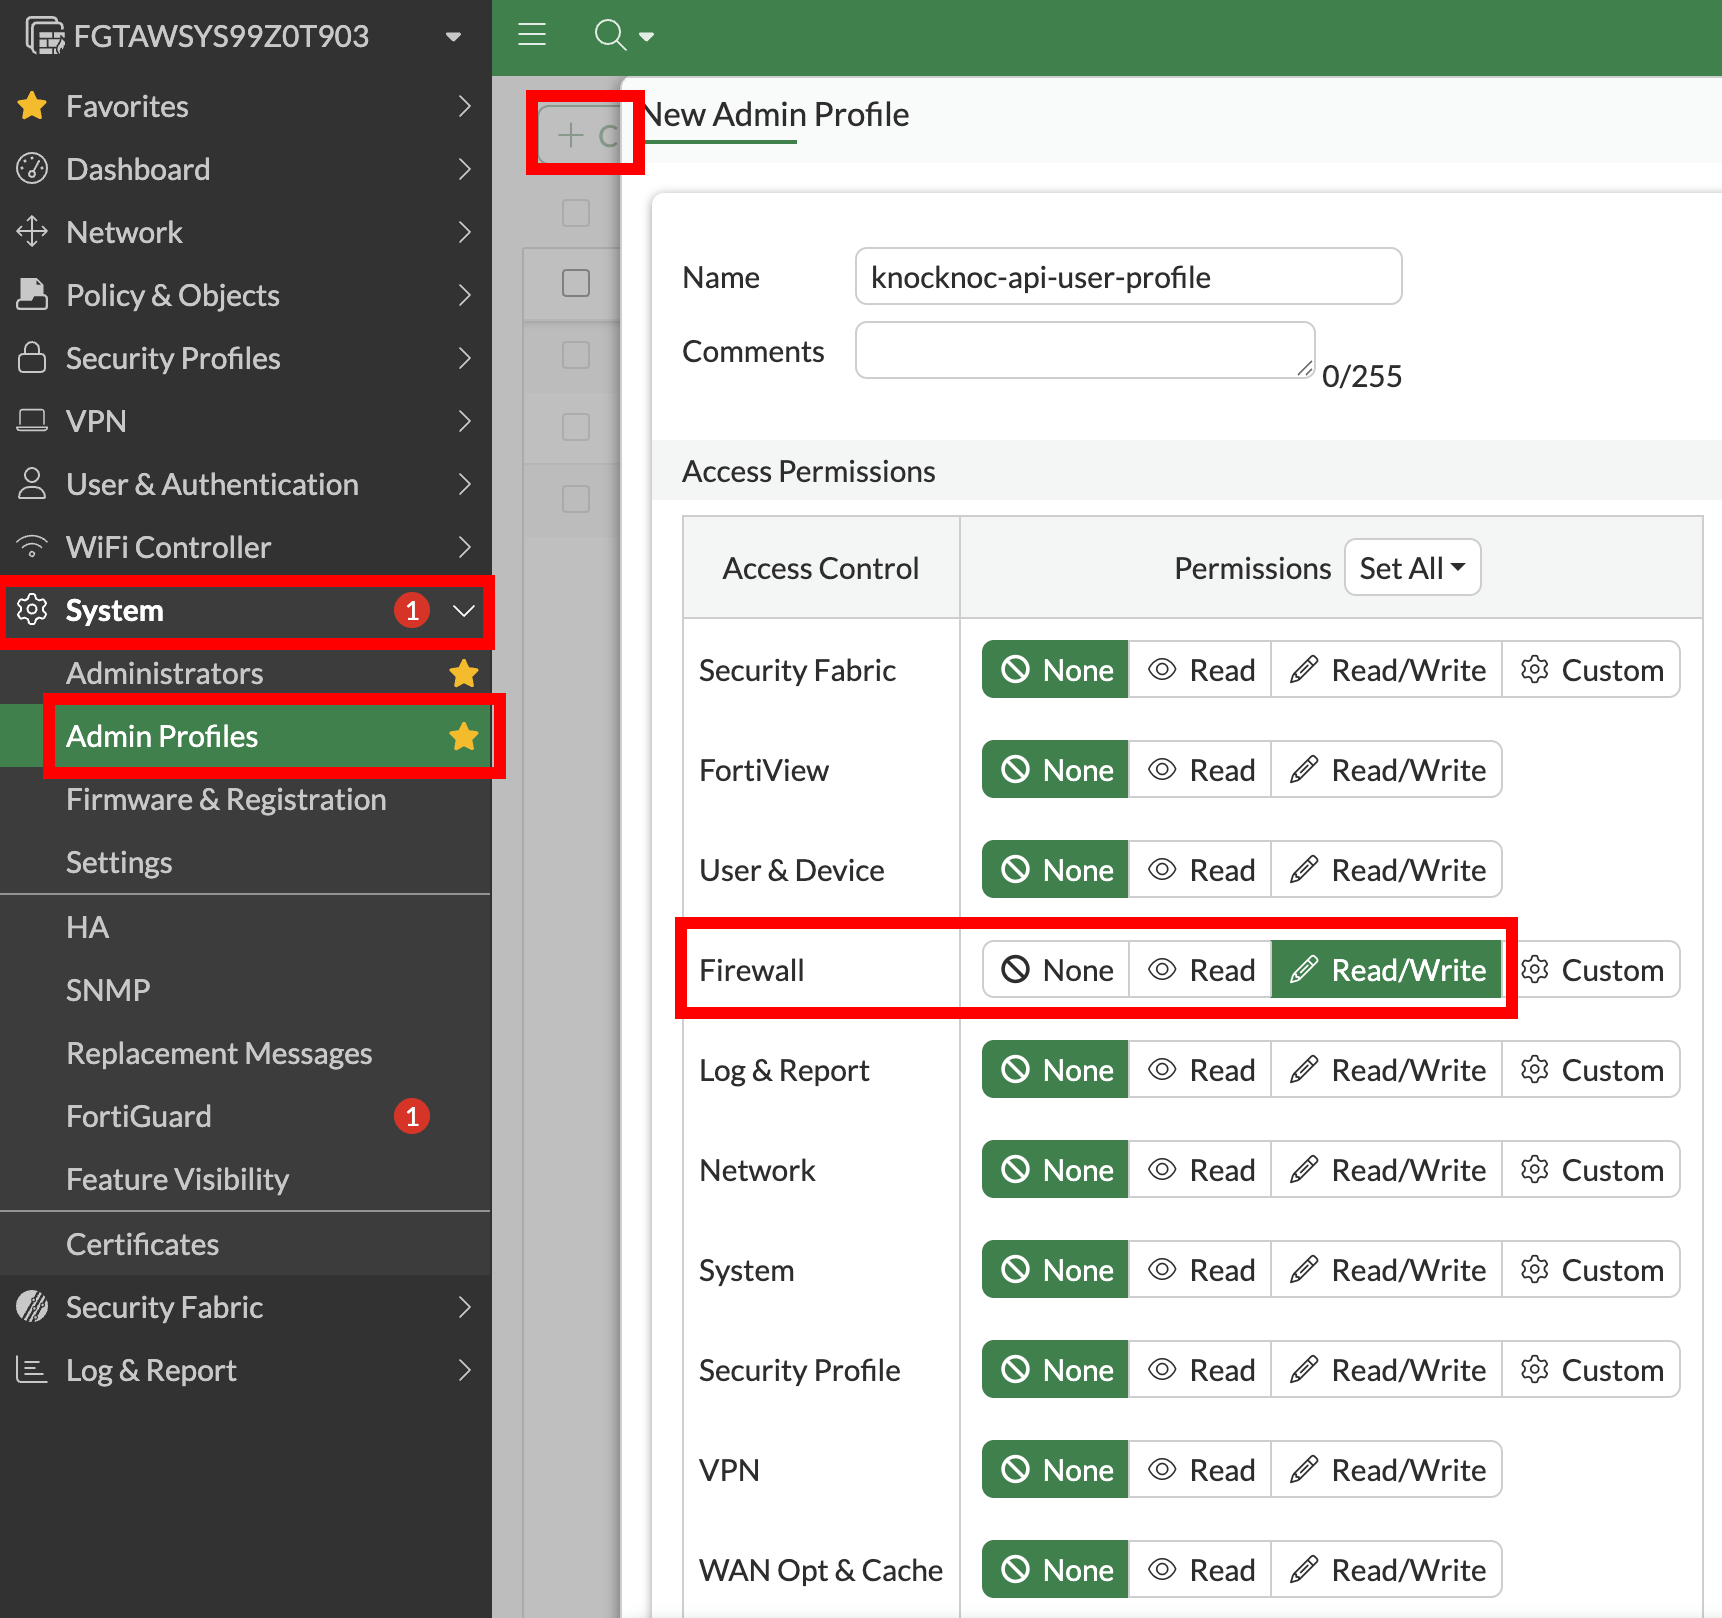
Step 2 - Create Admin Profile
FortiManager? Skip this step
-
If using FortiGate and no FortiManager: create a custom profile (least privilege)
-
Firewall: Read/Write
-
Everything else: None (or Read Only)
-
Step 3 - Create the API admin
- FortiGate (Direct): System > Administrators > Create New > REST API Admin
-
Assign the profile from Step 2
-
Restrict Trusted Hosts to the Knocknoc Agent IP
-
Save the API key
-

- Add a description and that's all the details
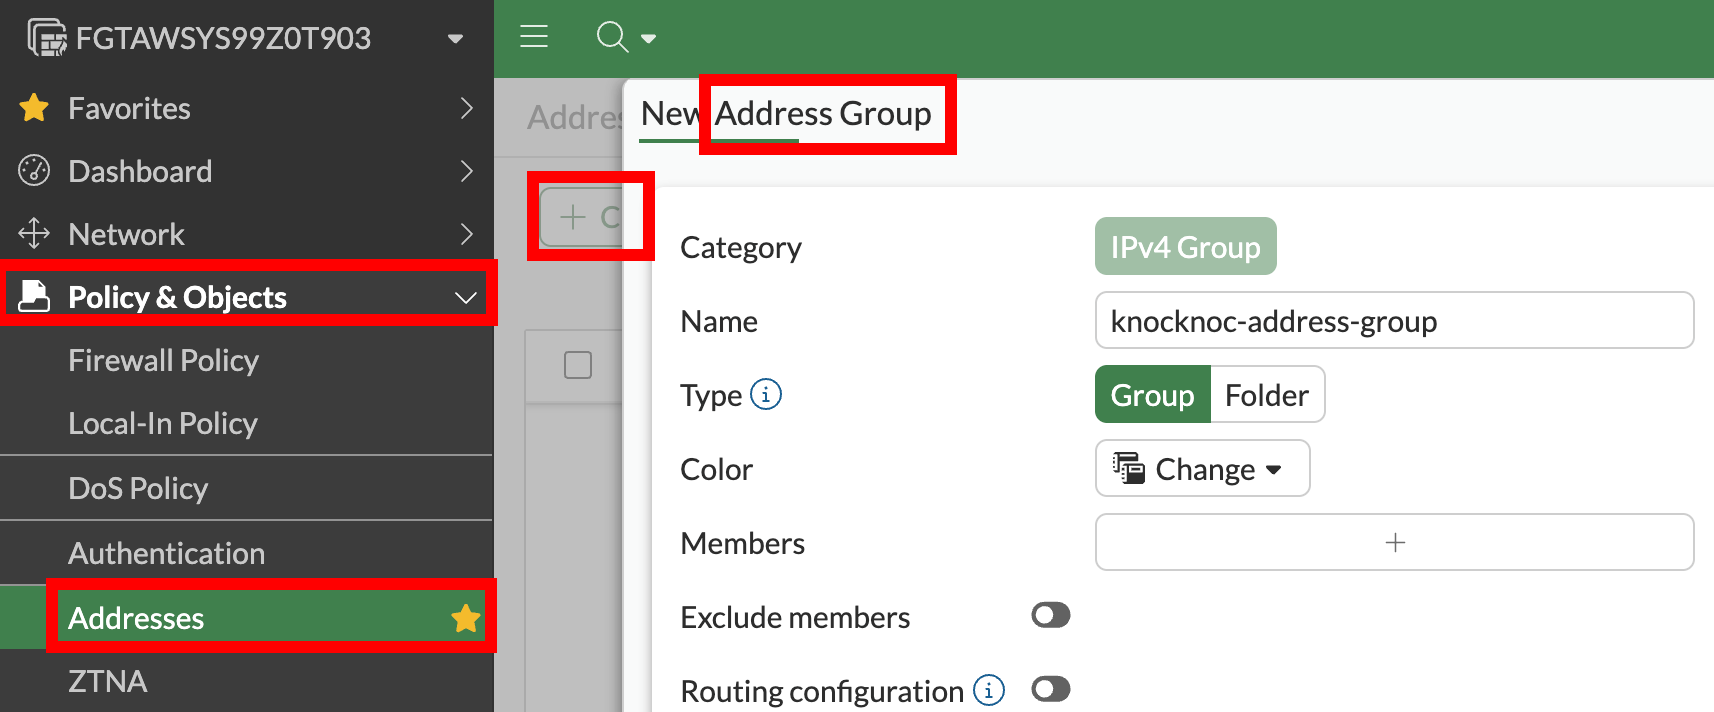
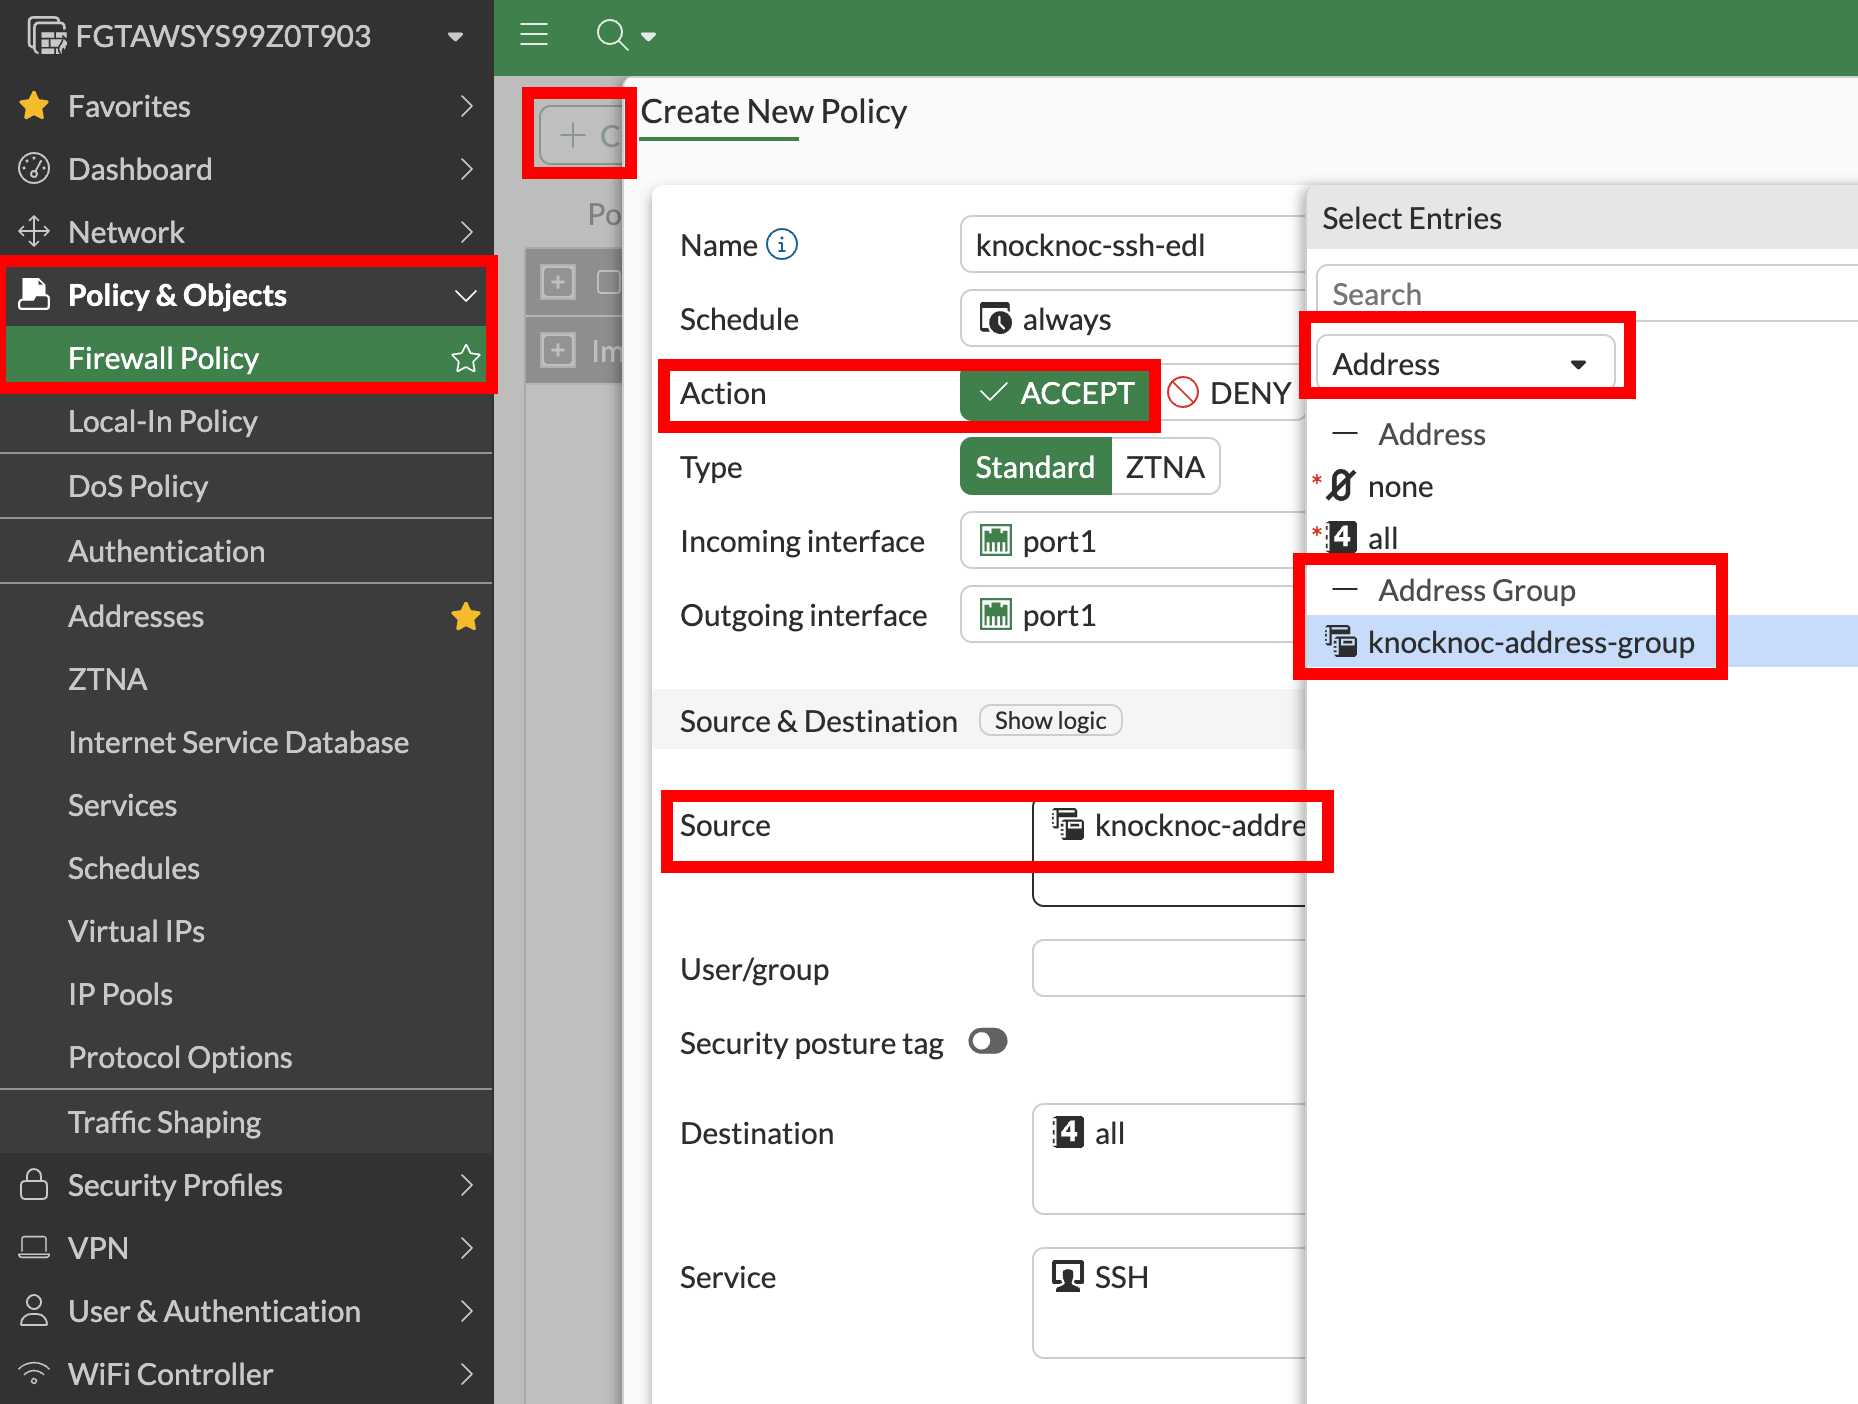
Step 4 - Create what Knocknoc will update
-
FortiGate: Policy & Objects > Firewall Policy > Create New
Step 5 - Test
-
Assign users/groups to the Knoc
-
Log in as a test user
-
Verify an address object is created and added to the address group
-
Verify the policy permits traffic
-
On logout/expiry, the address is removed from the group

Active Checklist
Your Knoc has the correct settings:
Your API user is correct:
- ✅ API user is IP-restricted to the agent (not the end user)
- ✅ FortiGate: Admin profile has Firewall Read/Write (everything else None)
- ✅ FortiManager: Super_User profile
- ✅ JSON API Access: Read / Write
Your configuration is correct:
- ✅ (FortiGate) Address group exists and firewall policy references it
Your testing is verified:
- ✅ (FortiGate) Address objects appear in the address group on login and are removed on logout/expiry
Option 2 - Passive+ mode
This is the recommended mode for multi‑FortiGate environments when FortiManager is present - the agent only needs connectivity to FortiManager, not to every individual FortiGate, but offers near real time updates of IP address information tied to user login/logout activity.
Passive+ mode combines an EDL (allowlist) with real‑time dynamic entry push. FortiGates poll the Knocknoc allowlist on a schedule for consistency reconciliation, while the agent pushes individual IP entries for near‑instant propagation.
Deploy an Orchestration Agent
Passive+ and Active require an Orchestration Agent to be deployed. This interacts with the Fortinet/Fortimanager device after obtaining instructions from the Knocknoc Server via an outbound subscription to the server. This should be deployed before following the below process. This Agent can be re-used for multiple configurations and devices. Read more here.
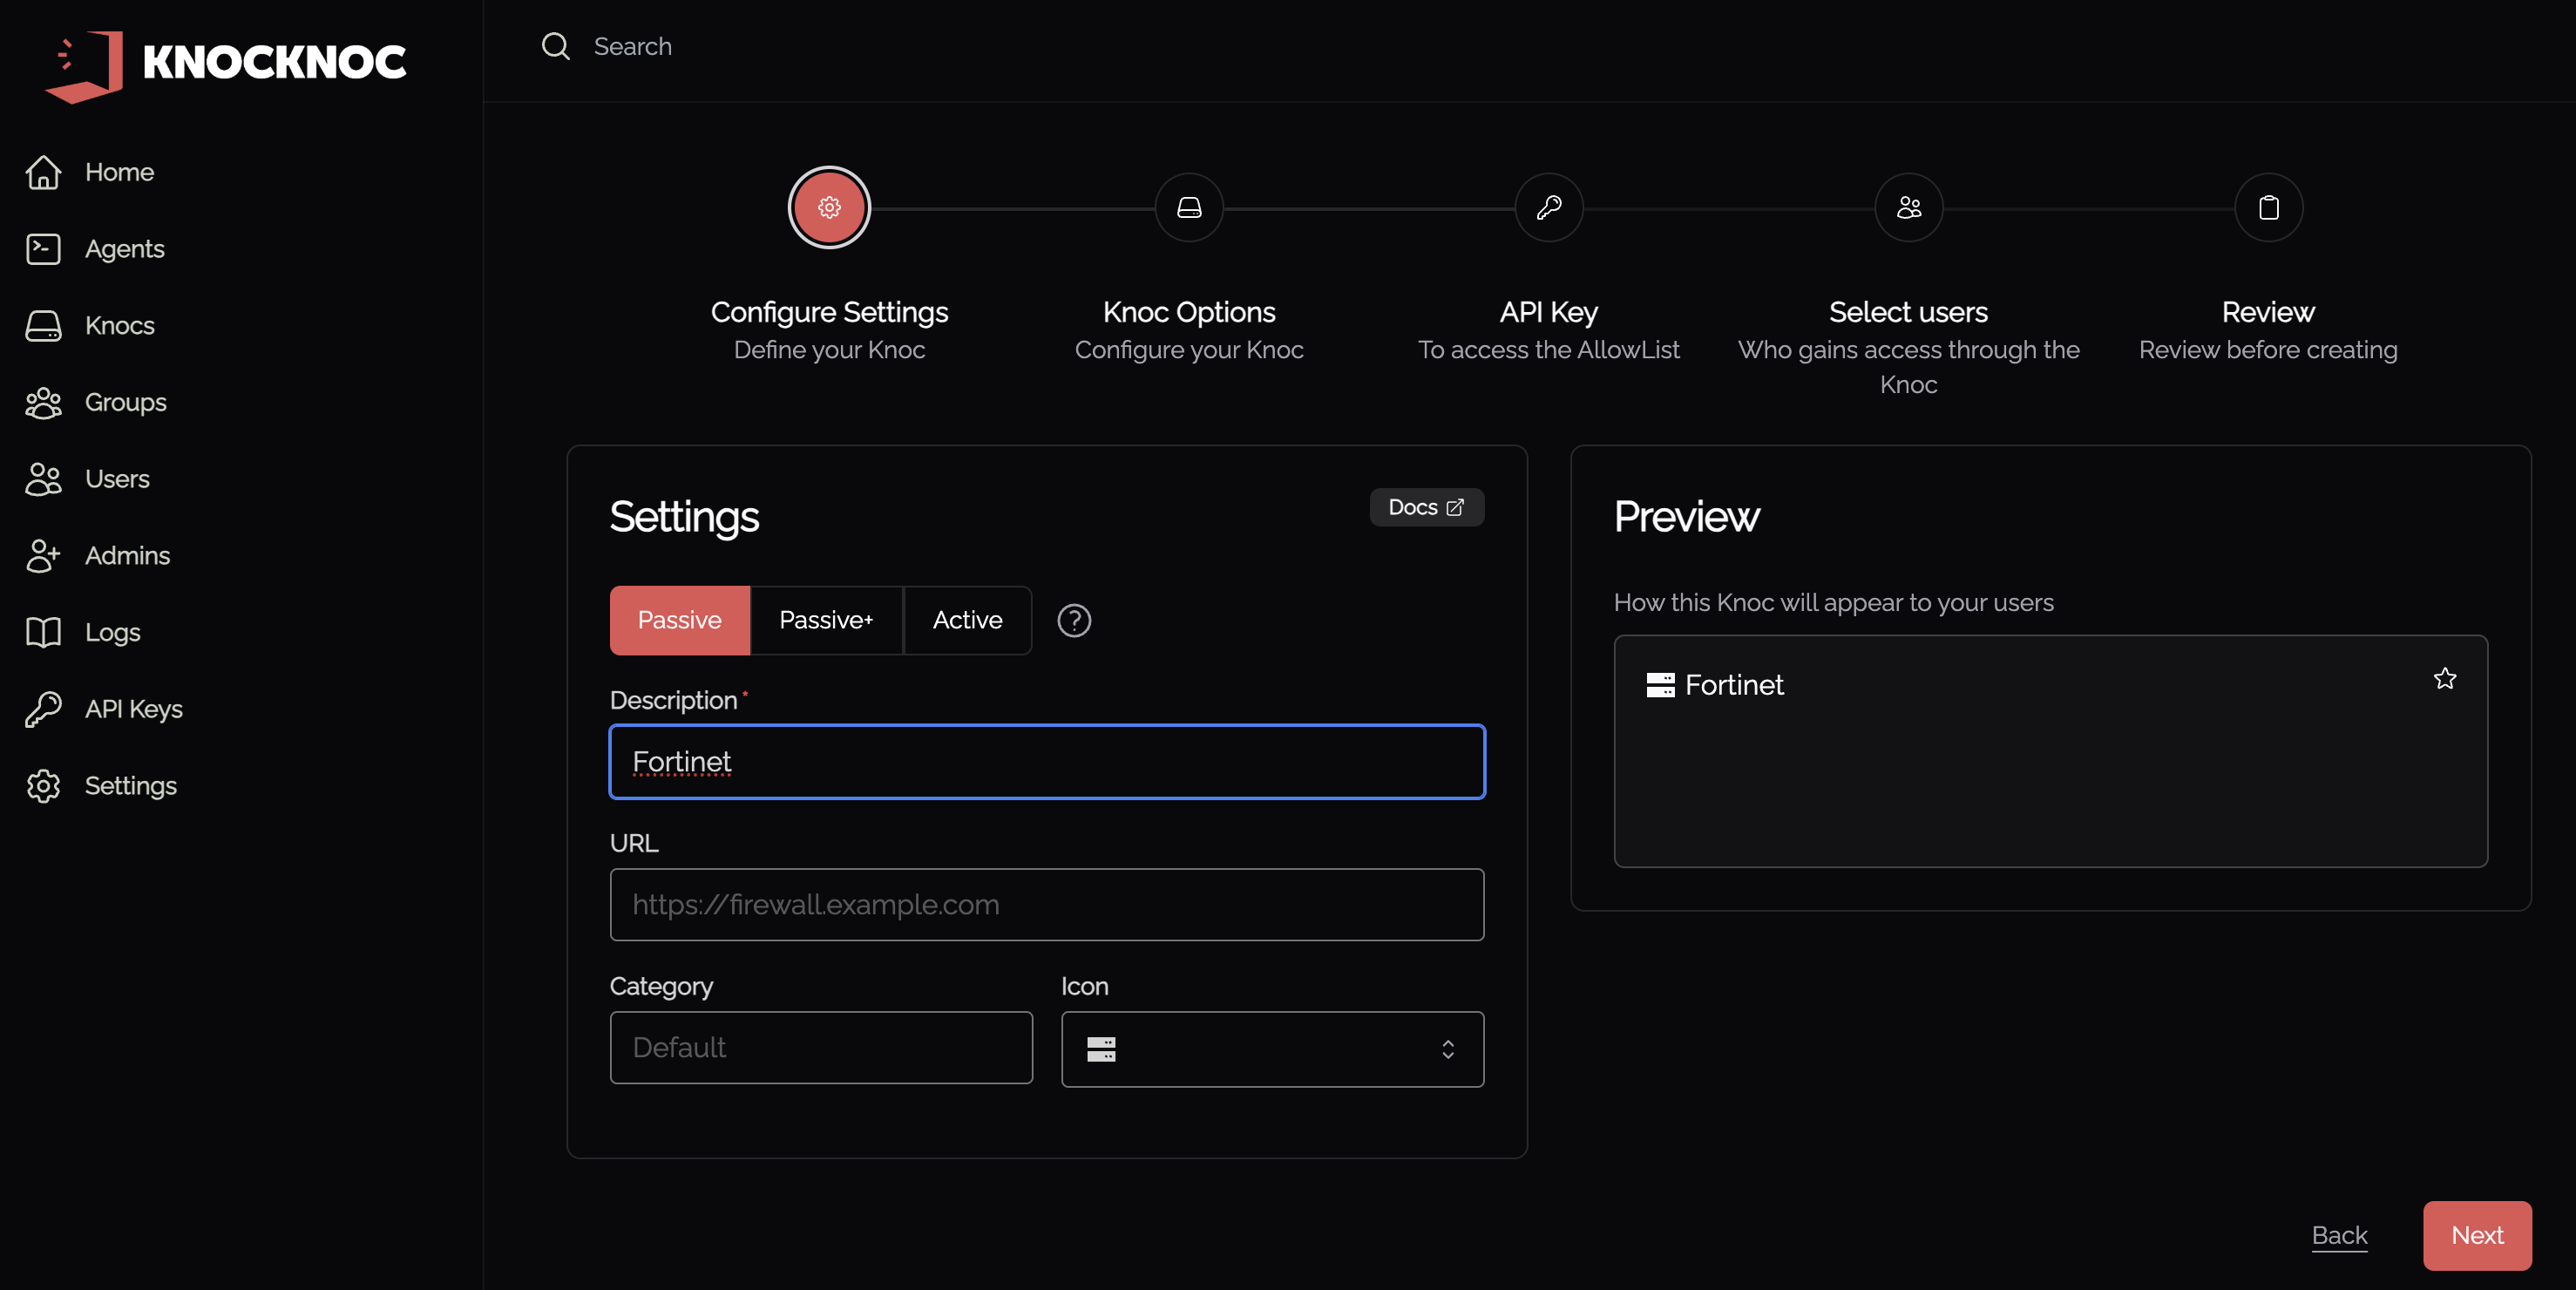
Step 1 - Knoc configuration
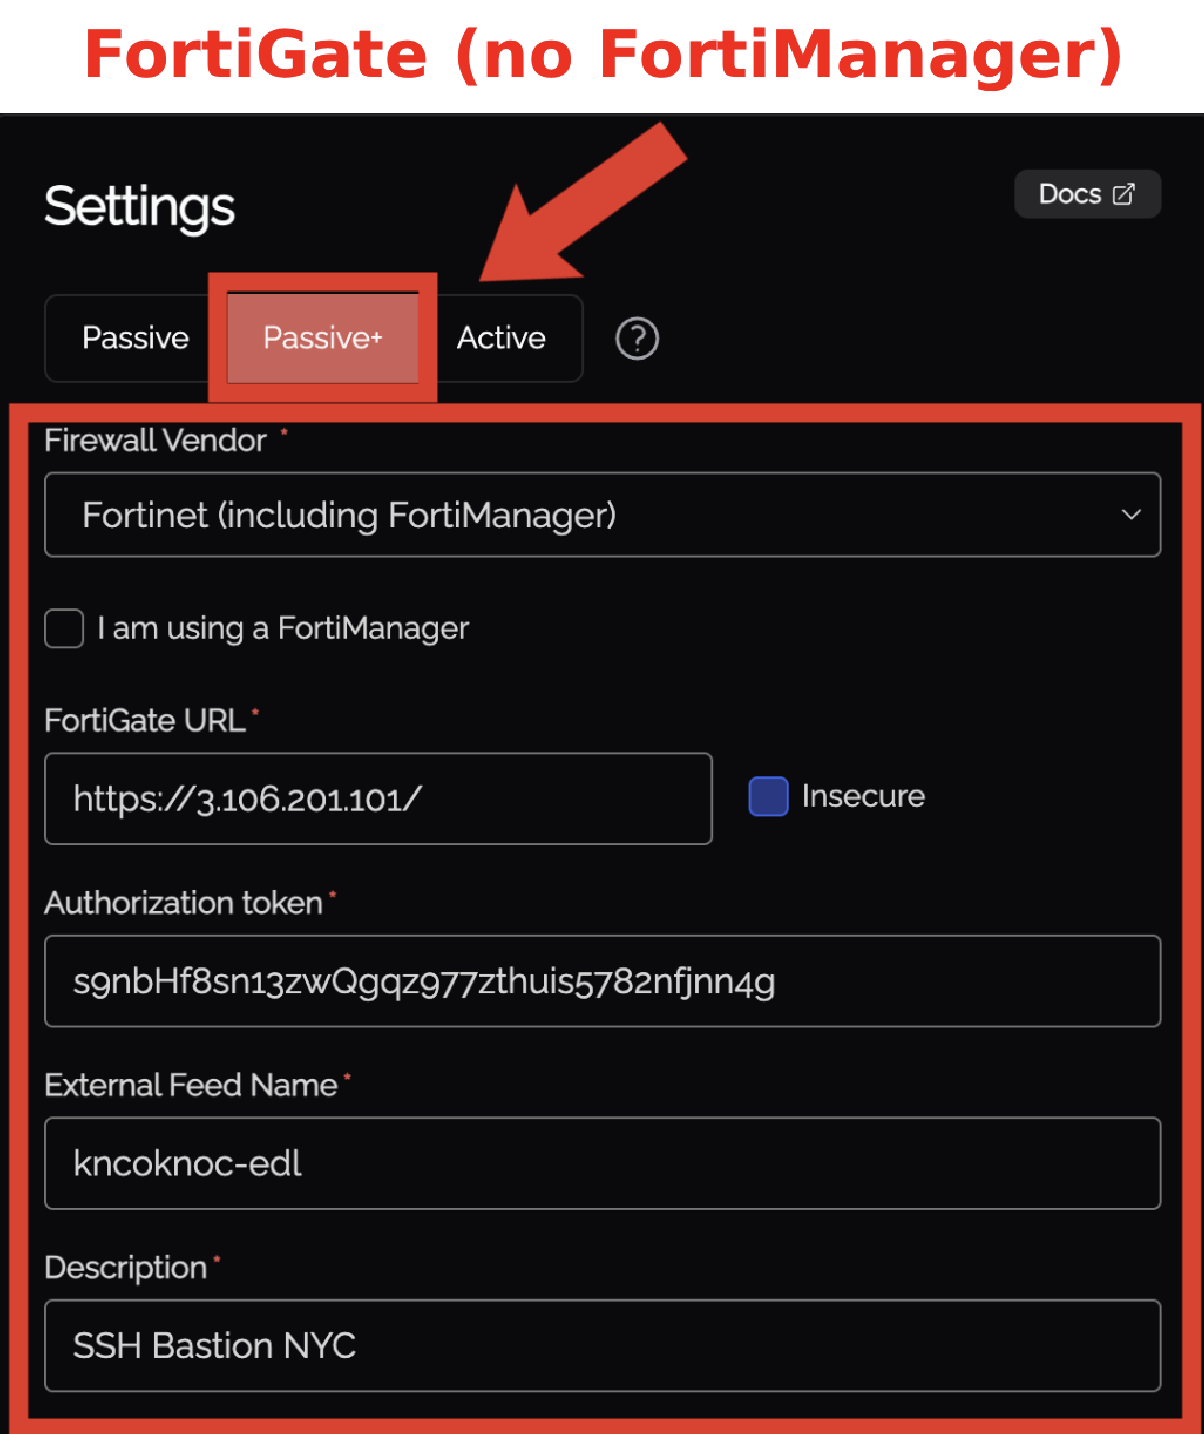
Select the "Firewalls / Appliances" Knoc configuration, selecting "Passive+"
-
Select the Firewalls / Appliances Knoc type
-
Choose Passive+ as the Application Type
-
Choose Fortinet as the Vendor
-
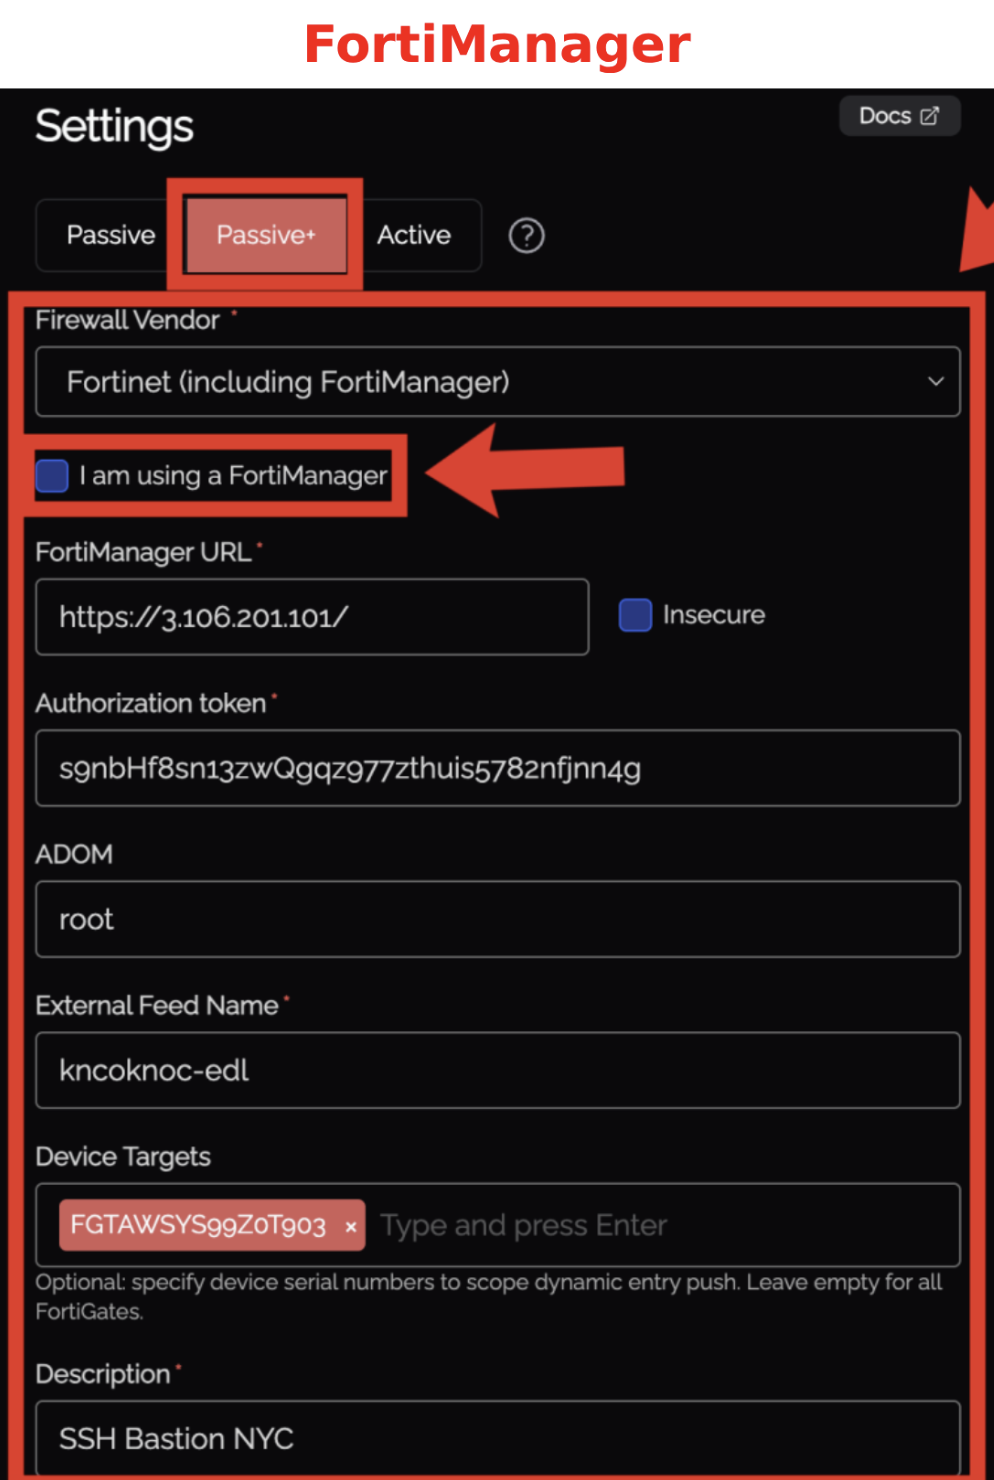
Set "I am using a FortiManager" correctly:
-
Checked = FortiManager managed
-
Unchecked = FortiGate
-

- Here's some context of what we're adding throughout this Passive+ option
| Field | Description |
|---|---|
| FortiGate URL / FortiManager URL | The URL of your device (e.g., https://fw.example.com or https://fmg.example.com) |
| Insecure | Check this if the TLS/SSL certificate is not signed by a trusted CA |
| Authorization token | The API key from the API user created in Step 3 |
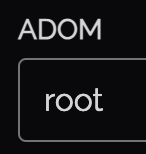
| ADOM | (FortiManager only) Leave blank to use root (default). Only set this if you are using multi‑ADOM mode. |
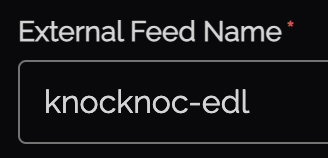
| External Connector Name | (Required) Must match the external resource name configured on the FortiGates in Step 4. |
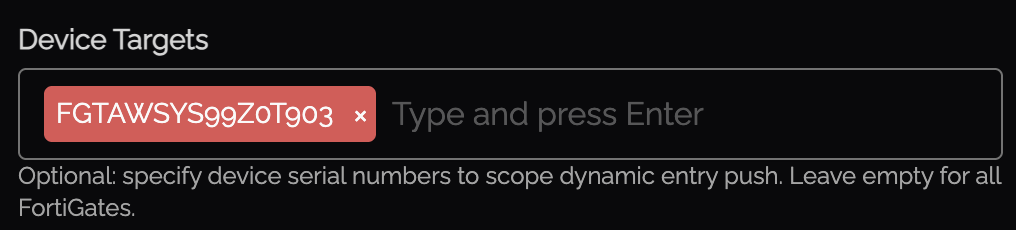
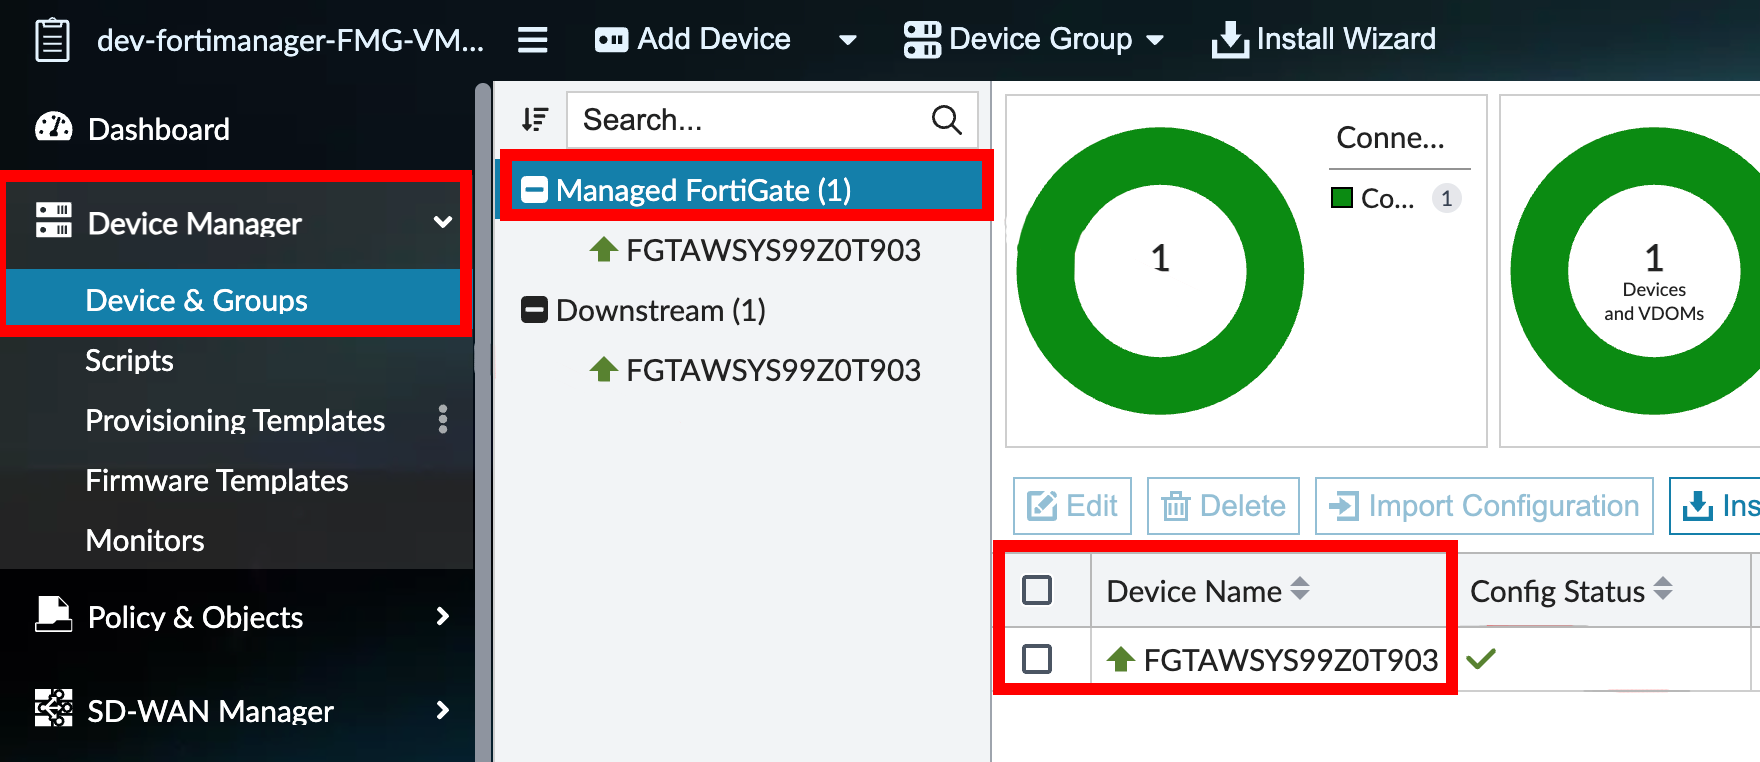
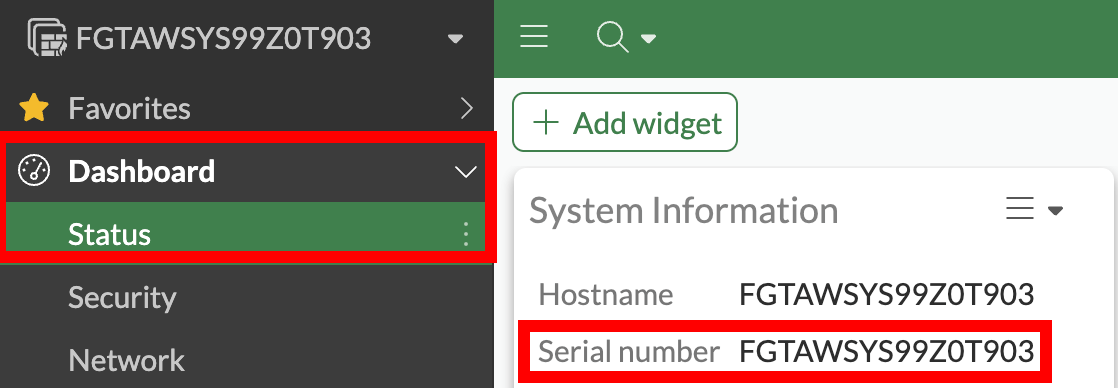
| Device Targets | (FortiManager only, Optional) Specific device serial numbers. If left empty, the push targets all FortiGates in the ADOM. |
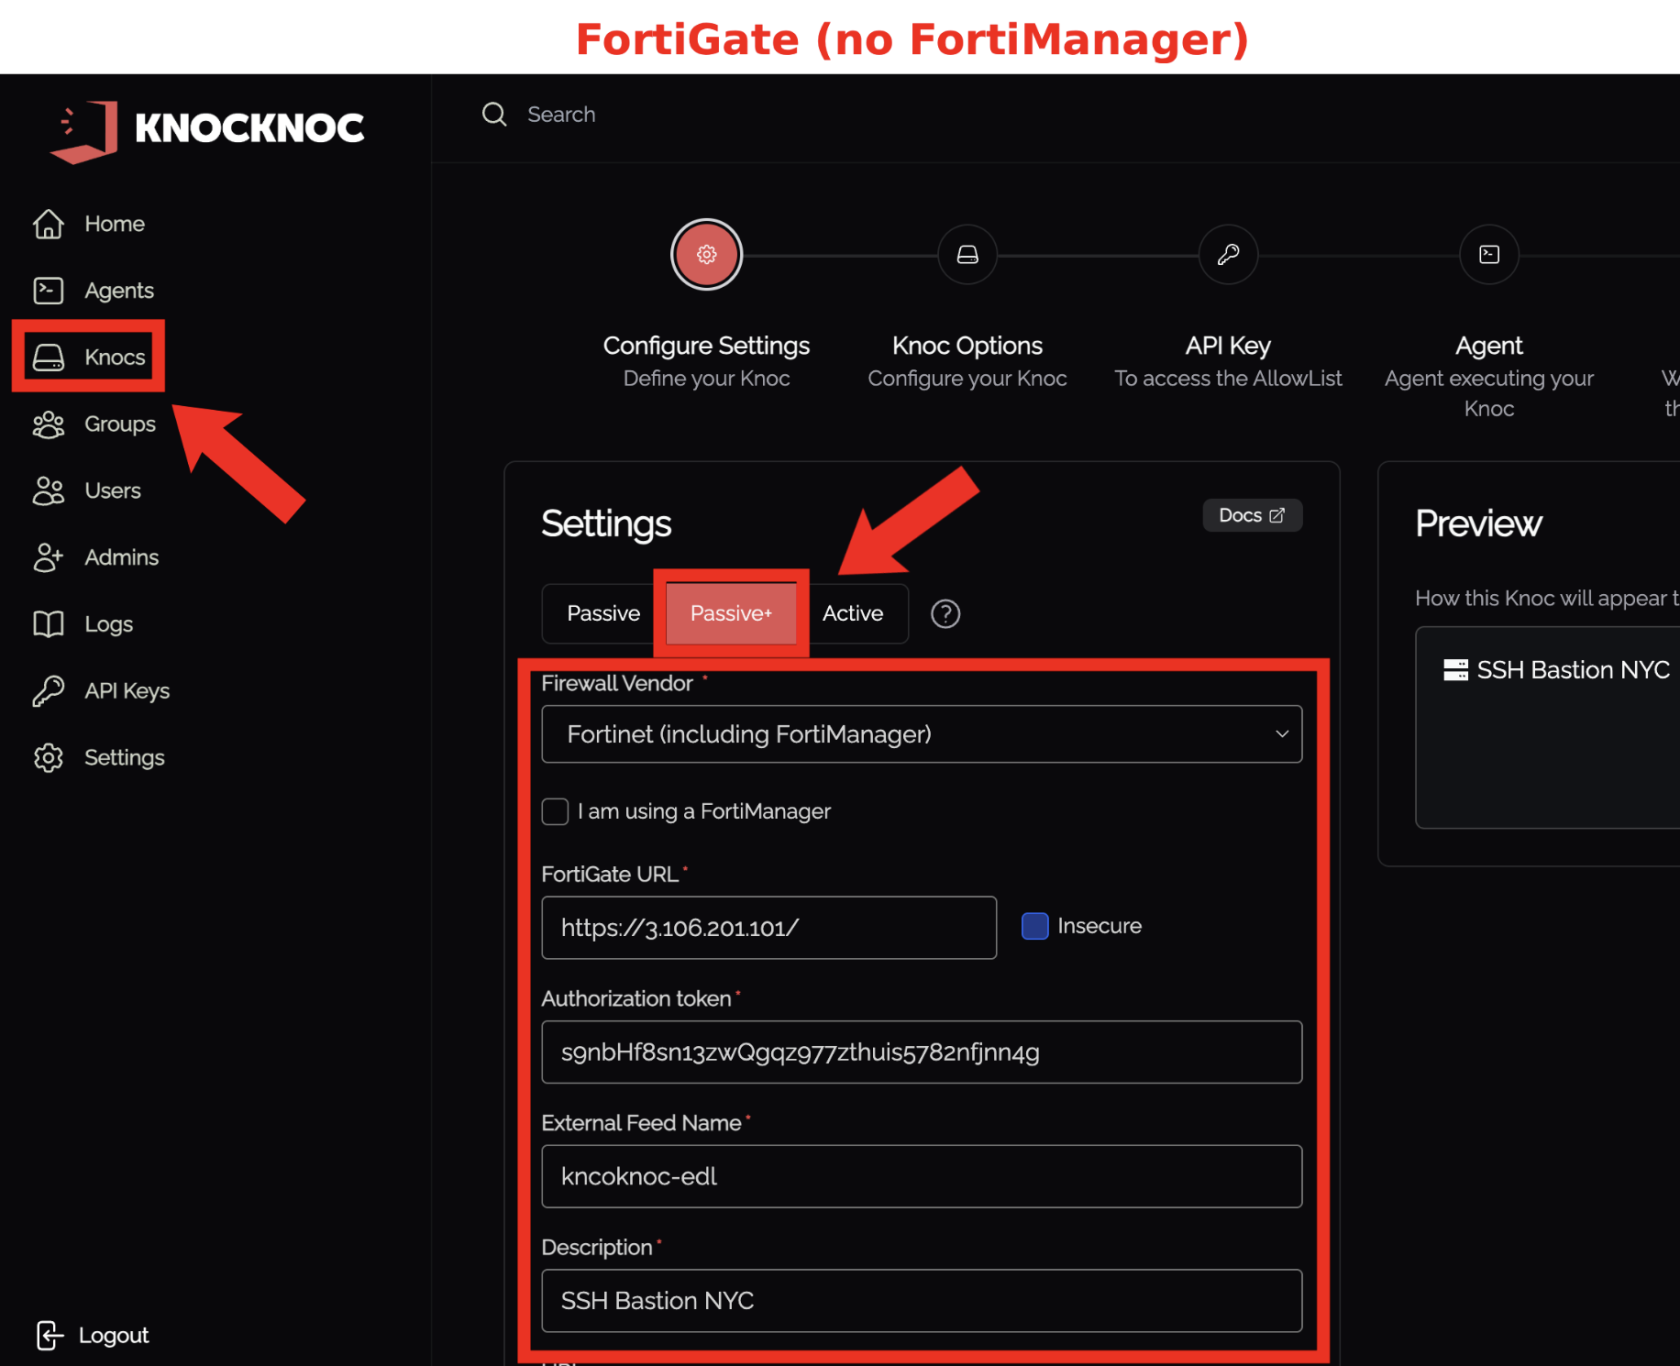
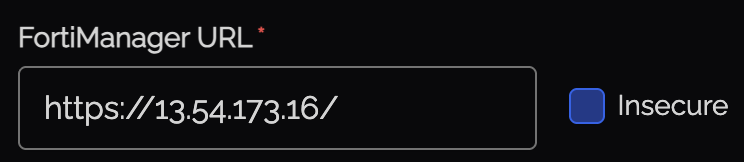
- We'll start off by grabbing our FortiGate URL / FortiManager URL's and adding one of them to the config
![]()


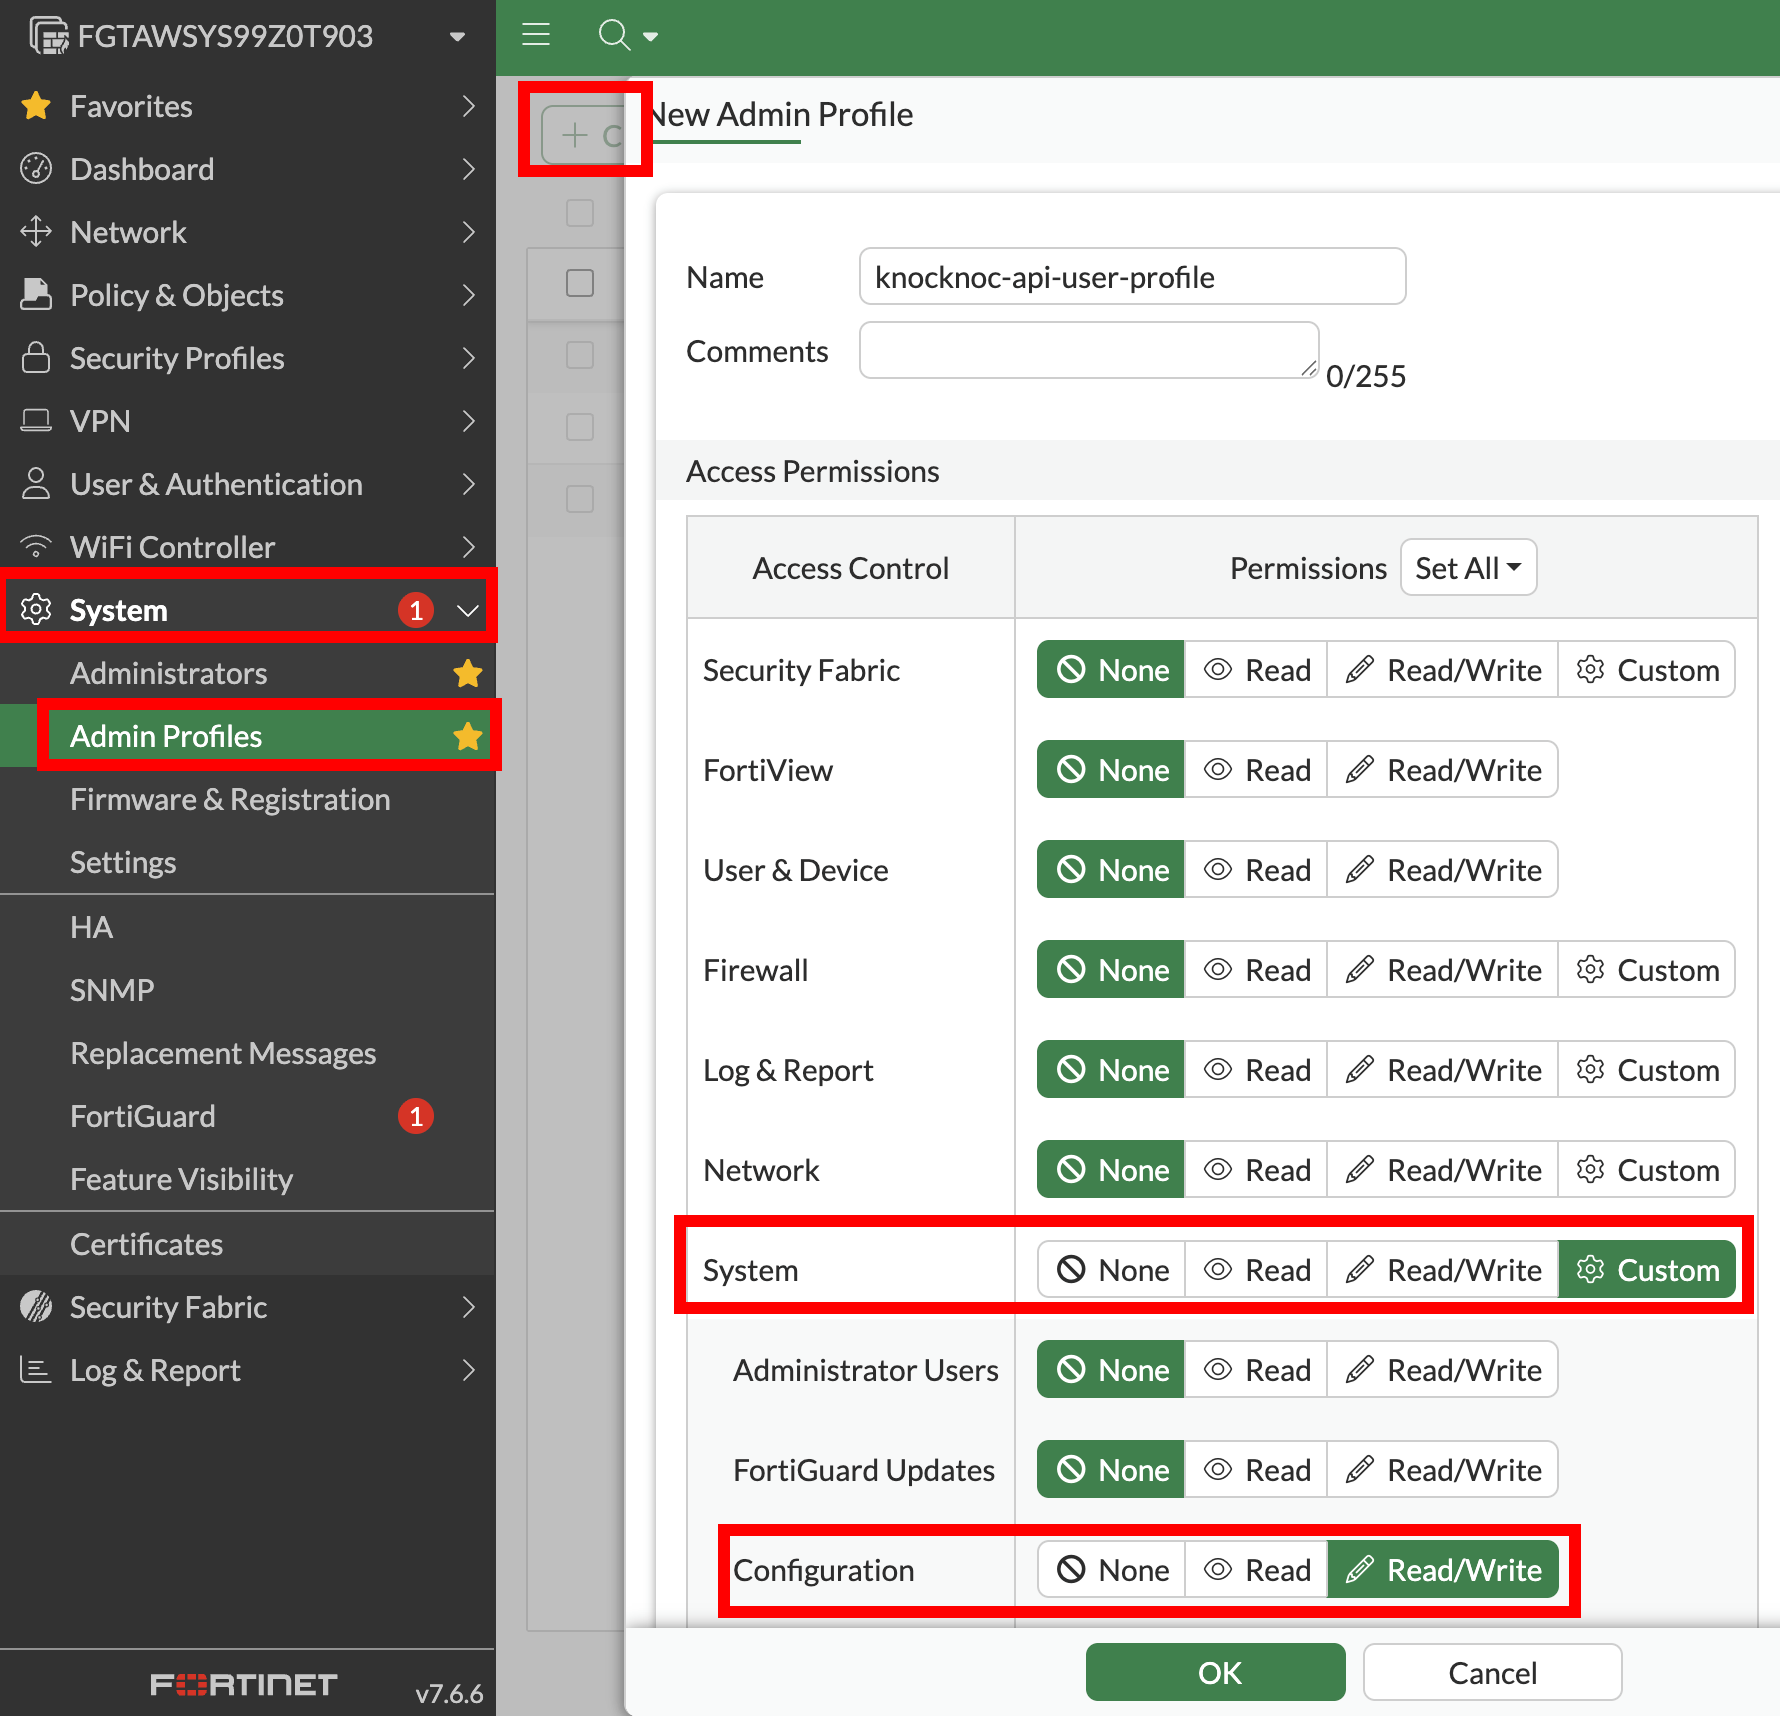
Step 2 - Create the Admin Profile
FortiGate (no FortiManager):
- Go to System > Admin Profile
- Select System, enable Read/Write.
- FortiManager: Create an Admin Profile with Read-Write on Device Manager, everything else can be set to 'none'
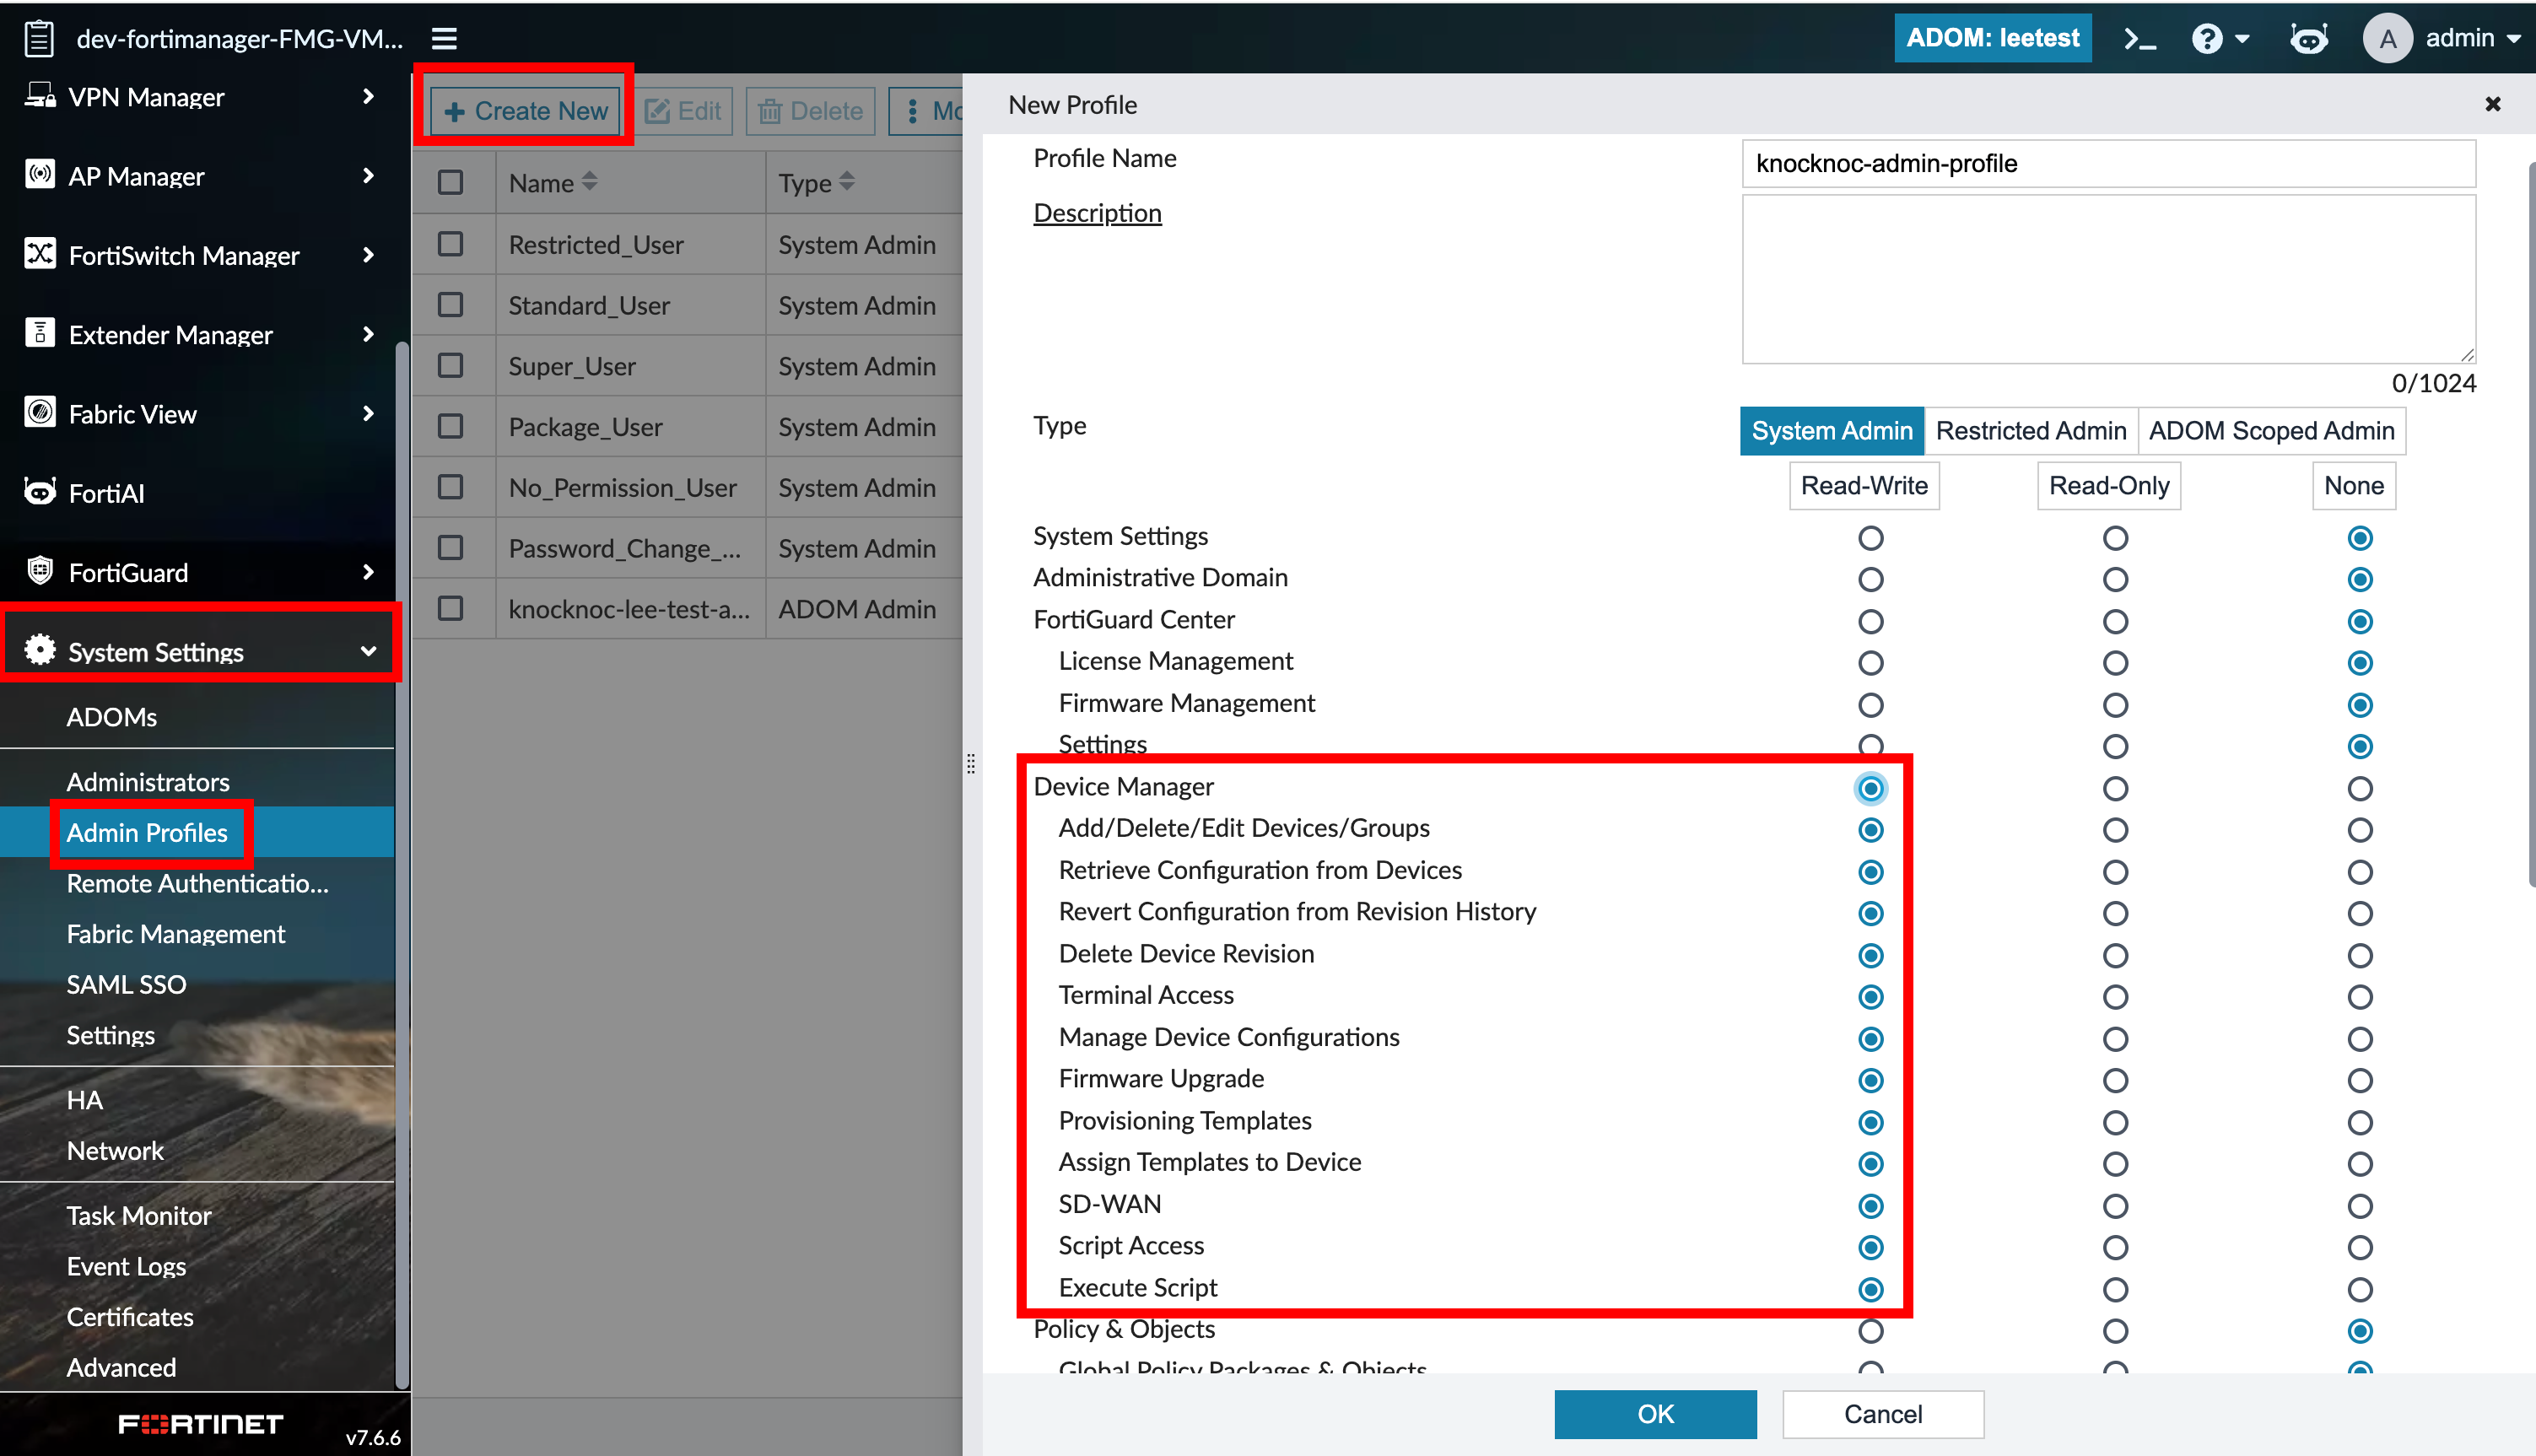
Step 3 - Create the API user
Create the API user for the Knocknoc Agent to utilize.
- FortiGate (no FortiManager): Create a FortiGate REST API user

- FortiManager: Create a FortiManager API Rest Admin (with your new Admin Profile, and Read-Write JSON API Access, and your agents IP in accordance to the FortiManager network connection to it (e.g. private / local IP vs public IP))
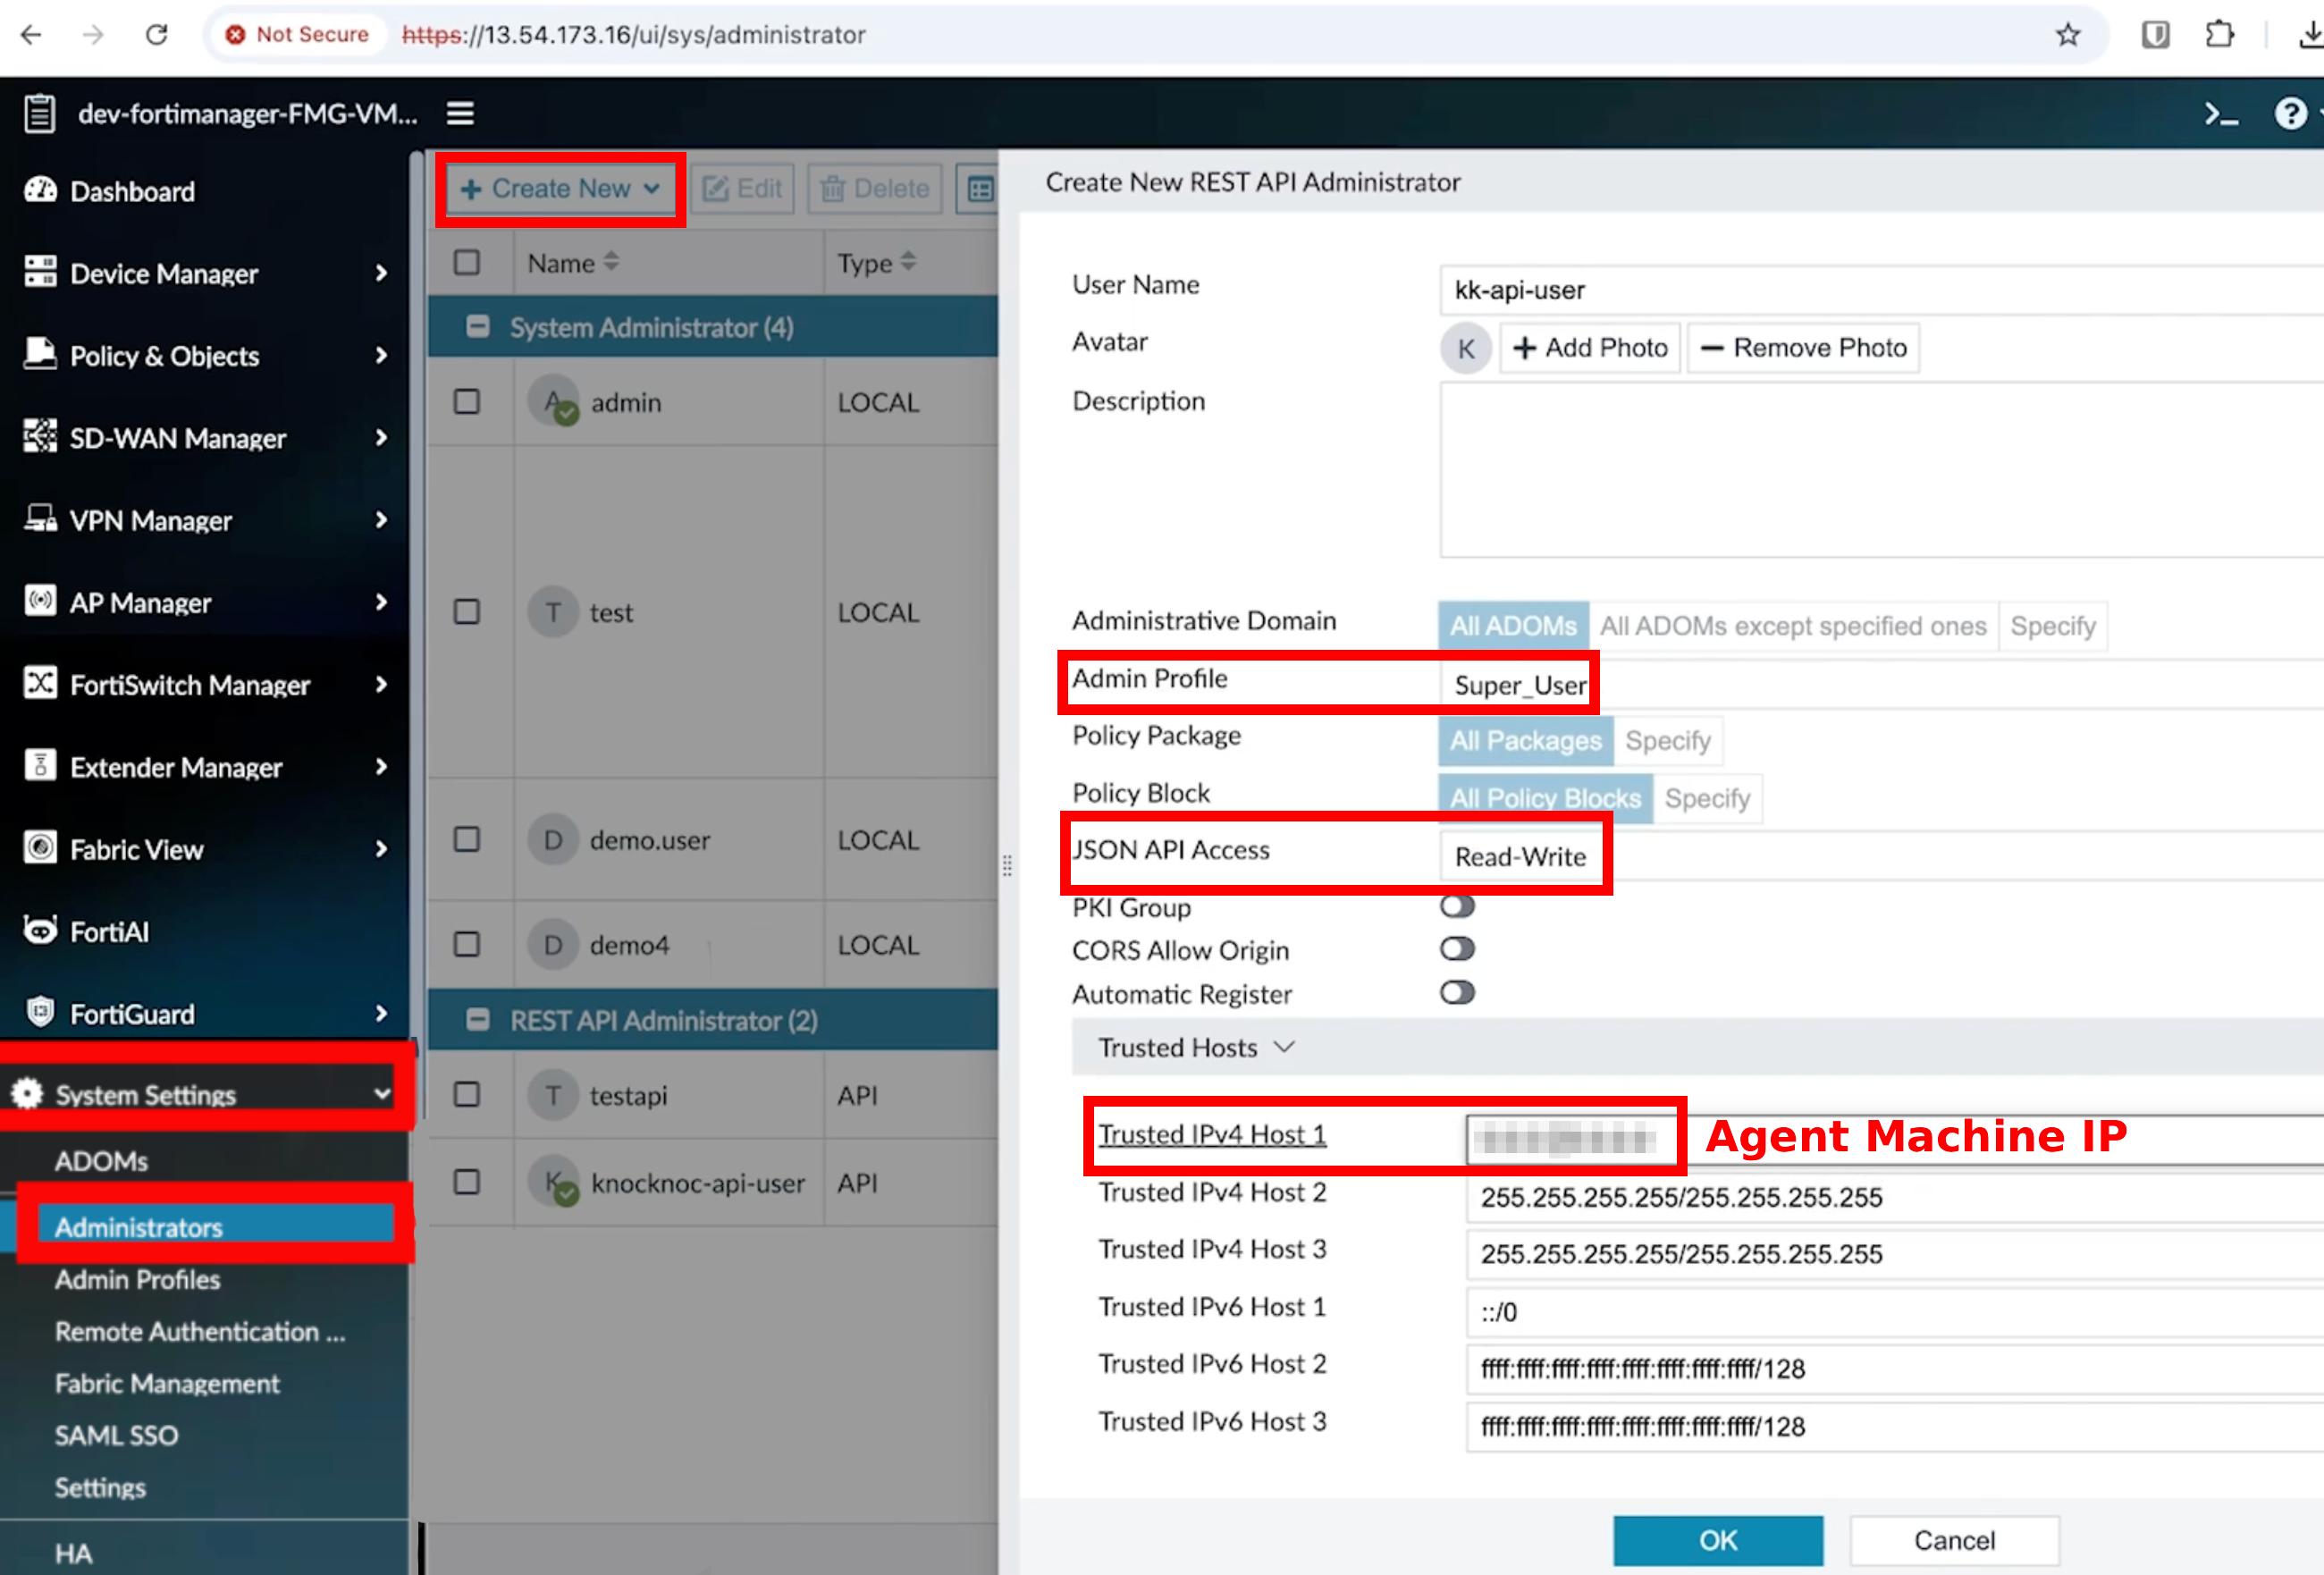
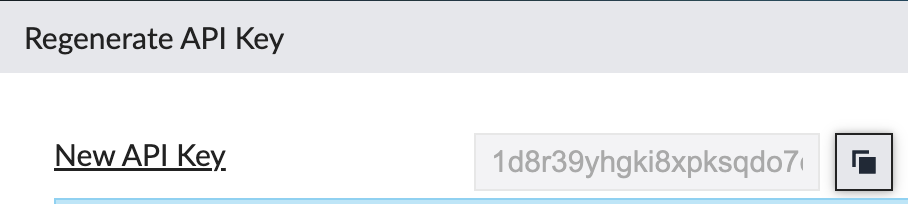
- Add the API User API key as the 'Authorization Token'

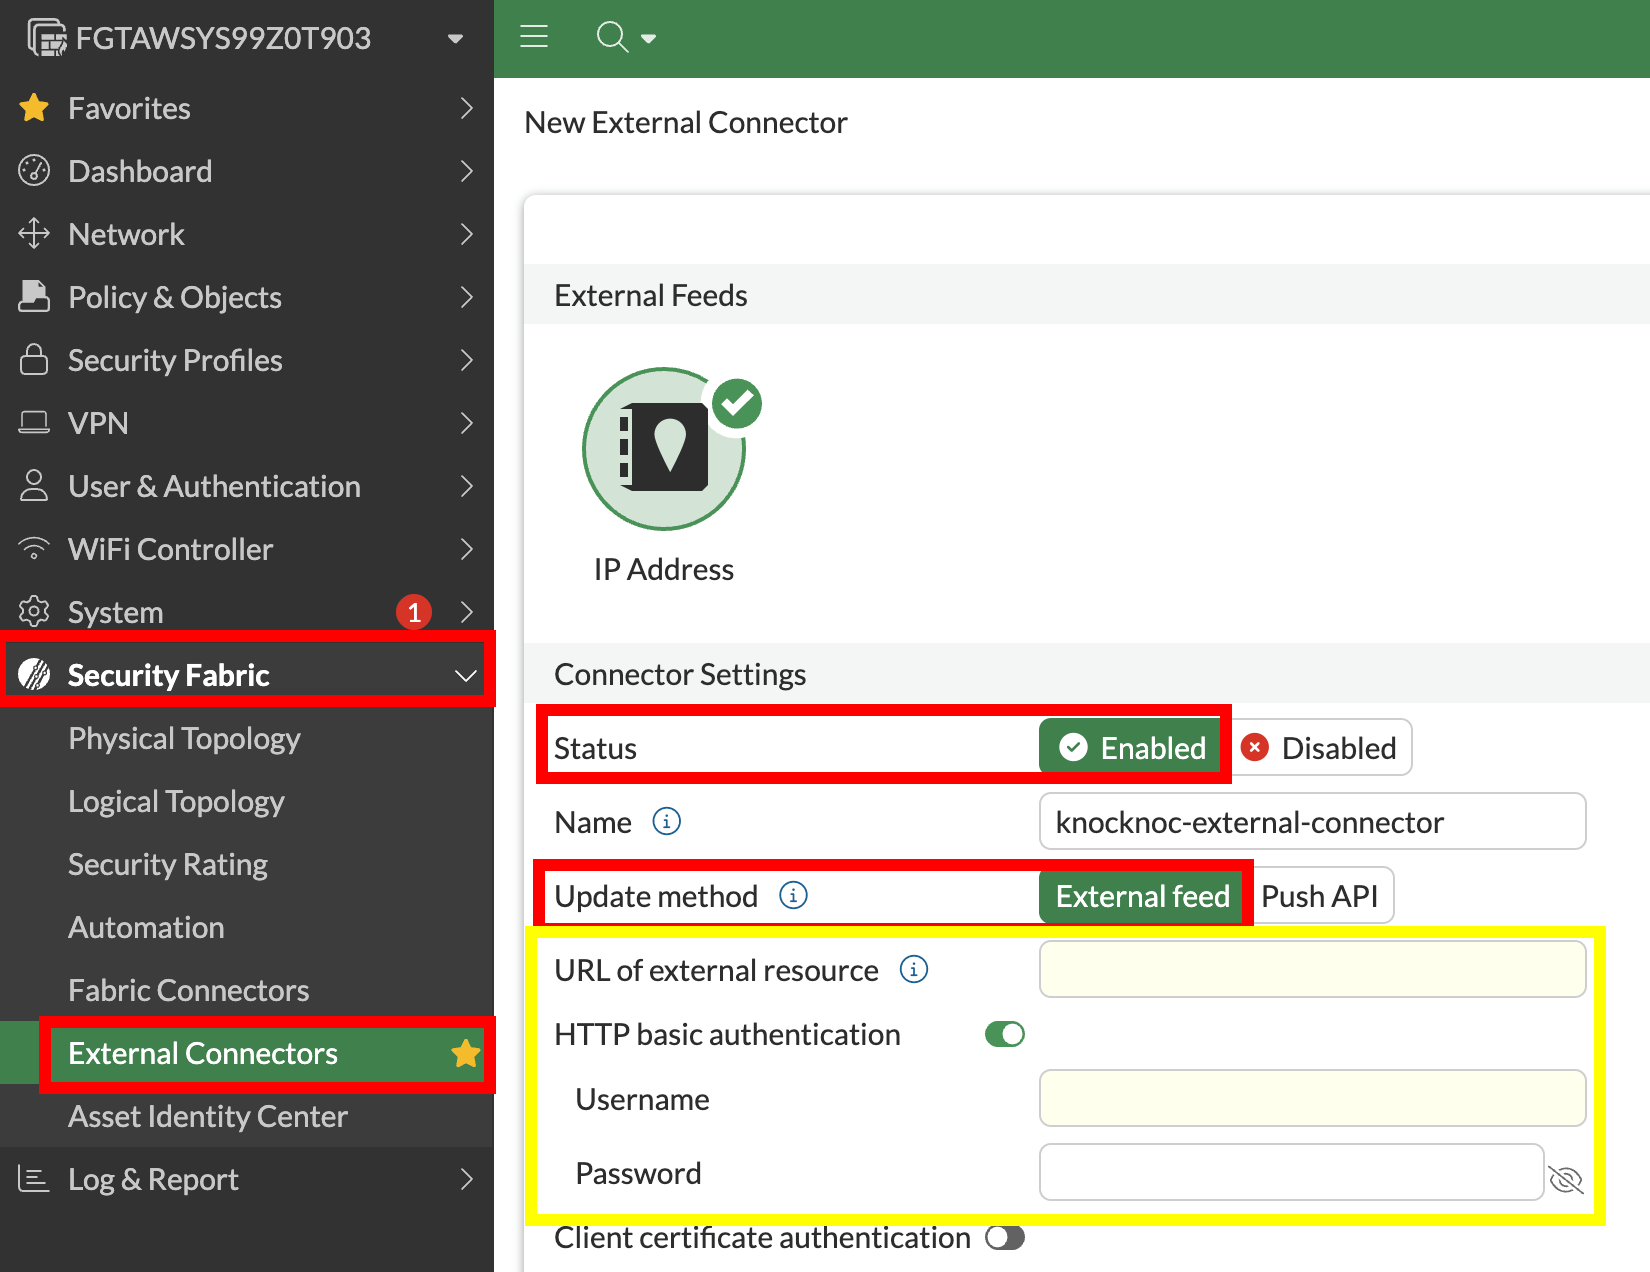
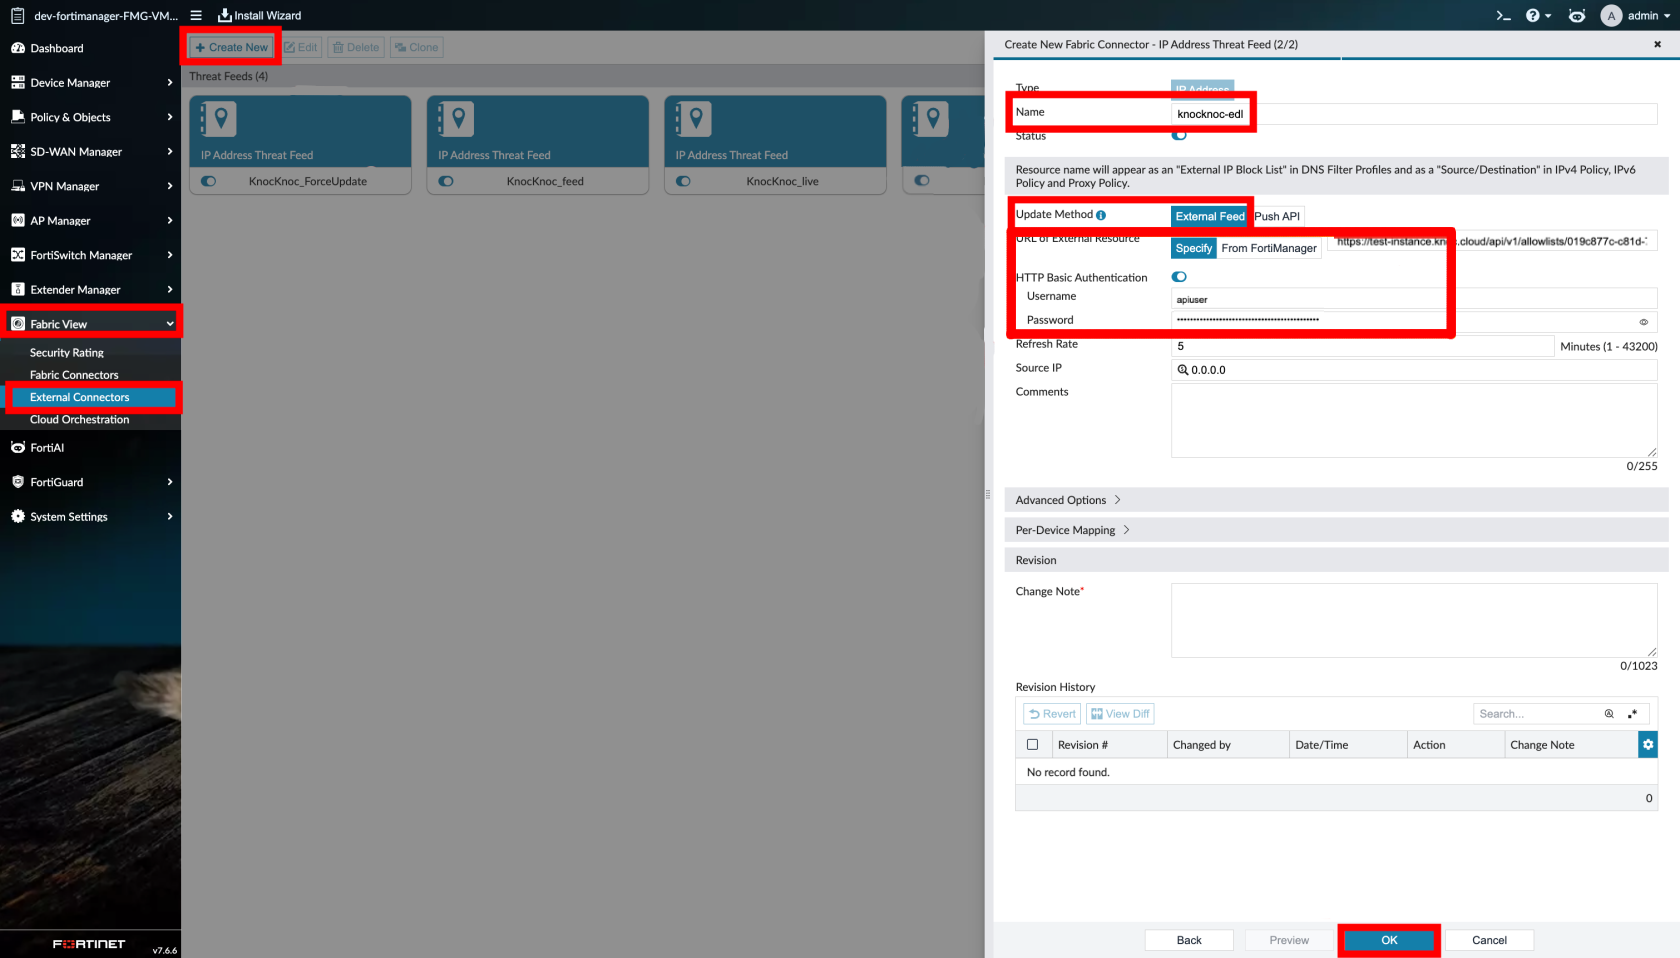
Step 4 - Configure external resource


- For FortiManager Only, add the ADOM
- For FortiManager only, add Device Targets you want to include

- For Both FortiGate / FortiManager, add a description

- All details should be filled out now
- Add any other option settings, then submit to get your External Connector details
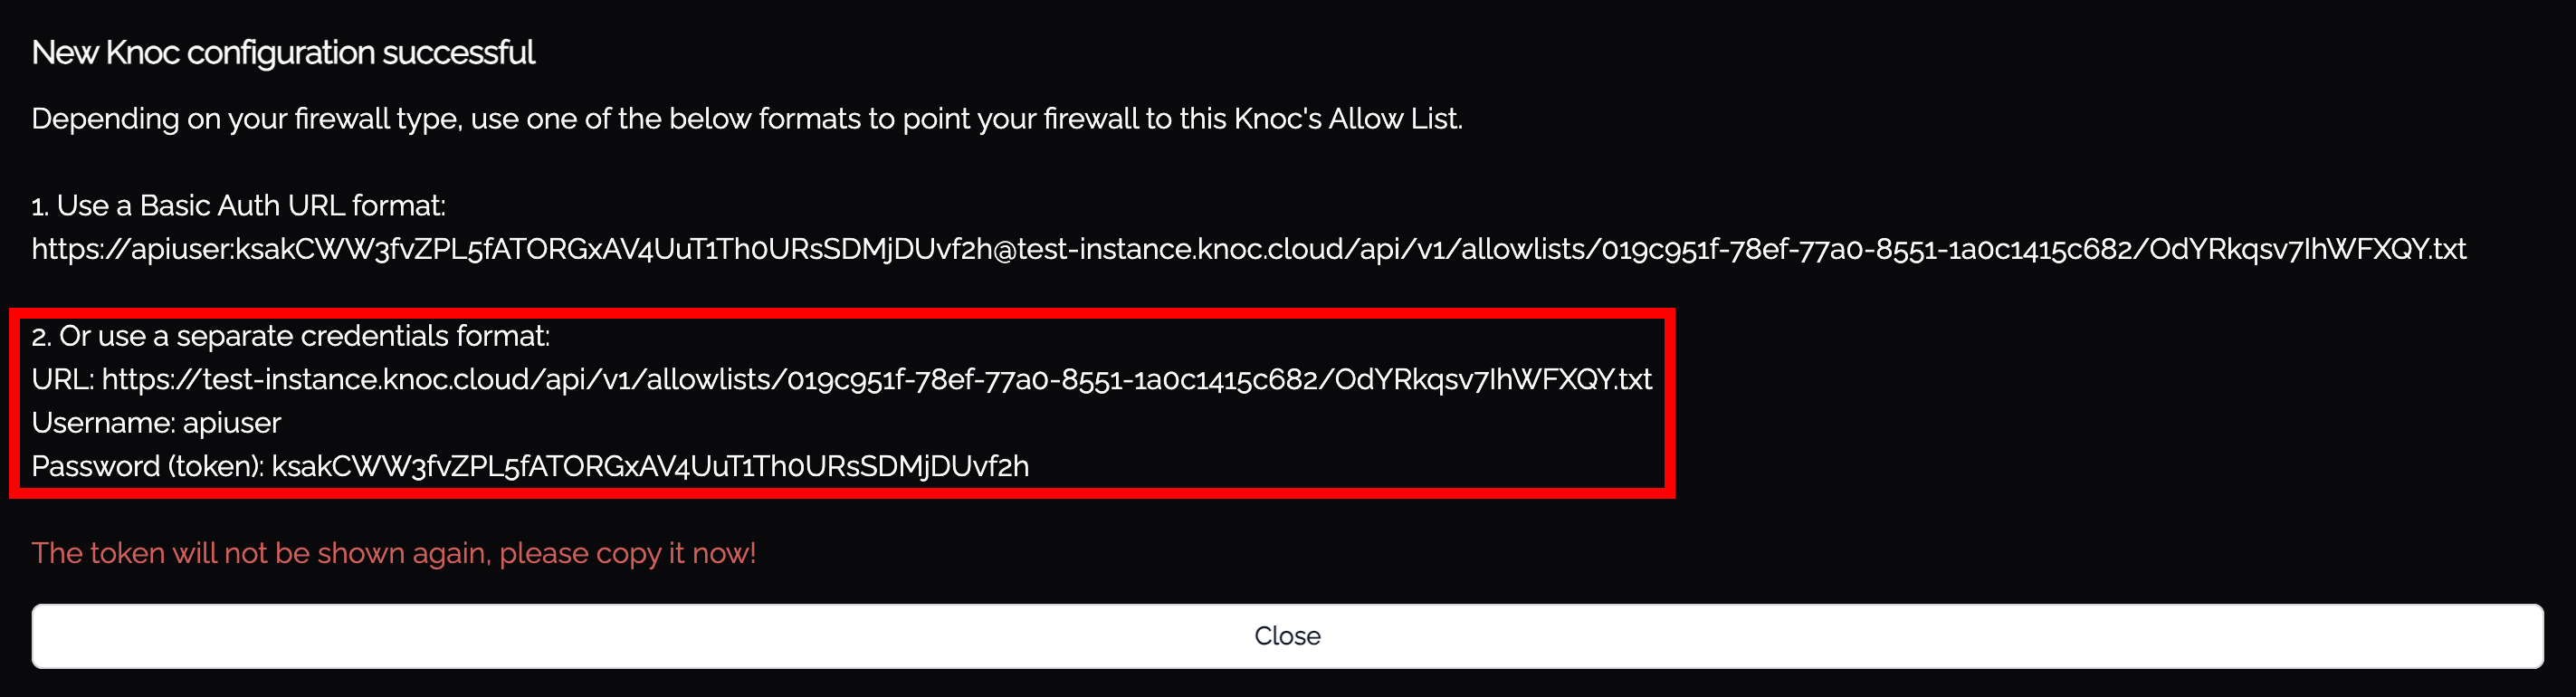
- Set the Resource URI to the Knocknoc URL provided
- Set the Username and Password (EDL Secret) under HTTP basic authentication


-
Set the polling interval - this is the fallback reconciliation interval; the dynamic push handles real‑time updates, so this does not need to be aggressive
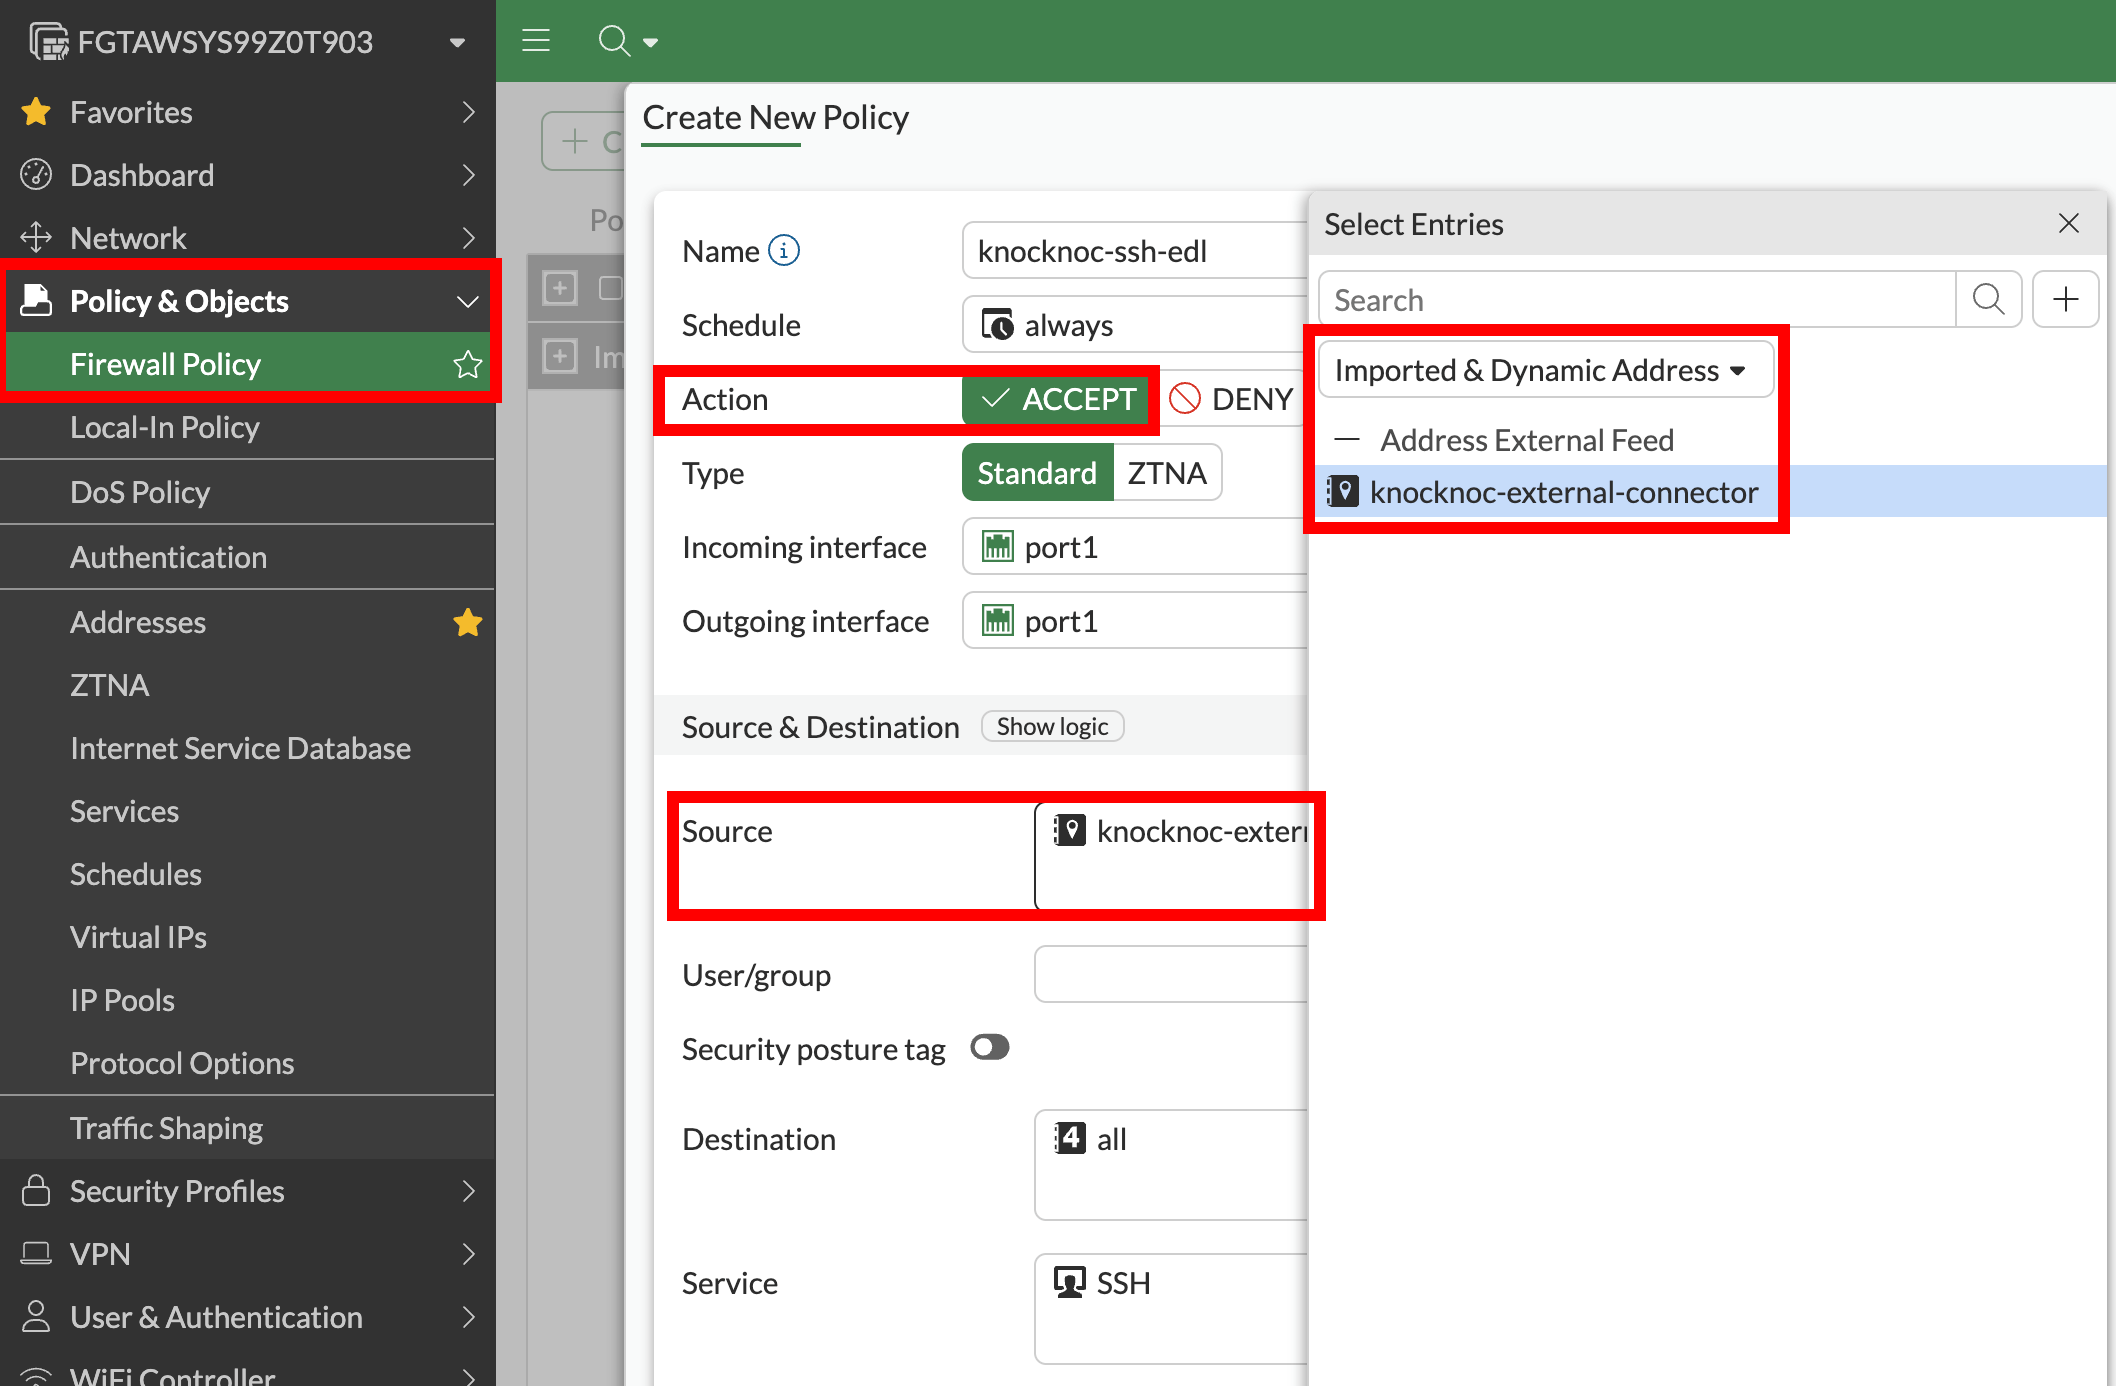
Step 5 - Create firewall policy (using external resource)
Create or edit a firewall policy:

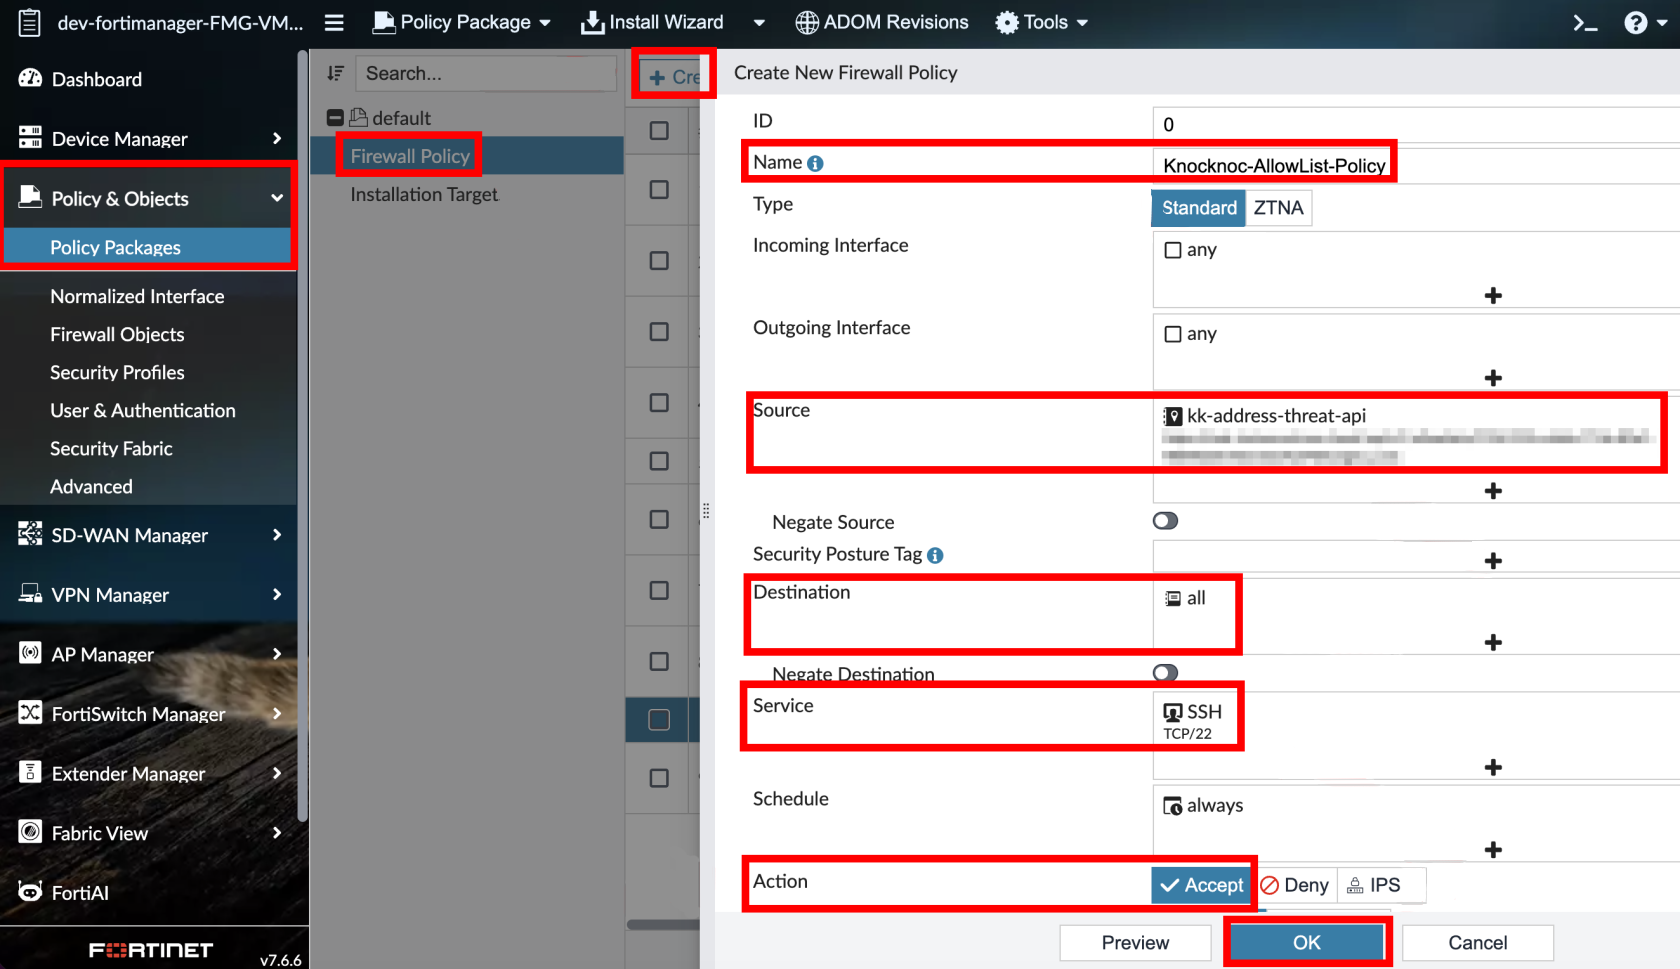
- In Source Address, select the external resource you created
- Configure destination, service, and action as appropriate
- Enable/save (FortiGate)
- Commit and push (FortiManager)
Instructions below are for FortiManager only

Step 6 - Testing
-
Log in as a test user
-
The user’s IP address should appear on the FortiGate(s) within 1-2 seconds
-
Verify the firewall policy permits traffic from the user’s IP
-
On logout or grant expiry, the IP is removed and access is revoked
Passive+ Checklist
Your Knoc has the correct settings:
- ✅ "I am using a FortiManager" is set correctly
- ✅ (FortiManager) ADOM and Device Targets are set if needed
Your allowlist details are correct:
- ✅ You noted the allowlist URL
- ✅ You created/selected the allowlist secret
- ✅ Credentials use the separate credentials format (not embedded in the URL)
- ✅ You have IP address restrictions that match the source firewall. Note the firewalls connect to Knocknoc, not the FortiManager (Trusted Hosts)
Your FortiGate external resource is correct:
- ✅ External Feed points to the allowlist URL
- ✅ Credentials match the allowlist secret
- ✅ External resource name exactly matches External Feed Name in the Knoc
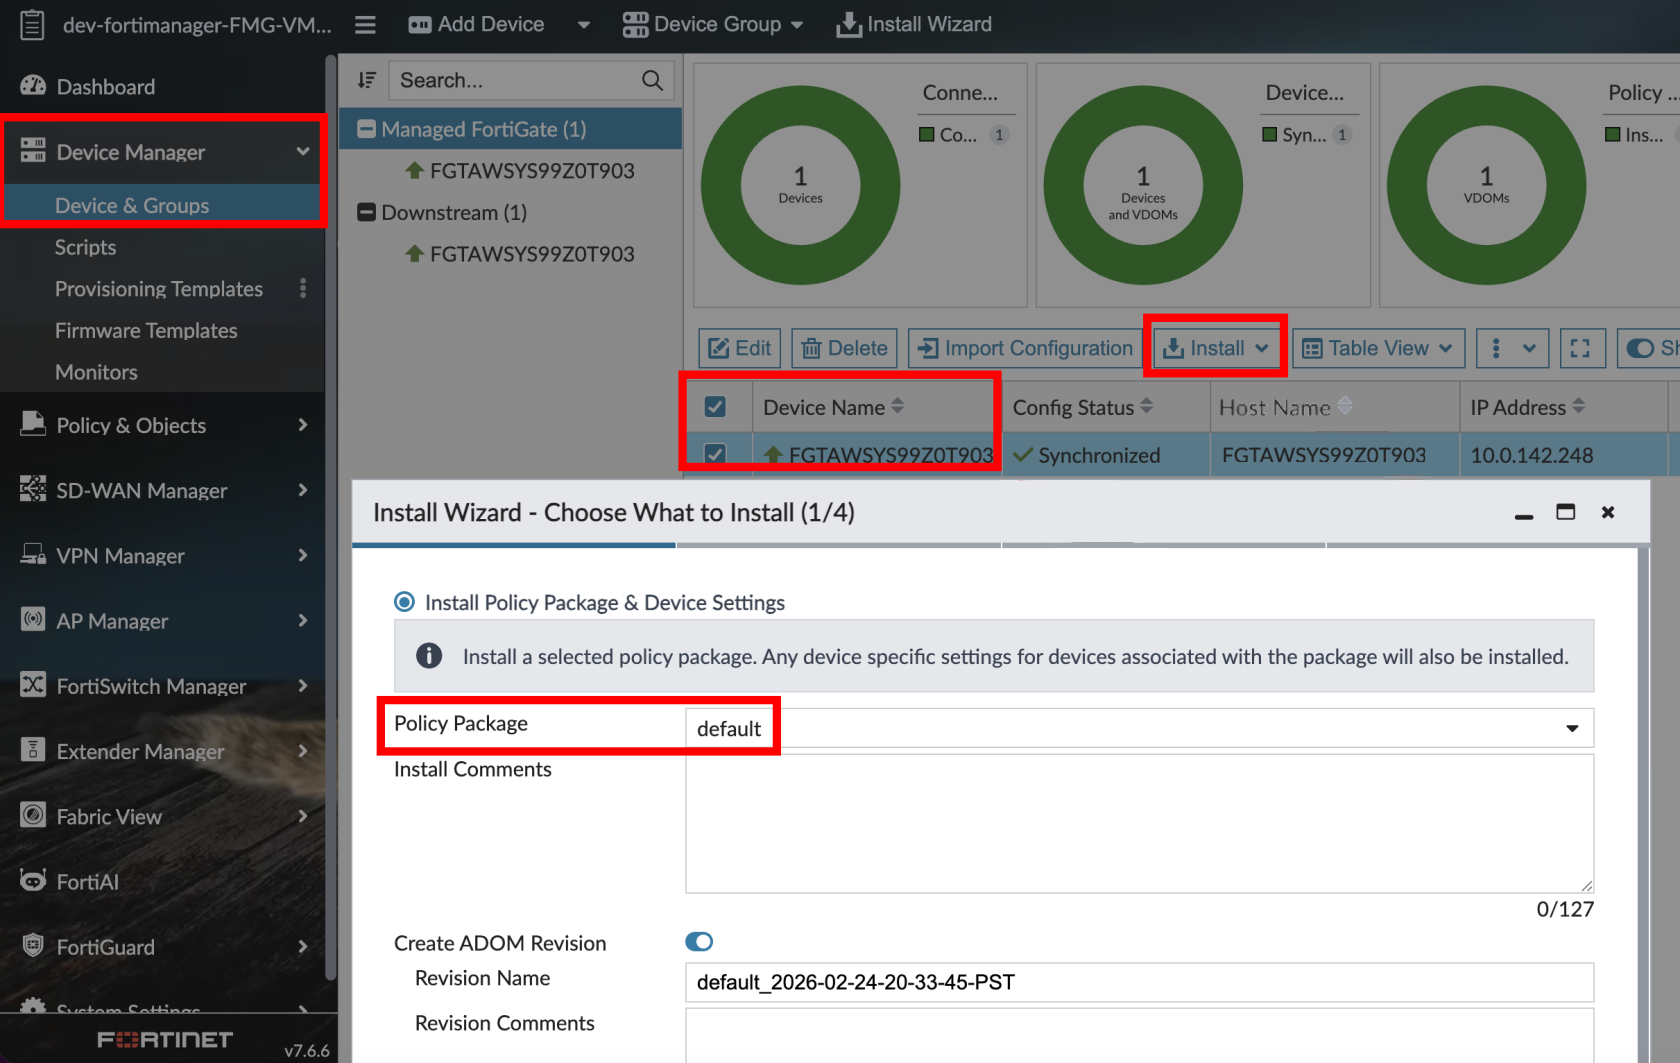
- ✅ (FortiManager) External resource was created in FortiManager and pushed to FortiGates via Install Wizard
Your policy is correct:
- ✅ Firewall policy references the external resource
- ✅ Incoming and outgoing interfaces reflect the actual traffic path
- ✅ Policy is enabled
- ✅ (FortiManager) Policy package has been pushed to FortiGates
Your push path is correct:
- ✅ Agent can reach FortiGate or FortiManager
- ✅ Device API user exists and is IP-restricted to the agent (not the end user)
- ✅ API user has correct permissions:
- FortiGate: System > Configuration (Custom) Read/Write
- FortiManager (GUI): Device-Manager perms profile
- JSON API Access: Read / Write
- ✅ Minimum permissions are used (where possible)
Your testing is verified:
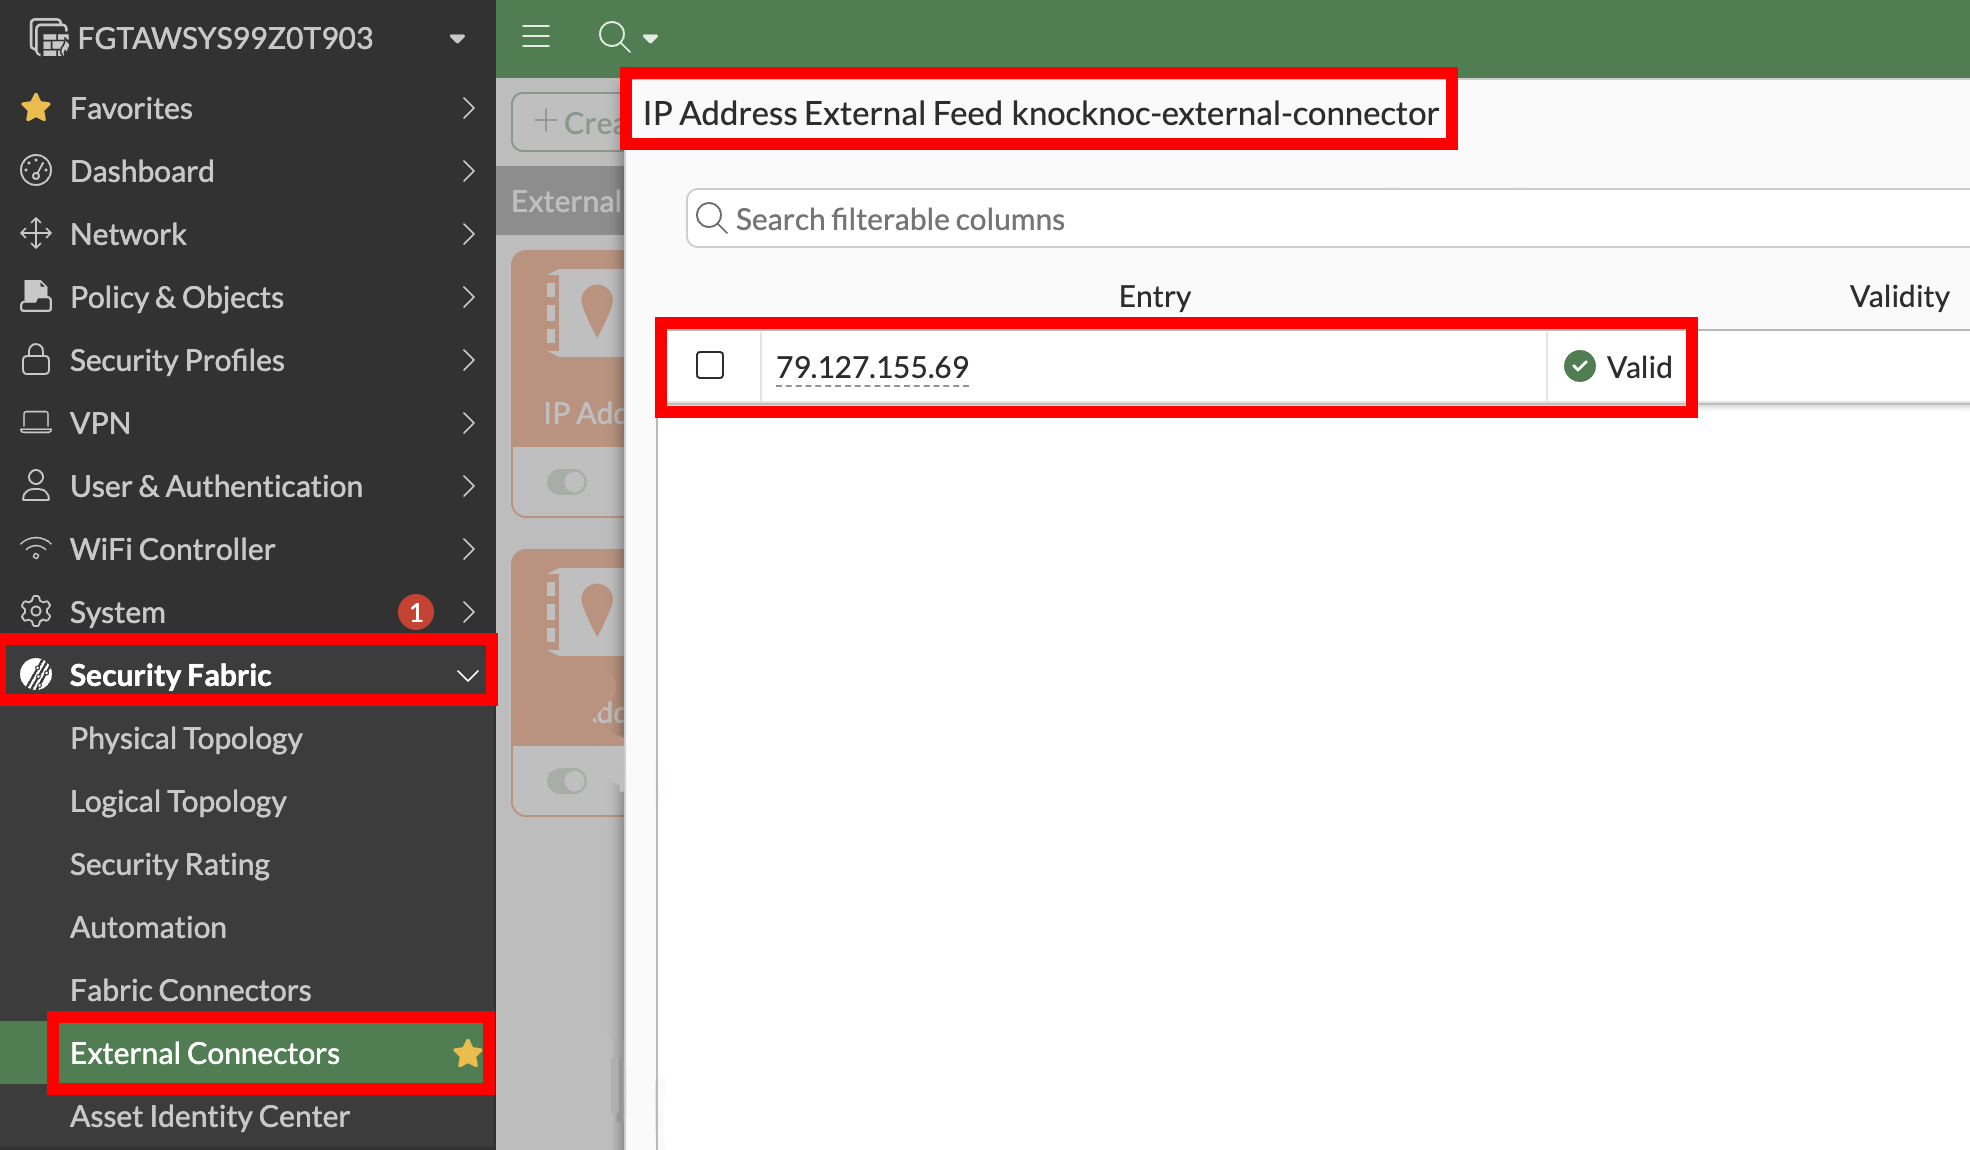
- ✅ External Connector entries appear under Security Fabric > External Connectors on the FortiGate (not under Policy & Objects > Addresses)
Option 3 - Trusted Hosts (weak protection)
Deploy an Orchestration Agent
Passive+ and Active require an Orchestration Agent to be deployed. This interacts with the Fortinet/Fortimanager device after obtaining instructions from the Knocknoc Server via an outbound subscription to the server. This should be deployed before following the below process. This Agent can be re-used for multiple configurations and devices. Read more here.
Step 1 - Create the Knoc in Knocknoc (Active)
- Select the Firewalls / Appliances Knoc type, choosing "Active"
- FortiManager (Trusted Hosts): Add FortiManager URL, Insecure (if needed)

- Here's some context of what we're adding throughout this Active option
| Field | Description |
|---|---|
| FortiGate / FortiManager URL | The URL of your device (e.g., https://fw.example.com or https://fmg.example.com) |
| Insecure | Check if the certificate is not signed by a trusted CA |
| Authorization token | The API key from the API user (Step 3) |
| Address group | (FortiGate only) Must match the address group name exactly |
| Prefix | (FortiGate only) Prefix for address object names (default: kk_) |
| VDOM | (FortiGate only) Optional (blank = root) |
- We'll start off by grabbing our FortiManager URL's and adding one of them to the config
Step 2 - Create the API admin
-
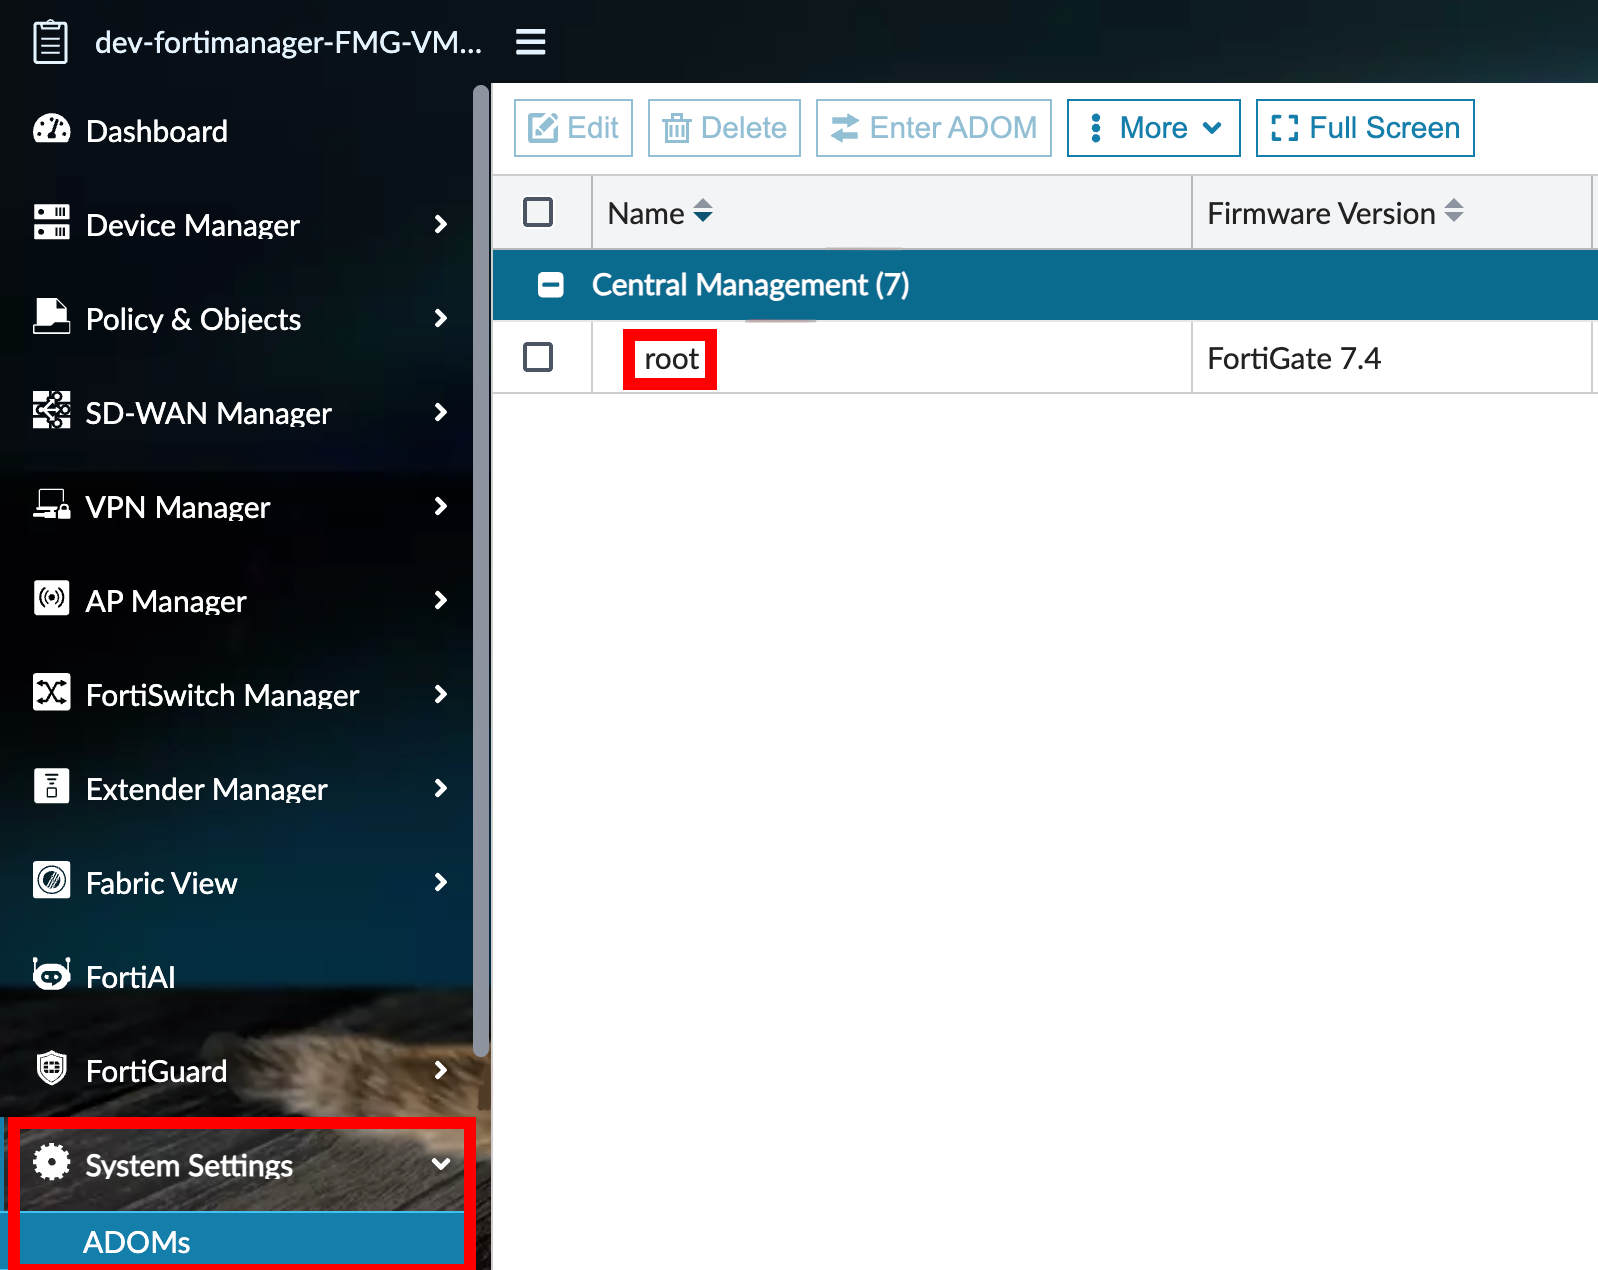
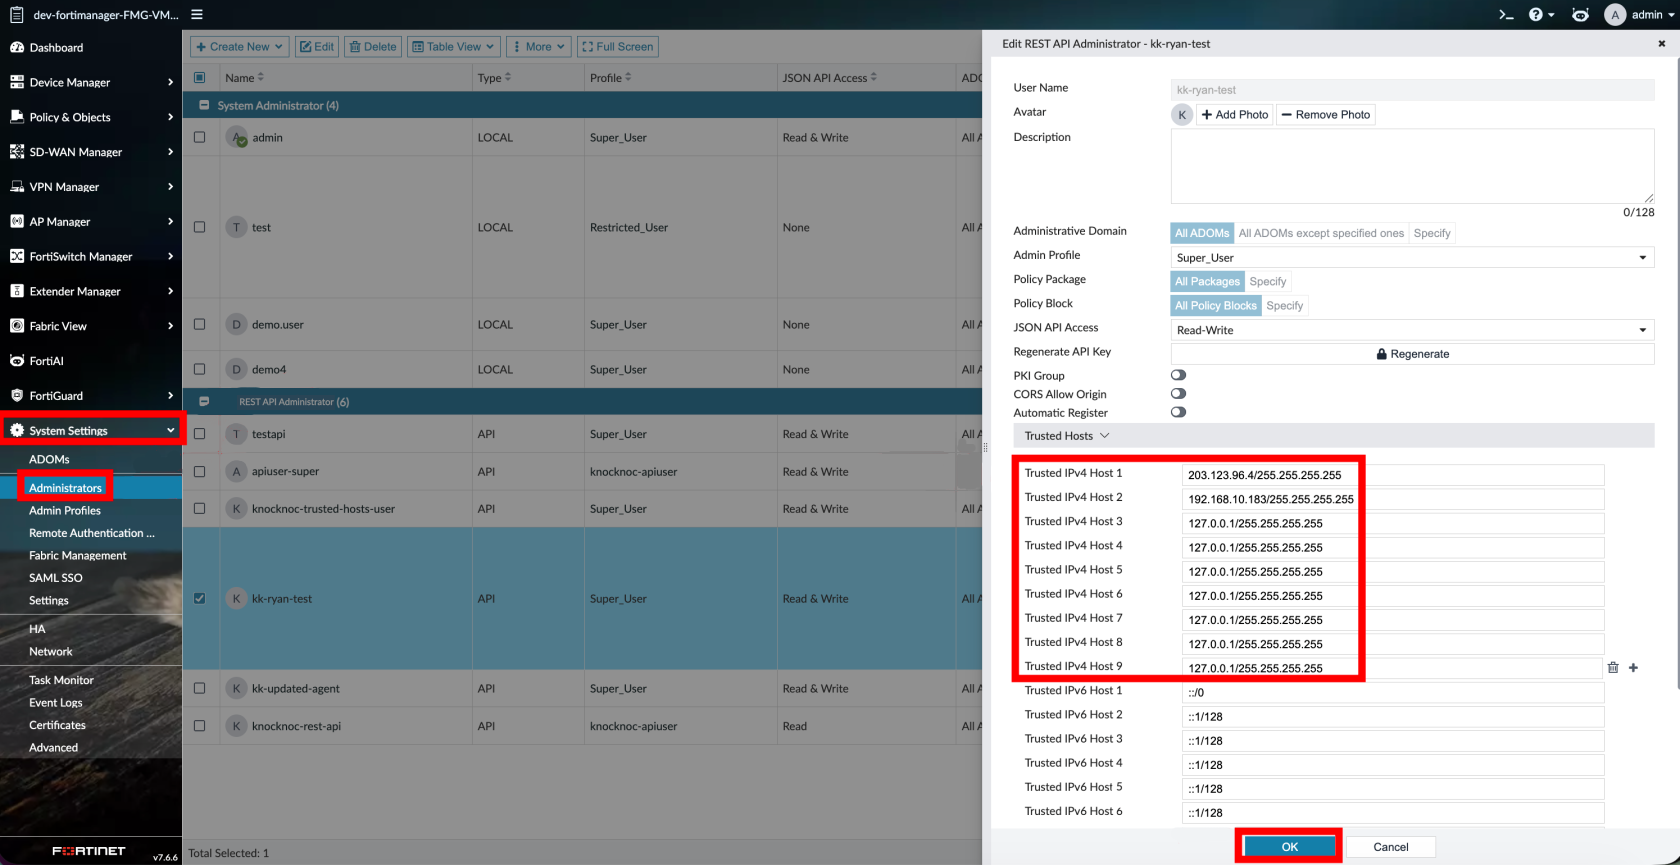
FortiManager (Trusted Hosts): System Settings > Administrators > API Rest Admin
The 'Rest API Administrator User Name' must match your Knocknoc users 'User Name'
-
-
Restrict source IP to the Knocknoc Agent IP
-
Save + generate the API key
-


- Add a description and that's all the details
-
FortiManager (Trusted Hosts):
-
Pick the FortiManager admin users you want Knocknoc to control
-
For each admin user: set Trusted Host 1-9 to
127.0.0.1(or a controlled backup IP)-
Do not leave 1-9 as "allow all"
-
-
Knocknoc will only write to Trusted Host 10
-
Knocknoc username must match the FortiManager admin username exactly
-
Step 5 - Test
-
Assign users/groups to the Knoc
-
Log in as a test user
-
Verify an address object is created and added to the address group
-
Verify the policy permits traffic
-
On logout/expiry, the address is removed from the group

Limitations
-
This applies the built‑in FortiManager Trusted Host restriction. It is an authentication‑layer control, not a network‑level firewall rule.
-
It will not prevent exploitation of FortiManager vulnerabilities, as network‑level access to the device is not restricted.
The Knocknoc username must match the FortiManager Administrator username exactly.
Active Checklist
Your Knoc has the correct settings:
Your API user is correct:
- ✅ API user is IP-restricted to the agent (not the end user)
- ✅ FortiGate: Admin profile has Firewall Read/Write (everything else None)
- ✅ FortiManager: Super_User profile
- ✅ JSON API Access: Read / Write
Your configuration is correct:
- ✅ (FortiGate) Address group exists and firewall policy references it
- ✅ (FortiManager) Trusted Hosts 1-9 are controlled (not unrestricted
0.0.0.0/0.0.0.0) - ✅ (FortiManager) Knocknoc usernames match FortiManager admin usernames exactly (This is a must)
Your testing is verified:
- ✅ (FortiGate) Address objects appear in the address group on login and are removed on logout/expiry
- ✅ (FortiManager) Trusted Host 10 updates on login and clears on logout/expiry
Option 4 - Passive mode (no agent)
In Passive mode, FortiGates periodically poll a Knocknoc‑hosted allowlist (External Dynamic List / EDL) of authenticated user IP addresses and use it in firewall policy. No agent is required.
This mode works with both standalone FortiGates and FortiManager‑managed environments. In a FortiManager‑managed environment, you can configure the external resource and firewall policy via FortiManager policy push to deploy across all managed FortiGates.
Step 1 - Create Knoc in Knocknoc (Passive)
-
Select the Firewalls / Appliances Knoc type
-
Choose Passive as the Application Type
- For Both FortiGate / FortiManager, add a description
- All details should be filled out now
Step 2 - Configure external resources

- For FortiManager only, add Device Targets you want to include
- Add any other option settings, then submit to get your External Connector details
- Set the Resource URI to the Knocknoc URL provided
- Set the Username and Password (EDL Secret) under HTTP basic authentication

-
Set the polling interval
Step 3 - Create firewall policy (using external resource)
Create or edit a firewall policy:

- In Source Address, select the external resource you created
- Configure destination, service, and action as appropriate
- Enable/save (FortiGate)
- Commit and push (FortiManager)
Instructions below are for FortiManager only
Step 4 - Testing
-
Log in as a test user
-
The user’s IP address should appear on the FortiGate(s) within 5 minutes (or your chosen interval)
-
Verify the firewall policy permits traffic from the user’s IP
-
On logout or grant expiry, the IP is removed and access is revoked

Passive Checklist
Your Knoc has the correct settings:
Your external resource is correct:
- ✅ External Feed points to the allowlist URL
- ✅ Credentials use the separate credentials format (not embedded in the URL)
- ✅ (FortiManager) External resource was pushed to FortiGates via Install Wizard
Your policy is correct:
- ✅ Firewall policy references the external resource
- ✅ Policy is enabled
- ✅ (FortiManager) Policy package has been pushed to FortiGates
Your testing is verified:
API role/permissions summary
| Knocknoc/Fortinet orchestration mode | Device | API access and permissions required |
|---|---|---|
| Passive | FortiGate/FortiManager | No device API access required |
| Passive+ | FortiGate | REST API Admin with System > Configuration read/write (external resource monitor operations) |
| Passive+ | FortiManager | API Rest Admin with Device-Manager permissions (JSON API-Access read-write). |
| Active | FortiGate (Direct) | REST API Admin with Firewall read/write (least privilege profile recommended) |
| Active | FortiManager (Trusted Hosts) | API Rest Admin with Super-User (JSON API-Access read-write). |
Connection Validation
After saving a Fortinet ACL, click Validate on the ACL detail page. Knocknoc runs a short set of checks against your FortiGate or FortiManager to confirm the connection works, the names match, and the API token has the access grants will need.
It is safe to run at any time, including against production.
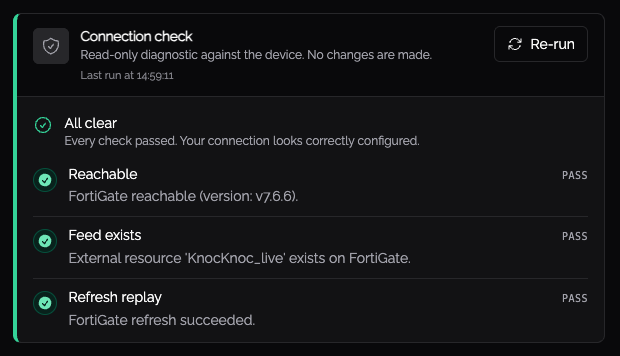
What it checks
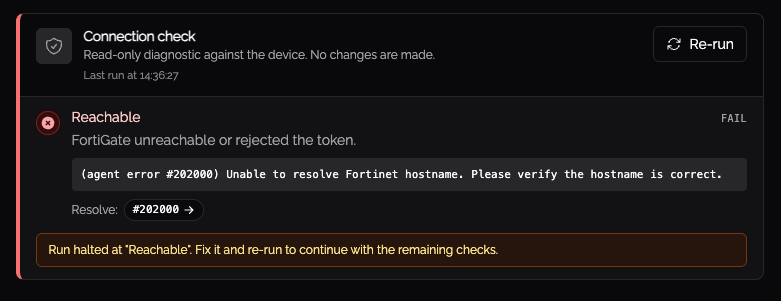
- Reachable: the agent can connect to the device and the token is accepted.
- ADOM and device: the ADOM (for example,
Production) exists and the configured device is registered and online. - Names match: the external resource feed or address group on the device matches what you entered. If you typed
knockoc-feedand the device hasknocknoc-feed, validation offers a one-click fix. - Permissions: the API token can perform the writes that grants need.
- Refresh (passive+): the FortiGate accepts a refresh request from Knocknoc.
The permissions check may briefly create and remove an address object called knocknoc_validate_probe pointing at 127.0.0.1/32. If you ever see one left behind, it is safe to delete; the next validation run will also remove it.
Reading the results
Each check returns Pass, Warn, or Fail. Validation stops at the first Fail.
- Pass means the check succeeded.
- Warn flags something worth knowing: a device that is offline in FortiManager, a FortiOS version too old for passive+ refresh, or a mode that does not match the fields you filled in.
- Fail means the check could not confirm the configuration. Fail results include an error code (for example,
#202003) that links to the agent error reference for full troubleshooting steps.
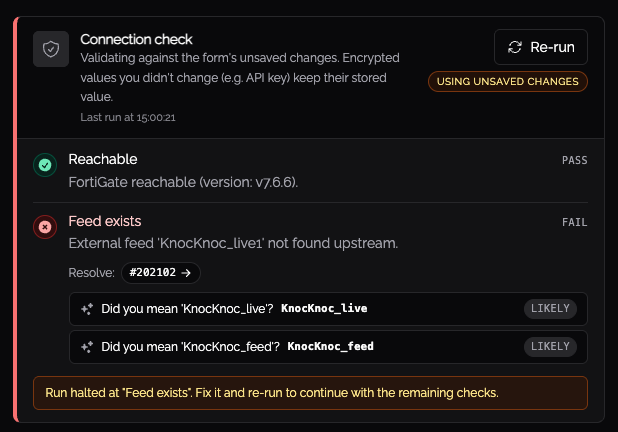
Where Knocknoc can suggest a fix, the result includes a clickable suggestion. The most common ones are case corrections (production to Production) and close-spelling matches.
Troubleshooting
Agent logs
If you are experiencing issues, the first step is checking the orchestration agent logs. Common problems include:
- Invalid API key: The API token may have been regenerated or expired
- Network connectivity: The agent cannot reach the FortiGate or FortiManager
- Incorrect External Feed Name: The name configured in Knocknoc must exactly match the external resource name on the FortiGates (Passive+ modes)
- ADOM mismatch: If using multi-ADOM mode, ensure the ADOM in Knocknoc matches the ADOM where your devices are managed (FortiManager modes)
- Insufficient permissions: FortiManager API users require the Super_User admin profile for Active mode, or a custom least-privilege profile for Passive+ mode - see API Permissions
Push failures are non-fatal (Passive+ modes)
If the dynamic entry push fails, the agent logs a warning but does not fail the grant/revoke operation. The FortiGates will pick up the change on their next scheduled poll of the allowlist. Check agent logs for "passive+ dynamic entry push failed" or "direct FortiGate dynamic entry push failed" messages to diagnose push issues.
FortiGate is not updating (Passive / Passive+ modes)
- Verify the external resource is configured correctly on the FortiGate and is successfully polling the Knocknoc allowlist URL
- Check that the API key / credentials for the allowlist are correct
- Verify the FortiGate can reach the Knocknoc server over HTTPS
- On FortiGate, run
diagnose system external-resource listto see external resource status - Run
diagnose system external-resource show <name>to see the current entries
Device Targets not working (Passive+ FortiManager)
If using Device Targets to scope the push to specific devices:
- Ensure the serial numbers or group names exactly match the devices configured in FortiManager
- Targets are referenced as
adom/{adom}/device/{serial}in the API call - If left empty, the default target is
All_FortiGatein the configured ADOM
Trusted host not updating (Active FortiManager)
- Verify the Knocknoc username matches the FortiManager Administrator username exactly
- Check that trusted host entries 1-9 are not set to
0.0.0.0/0.0.0.0(this would mask any changes to entry 10) - Verify the API user has the Super_User admin profile (see API Permissions)
- Check agent logs for error code 202051 (admin user not found)
Error Codes
The Knocknoc agent reports structured error codes when Fortinet operations fail. You can find more details on resolving these issues here.
Fortinet Documentation References
- Configuring an external feed - FortiOS external resource / threat feed setup
- Creating administrators for the FortiManager API - API user creation
- FortiManager authentication token for API administrators - API key generation
- Trusted hosts - FortiManager trusted host restrictions
- Administrative Domains (ADOMs) - FortiManager ADOM configuration