
SAML with EntraID (Azure AD)
The following example assumes your Knocknoc instance is located at https://<hosting instance>.knoc.cloud. Wherever you see that, please substitute it for your own instance URL (e.g. https://demo.knoc.cloud, https://my-saas.knoc.cloud).
Setting Up the IdP
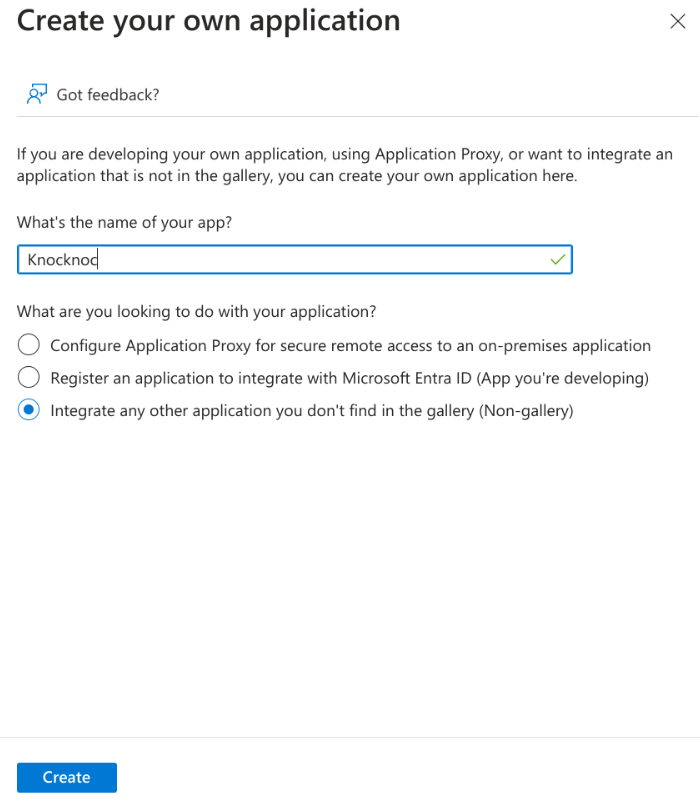
Create an Application
- Navigate to the Microsoft Entra admin center and login with administrator credentials.
- Go to Identity and select Enterprise Applications

- Click New Application
- Click Create your own application.
- Type a name for your application (e.g., knocknoc)
- Check "Integrate any other application you don't find in the gallery (Non-gallery)"
- Click Create.

Assign Groups
- Click "Assign users and groups"
- Click "None Selected" under groups.
- Add the user groups you wish to access Knocknoc protected services.
SAML Configuration
Configure the app to use SAML
- Click Set up single sign on.
- Click SAML.
- In the Basic SAML section, add the links to your Knocknoc instance.
- Set the Identifier (Entity ID) to https://<hosting instance>.knoc.cloud/api/saml/metadata for Admin SAML integration the URI path is: /api/admin/saml/metadata)
- Set the Reply URL (Assertion Consumer Service URL) to https://<hosting instance>.knoc.cloud/api/saml/acs (and /api/admin/saml/acs for Admin)
- Leave the Optional Basic SAML Configuration options blank at this stage and click Save.
- Set the Identifier (Entity ID) to https://<hosting instance>.knoc.cloud/api/saml/metadata for Admin SAML integration the URI path is: /api/admin/saml/metadata)
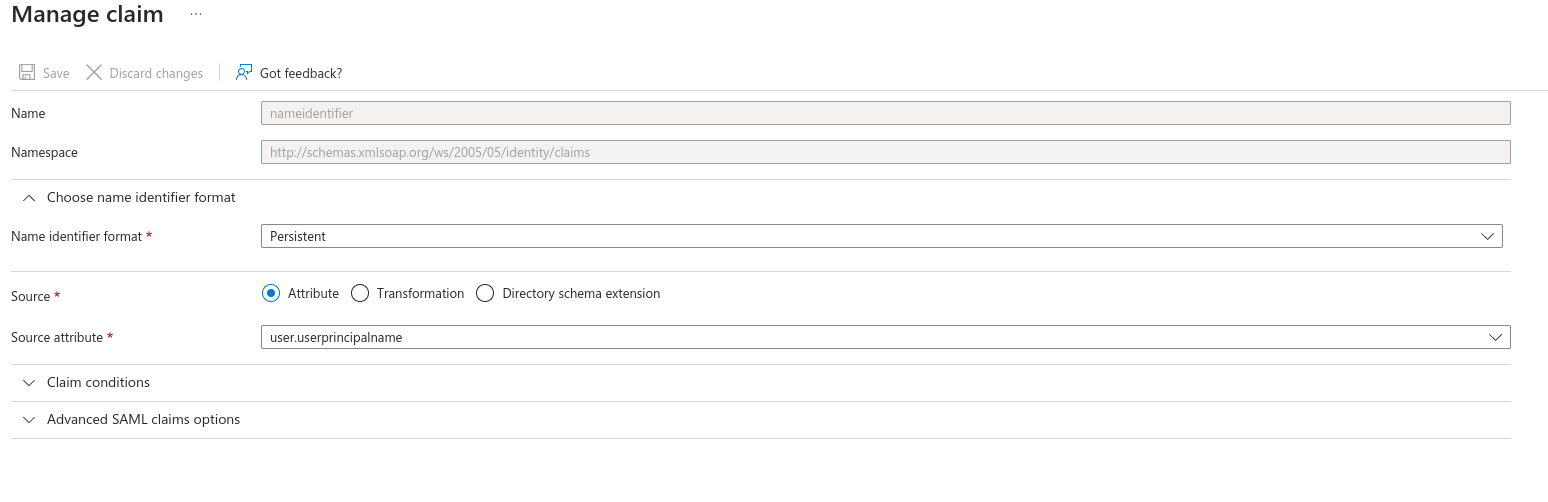
Configure the Attributes & Claims
- In the Attributes & Claims section:
- Update the Required Claim, changing the Name Identifier Format to Persistent

- Remove all other Claims (delete).
- It should look like the below:
-
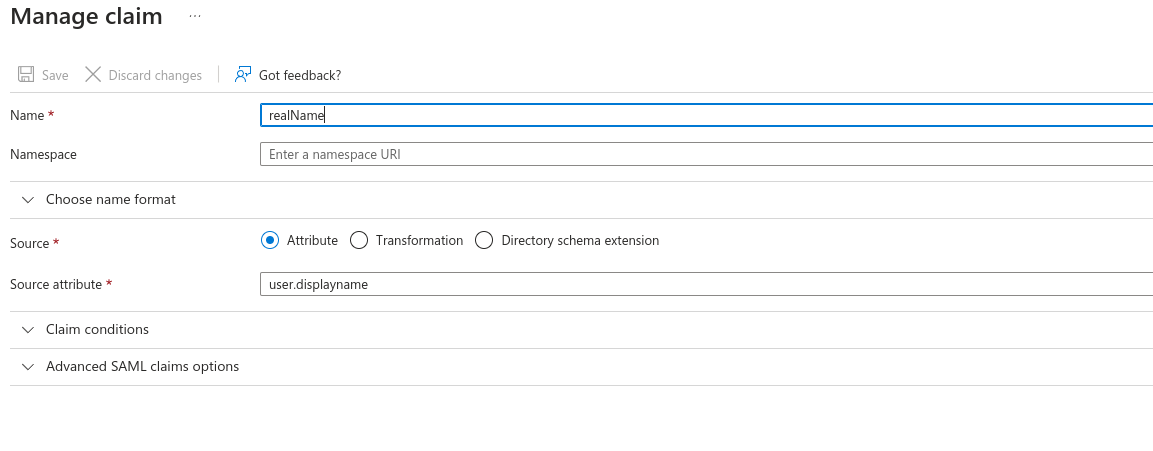
- Click "Add new claim"
- Set the Name as "realName".
- Leave Source as Attribute.
- Set Source Attribute to "user.displayname".
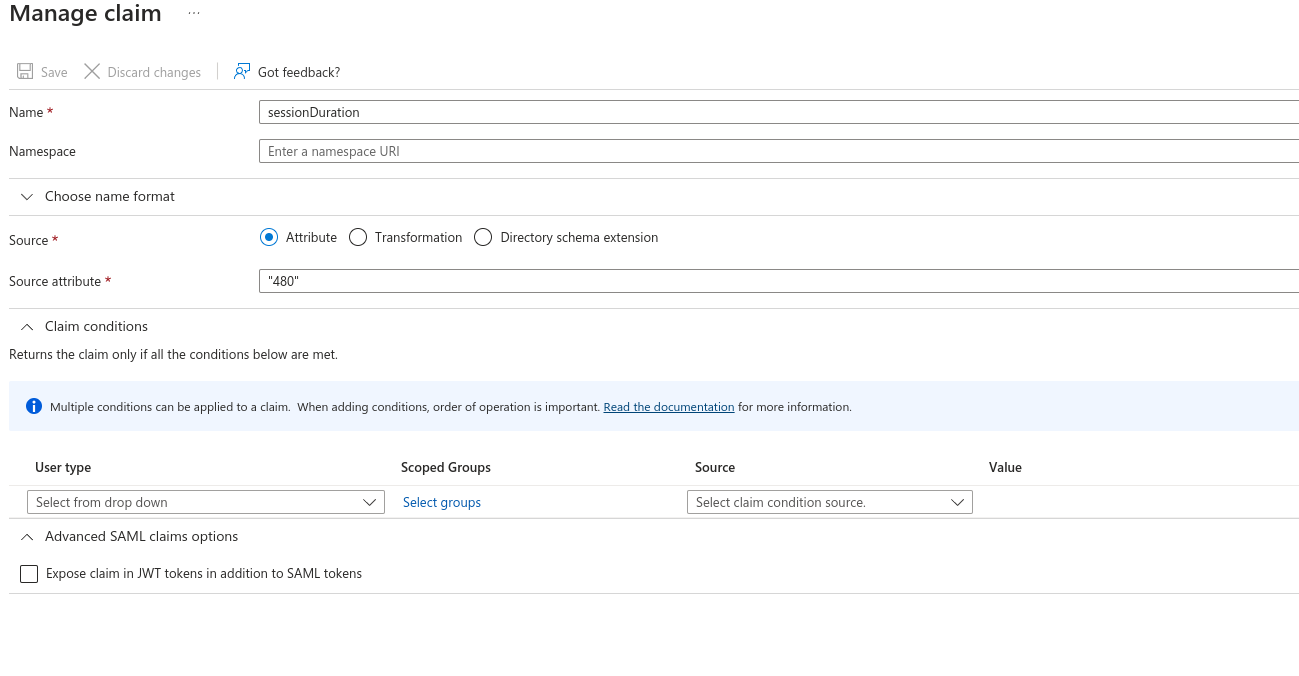
- Add another new claim (click "Add new claim")
- Set the Name as "sessionDuration"
- Leave Source as Attribute.
- Set Source Attribute to the default login duration in minutes for users logging in to Knocknoc. You can manually override this with a user attribute later for specific users, or control this per-Knoc within Knocknoc.
- This is a whole number, e.g., 480. Do not add the quotation marks as Entra displays in the image below!
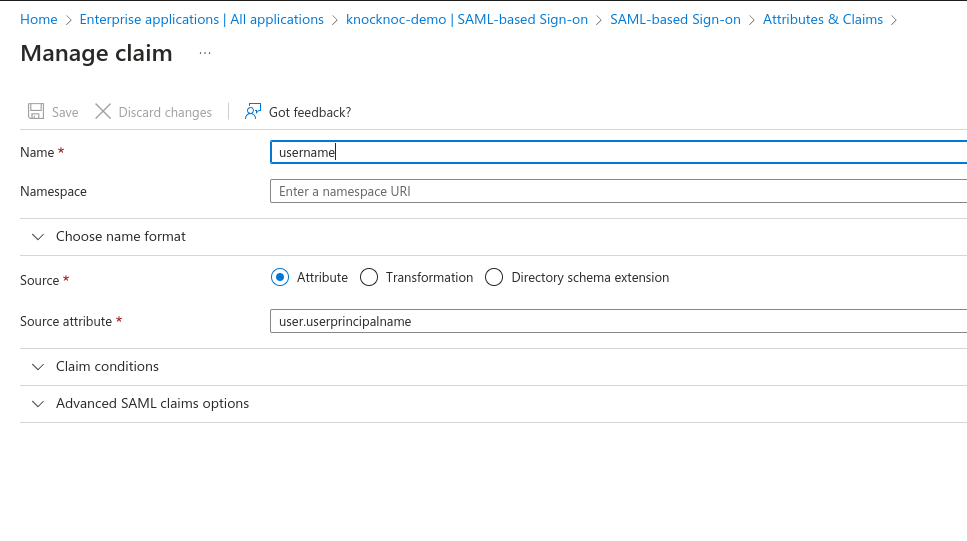
- Add a third new claim
- Set the Name as "username"
- Leave Source as Attribute.
- Set Source Attribute "user.userprincipalname"
- Click "Add new claim"


Entra Groups & Knocknoc naming
Mapping can be done in two ways:
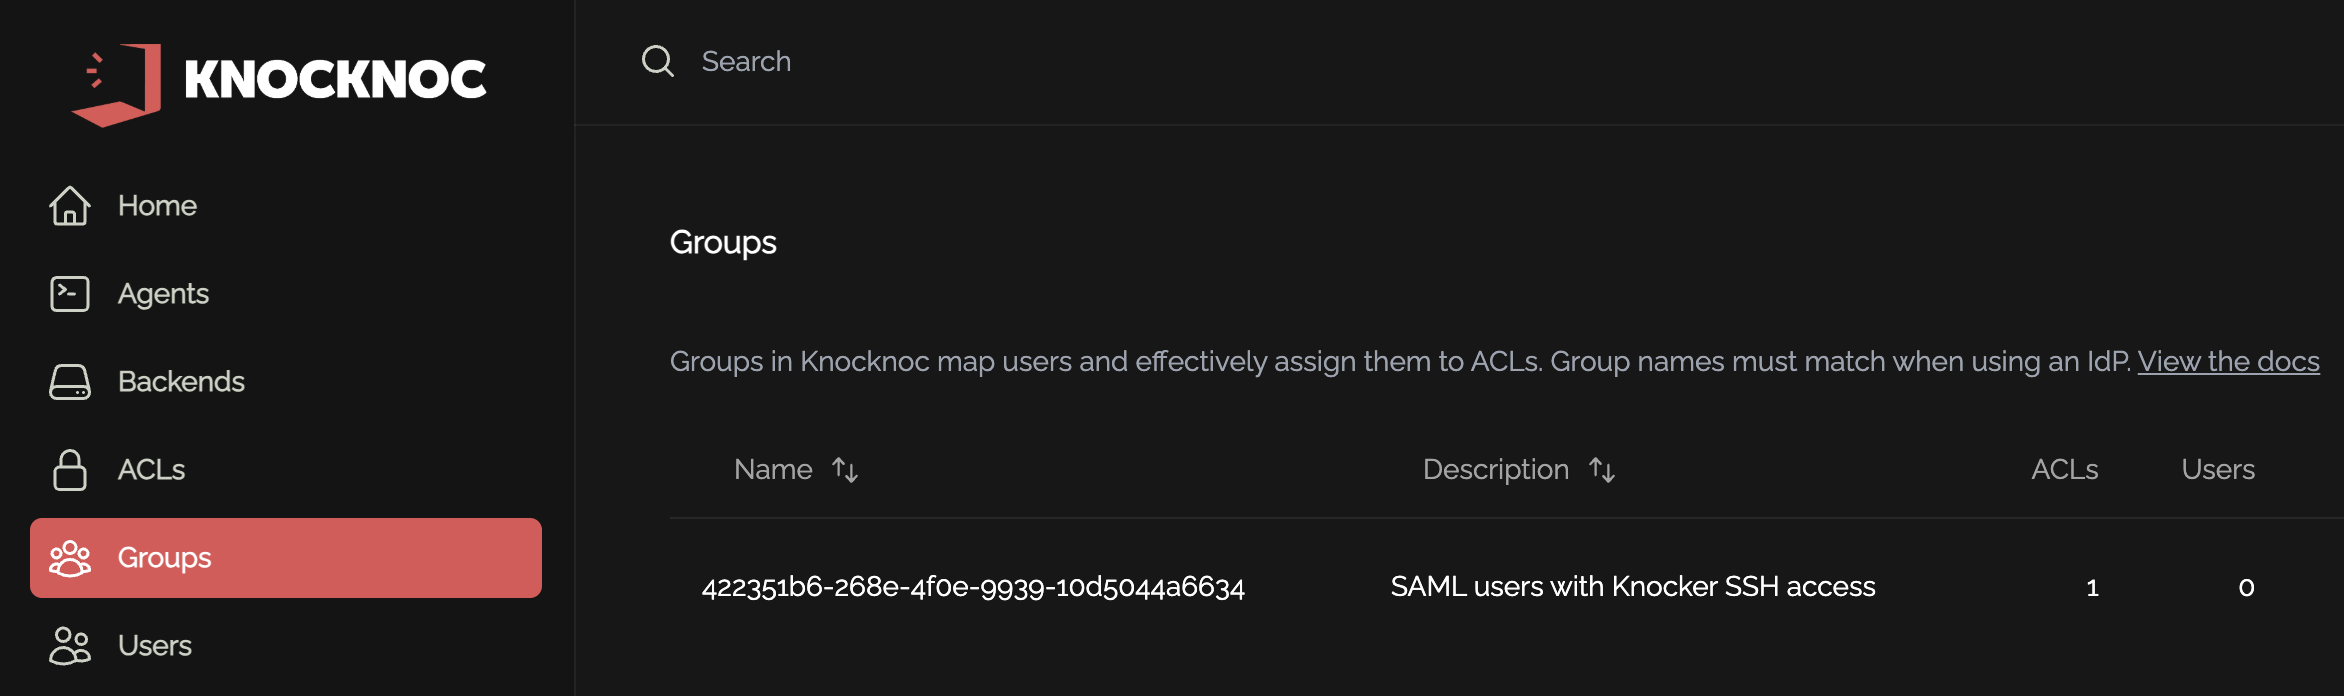
1) Using "Security Groups", which supports 365/Cloud groups plus Hybrid groups. The UUID or Object ID must be used, you cannot simply use a group name (string), you must use the object IDs (e.g. 6a696eec-482f-4b40-97c8-9ea3dba8ac3a) as the group name in your Knocknoc configuration.
2) Using "Groups assigned to the application", then selecting "Cloud-only group display names", which allows you to use group ID strings, e.g., "Developers" or "US-Admin-SSH" instead of UUID Object ID values. These groups must also be specifically assigned to the application in order to use them.
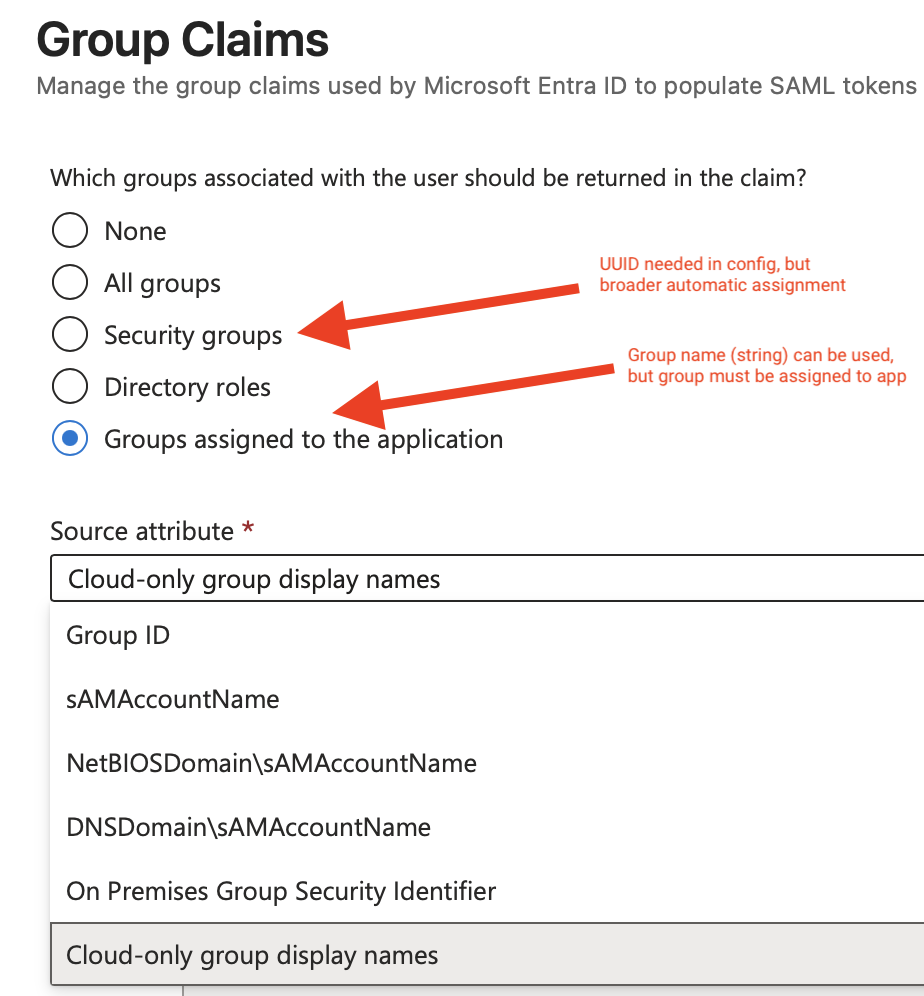
For Admin SAML, you can simply assign users directly to the enterprise-application, and ignore groups entirely.
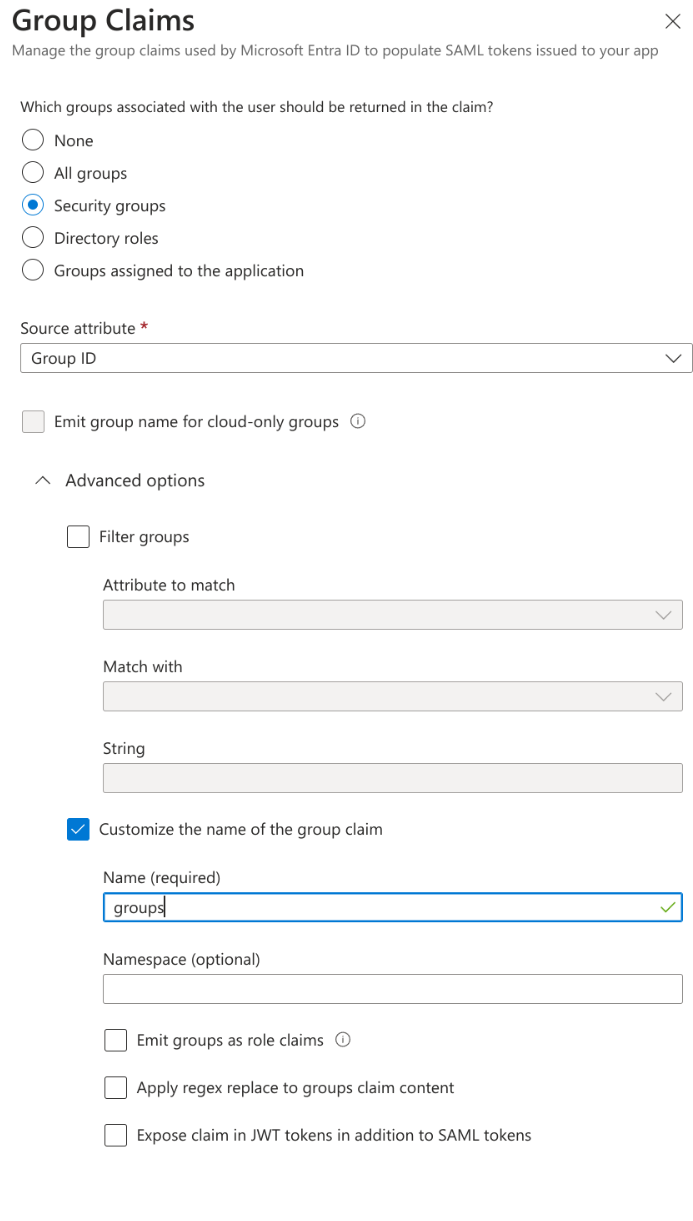
Adding Security Groups
- Click "Add a group claim".
- Select Security Groups
- Select Group ID for the Source Attribute.
- Check "Customize the name of the group claim" Under Advanced Options
- Add the Name as, groups.
- Click save when done.

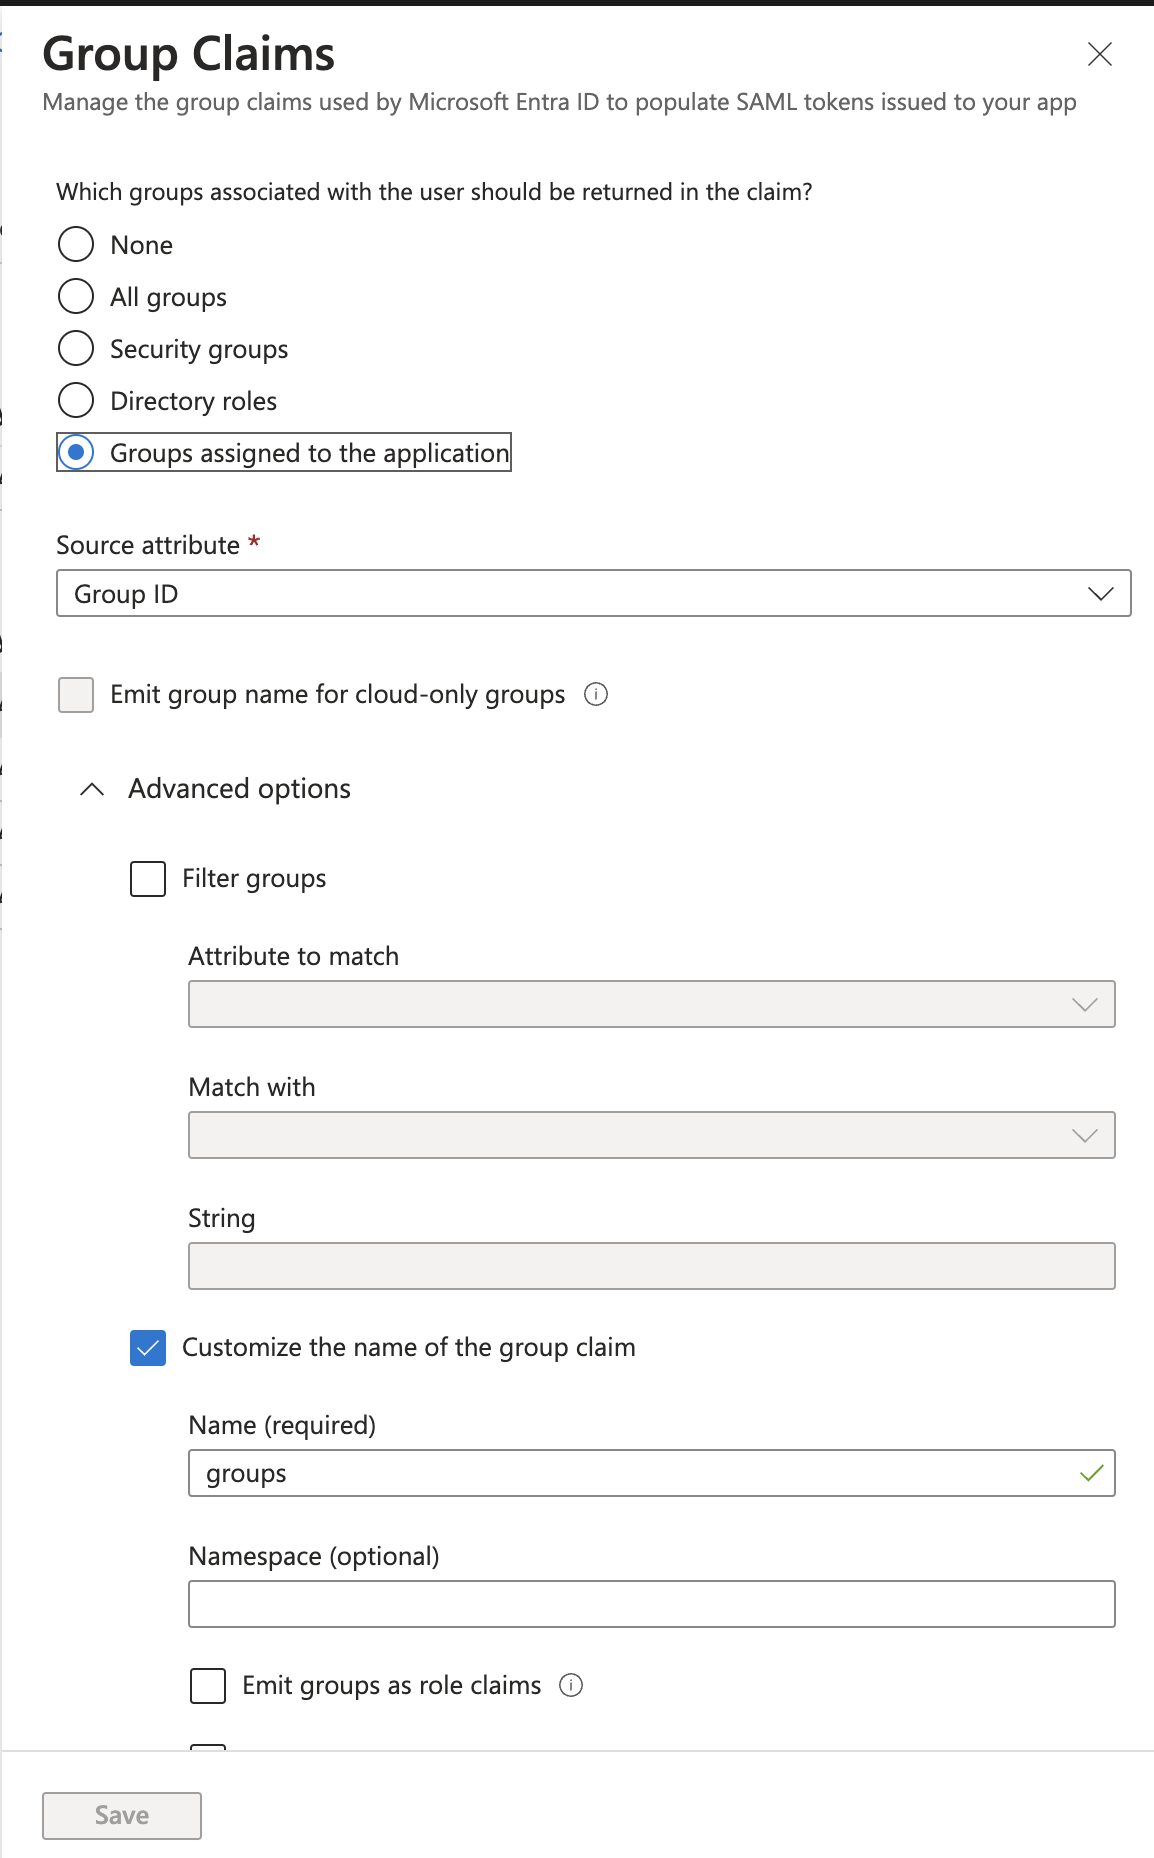
Explicitly assigned groups (performance/security)
For additional security or large environments with many groups (end user login performance) - you can explicitly only pass/permit groups that have been a) assigned to the user AND b) assigned to the Enterprise Application.
To do this, adjust the groups to be "groups assigned to the application", as below:
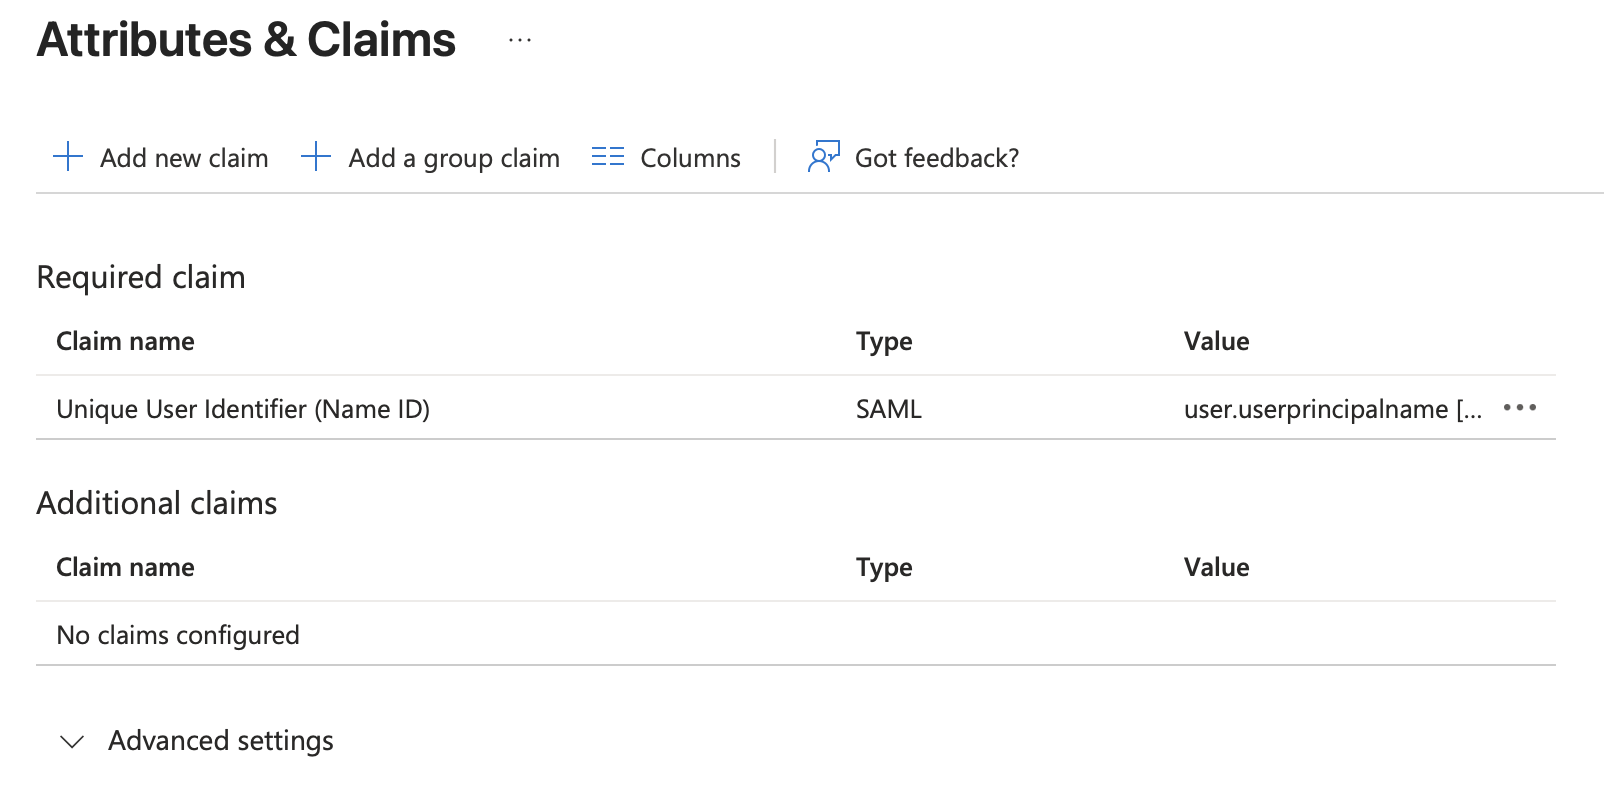
Attributes & Claims overview
- Once the claims are completed, it should look something like this (depending on the 480 minutes value below)


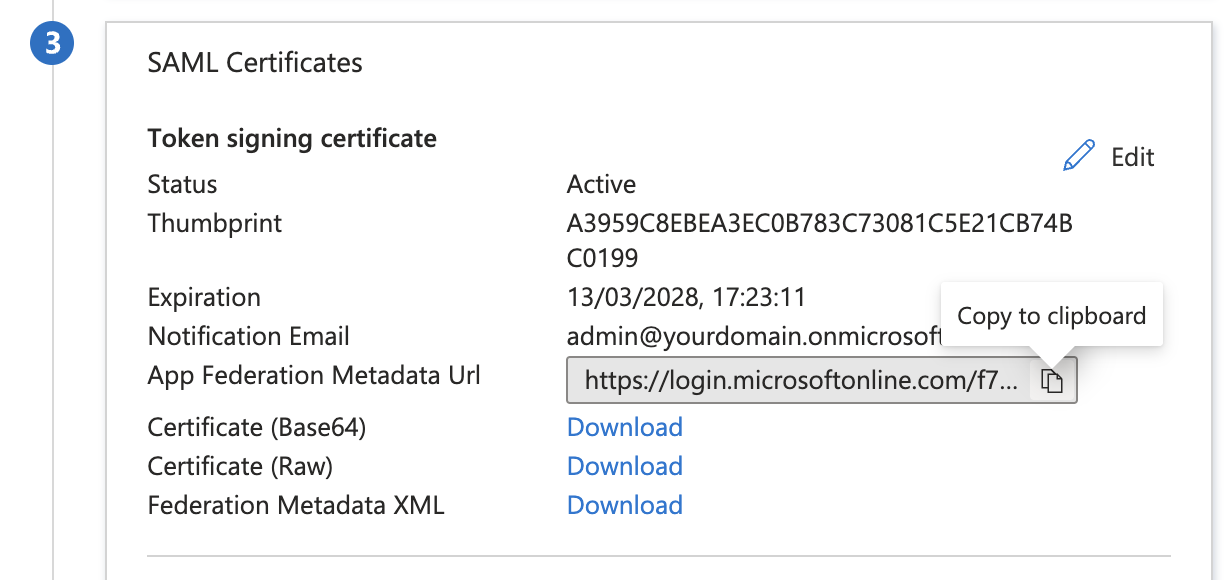
Metadata url
- Copy the App Federation Metadata Url and save it, you will need it in the next step configuring Knocknoc.

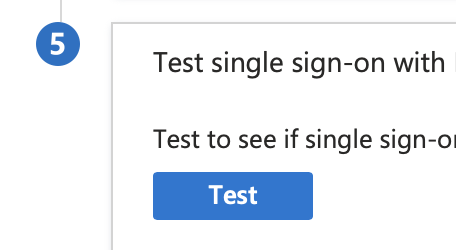
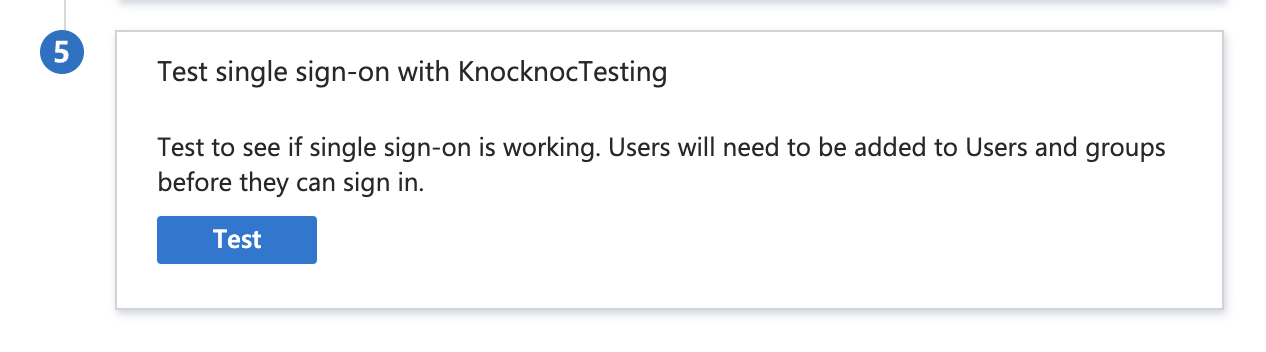
- It is worth testing the SAML configuration using step 4 in Entra:
- Now configure Knocknoc.

Knocknoc SAML Config
Knocknoc supports SAML for Users and/or for Administrators. Initially we suggest configuring SAML for Users, and once confirmed as working, extending this to the Administrator users, whilst retaining a break-glass local Admin user for emergencies or broken SAML situations.
- Login In the Knocknoc admin interface.
- Click on Settings on the left.
- For the "Metadata URL", paste in the "App Federation Metadata Url" you previously saved. It starts with https://login.microsoftonline.com/...
- Click "Generate new keypair"
- You are OK to save.
- Optionally - If instead of creating keys on the Knocknoc server you want to create keys manually, follow these steps.
- Click Save.
Final Testing
Assuming you granted your own user permission to one or more Knocknoc groups in EntraID, you should now be able to log in to Knocknoc using SSO.
- Browse to https://<hosting instance>.knoc.cloud/
- There should now be an "SSO Login" button.
- Click this, if you are not already authenticated to your IdP you should now be directed to the IdP login page. Note: If you are already authenticated you'll simply be redirected to an authenticated Knocknoc session.
- If ACLs have already been added you should also see these now say Granted.
You can also test using the Entra testing tool which is in Step 5 of the Entra configuration, shown below. Remember you will need to log in with a User or Group you granted access previously.
If this all works, congratulations! You've successfully run the SAML gauntlet.
Now it is time to create ACLs and assign them to the Entra SAML Groups.
Groups and getting GUIDs
If you're using the by-guid option, not the by-name option.
Depending on the choice made above (Entra Groups & Knocknoc matching), you need to map the group by-name, or by-guid.
If you are using the GUID method, to obtain these for a particular group, view the Group in the Entra Admin portal.
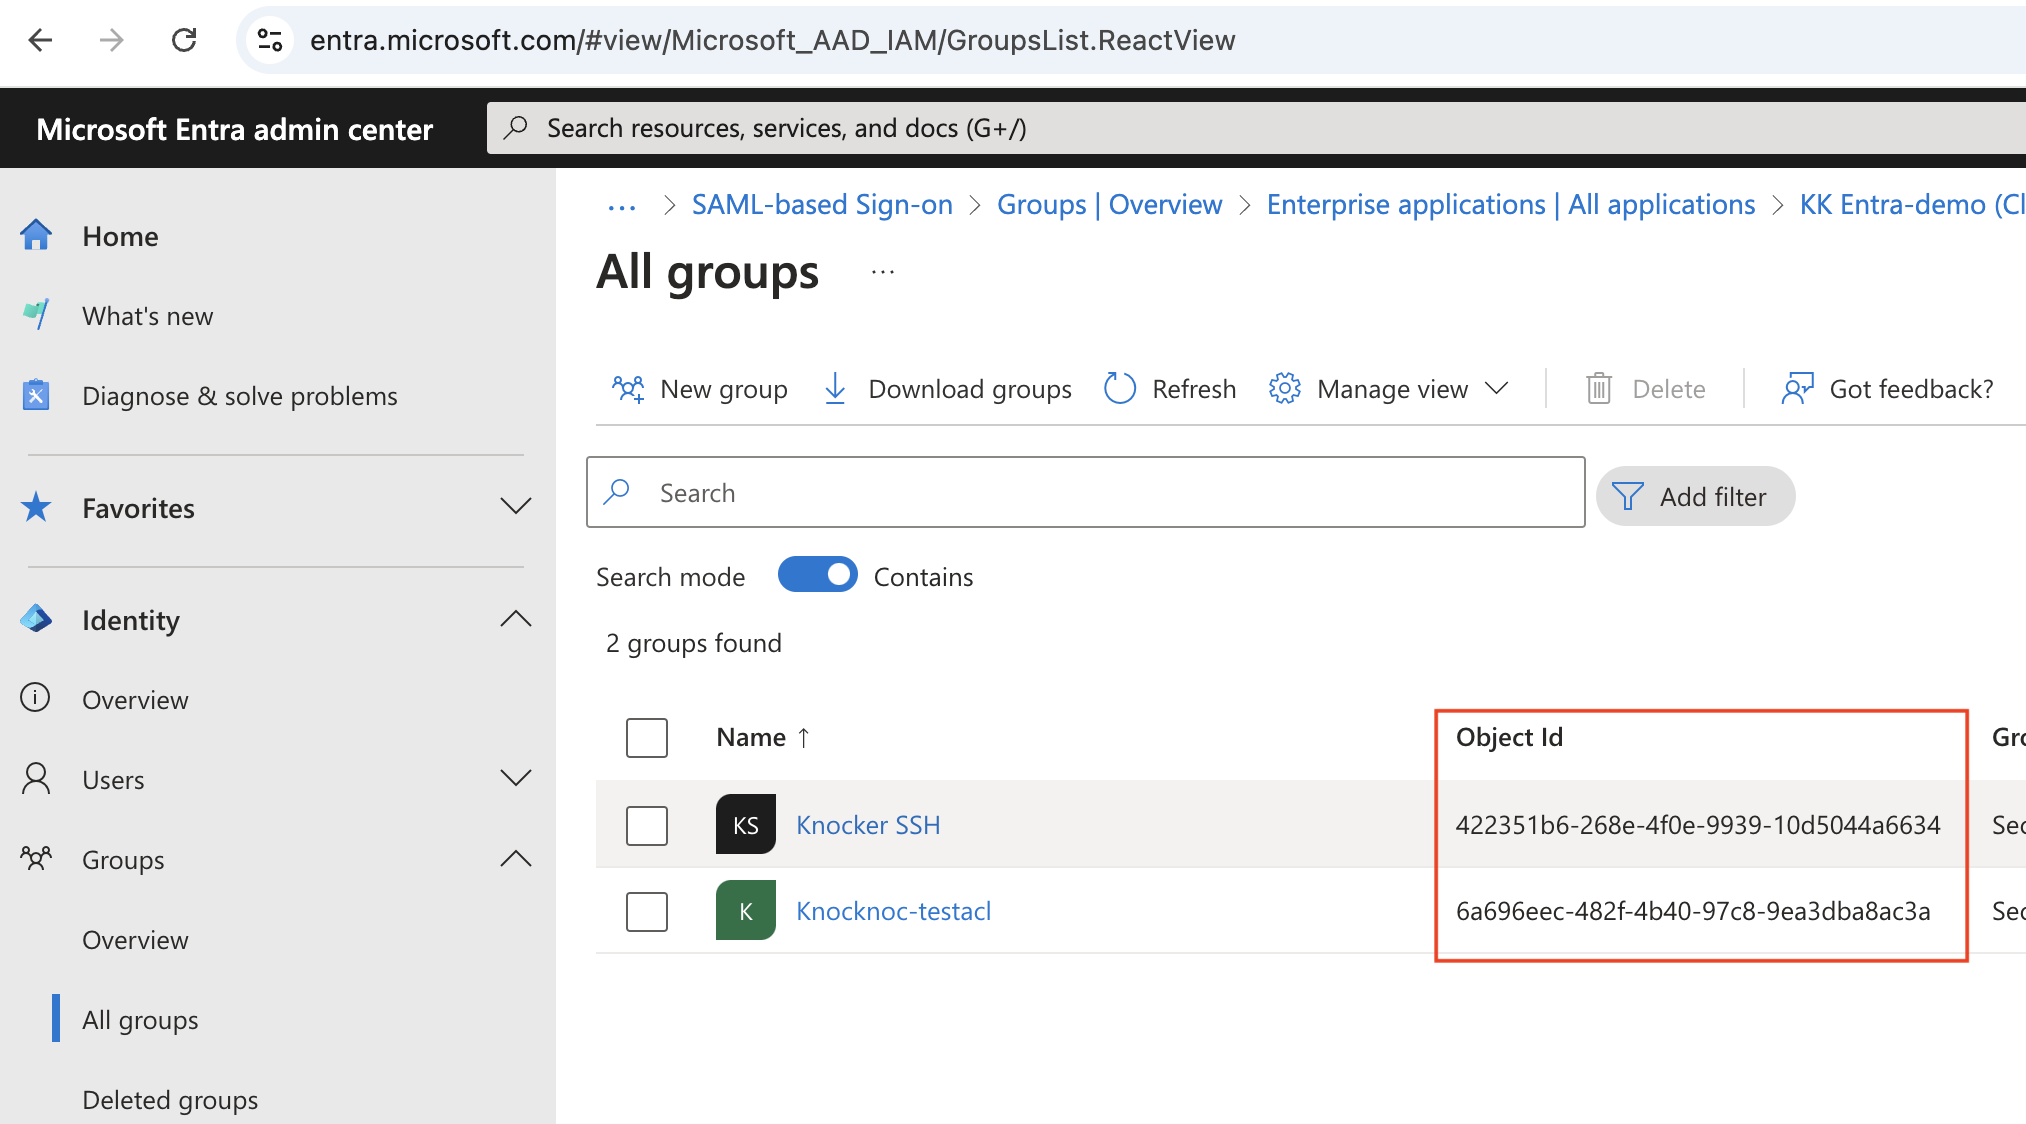
The relevant GUID is then placed as the Group Name in Knocknoc, which will be matched automatically and assigns the Group Users to the Knocknoc ACL.
If you are using the by-name method, the name is used, not the GUID.