Sonicwall
The Sonicwall can be orchestrated in three ways, Actively (API call from an Orchestration Agent to the Firewall), Passively via Sonicwalls DEAG polling capability, or a combination known as Passive+, where a DEAG is utilized with an active force-download-now call made to the Sonicwall API to shorten the polling period.
Active or Passive orchestration
Active - Knocknoc's Sonicwall orchestration capability utilises the Sonicwall API to actively manage the device, inserting and removing IP addresses as part of the Knocknoc Grant process. This is an active, near-real-time approach that provides the best user experience. Knocknoc manages the IP lists within address groups, but not the firewall policy itself. Policies are controlled by the Administrator or firewall team/MSSP, and Knocknoc only adds/removes IP addresses from address-groups, which are then utilized within these pre-existing firewall policies.
Passive - Knocknoc's Allowlist feature provides a passive integration with firewalls that support polling for IP address lists, Sonicwall calls these Dynamic External Address Groups or DEAGs. This feature pulls from the Knocknoc server a list of IPs of authenticated users, in the correct group/for the assigned firewall policy. The drawback of this feature is that the list can only be fetched every 5 minutes in the case of a Sonicwall.
Passive+ (Passive with an Active sync) - the Passive DEAG can be utilised in conjunction with an Active API hit to trigger a live refresh from the DEAG. This shortens the time taken for polling from 5 minutes to near instantaneous and is useful for large IP address lists.
Requirements
- Sonicwall 7+
- Agent version 25.12+ if you're using an Active or Passive+ integration.
Prefer video? This shows an Active integration:
Active (via Sonicwall API)
Sonicwall configuration
Log in to the Sonicwall as an Admin user. See below to create/use a non-admin account.
You need to create an "Address group" along with a baseline V4 Host entry. Knocknoc will add/remove host IP entries from these groups actively as users login/logout of Knocknoc.
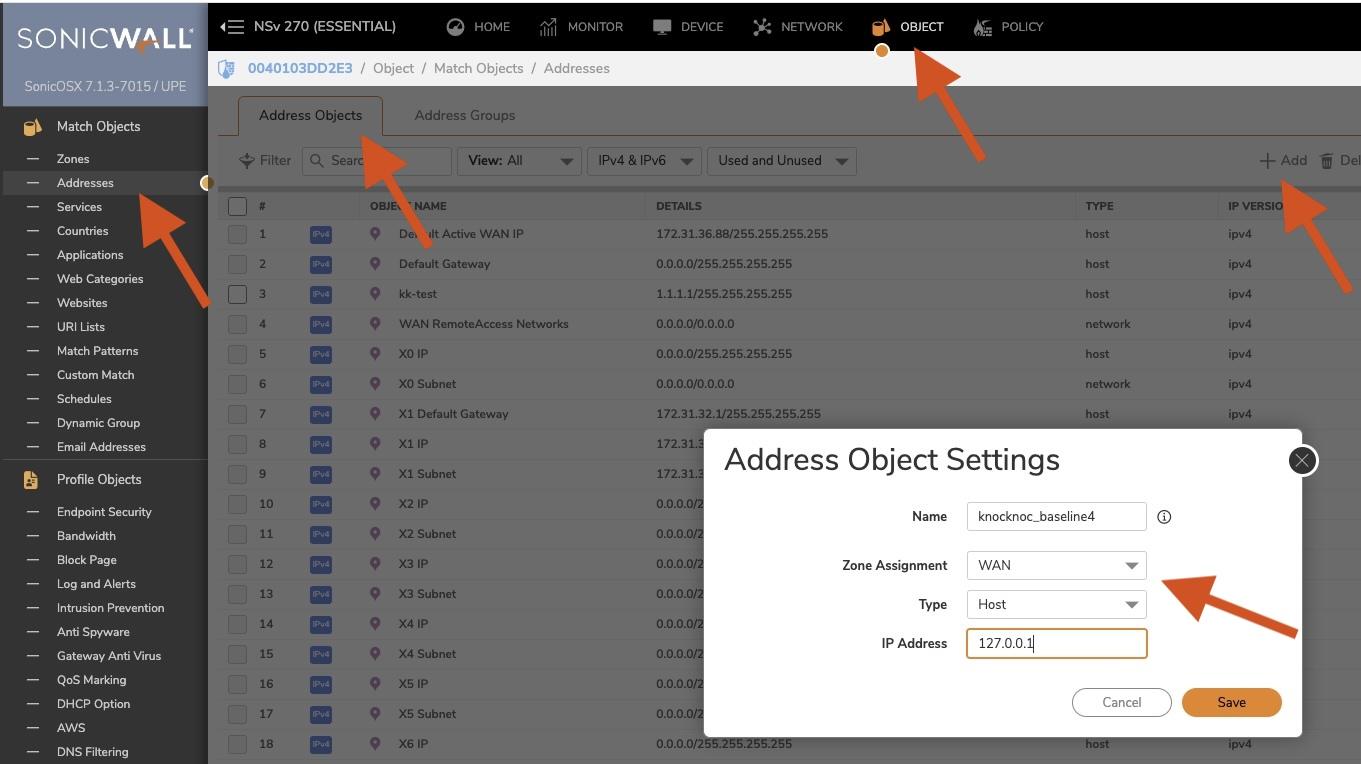
First we create a baseline host address, Sonicwall requires an entry in the address-group lists as a baseline.
- Navigate to Object (top menu), Match Objects (left menu), Addresses. Address Objects will be the first menu loaded.
- Click "+Add" (right hand side)
- A name "knocknoc_baseline4" is recommended, this is a placeholder for Sonicwall, not a rule/group.
- Select the correct Zone, likely WAN. Type is Host. IP address should be 127.0.0.1
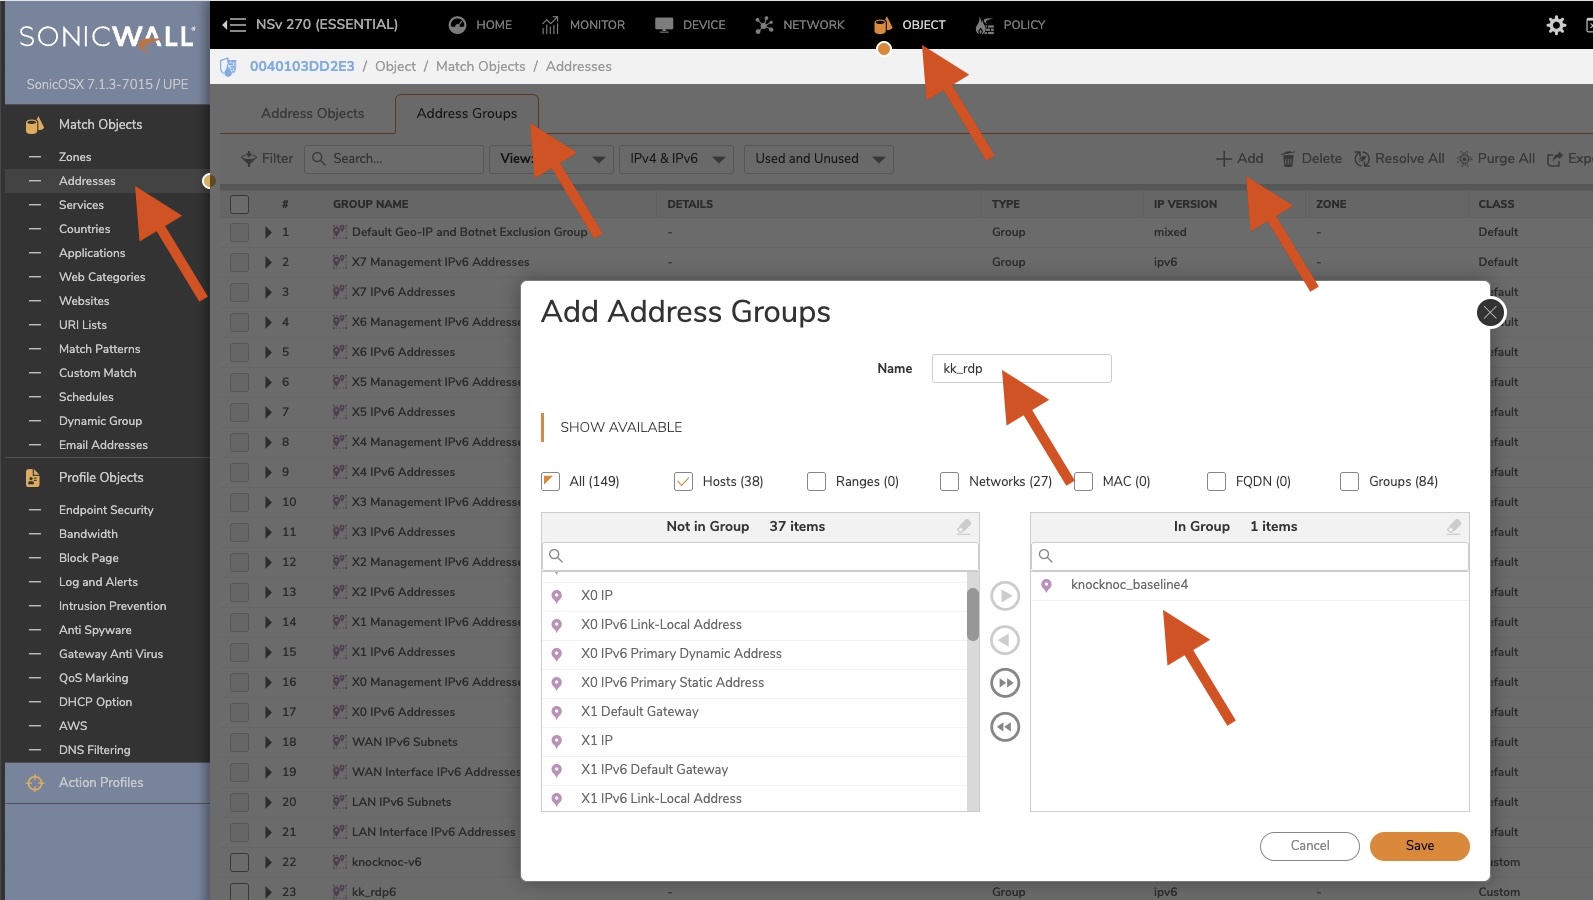
- Now we set up the "Address Group"
- Navigate to "Address Groups" on the same page.
- Click "+Add"
- Name the item related to your firewall policy, eg: "kk_rdp" for a list of trusted IP addresses you will allow for RDP access. Naming is up to you.
- Add the "baseline" Host entry we created earlier, Sonicwall requires this to be not empty.

- You need to do this for IPv6 too. Note that the V6 does not need a baseline entry.
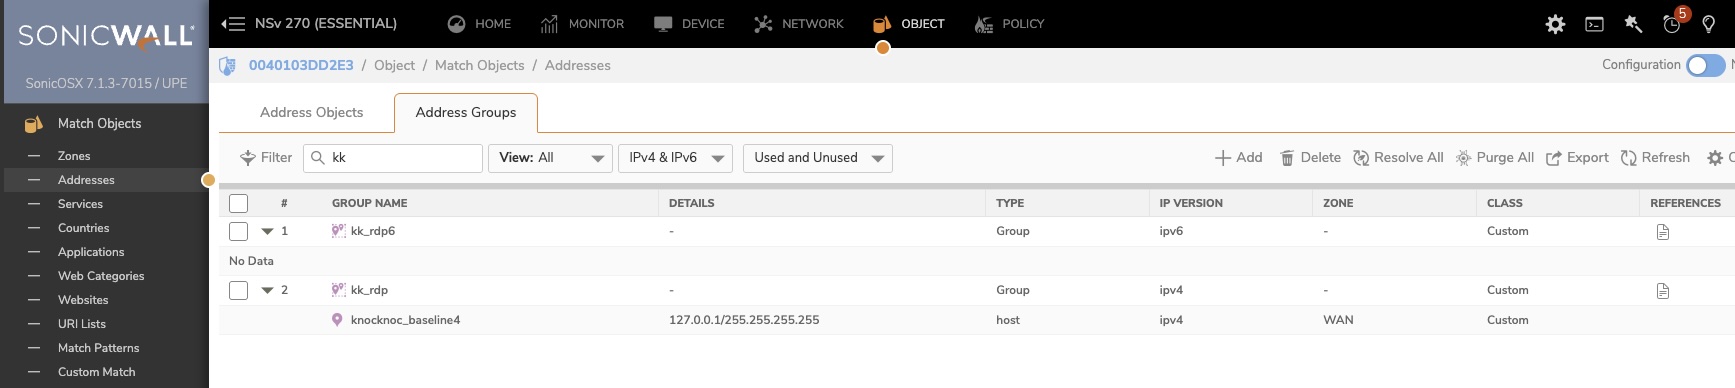
- Once completed, it should look like the below:

-
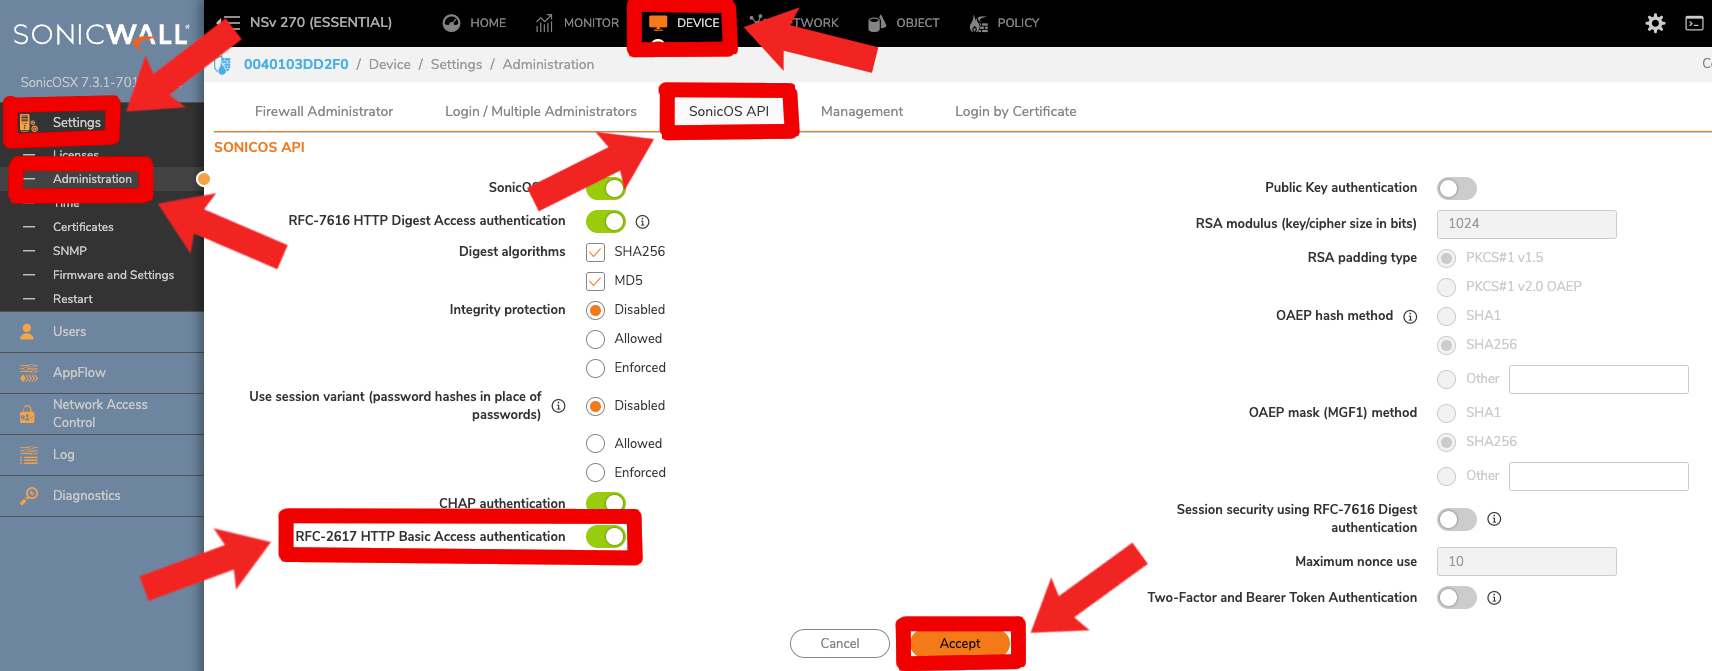
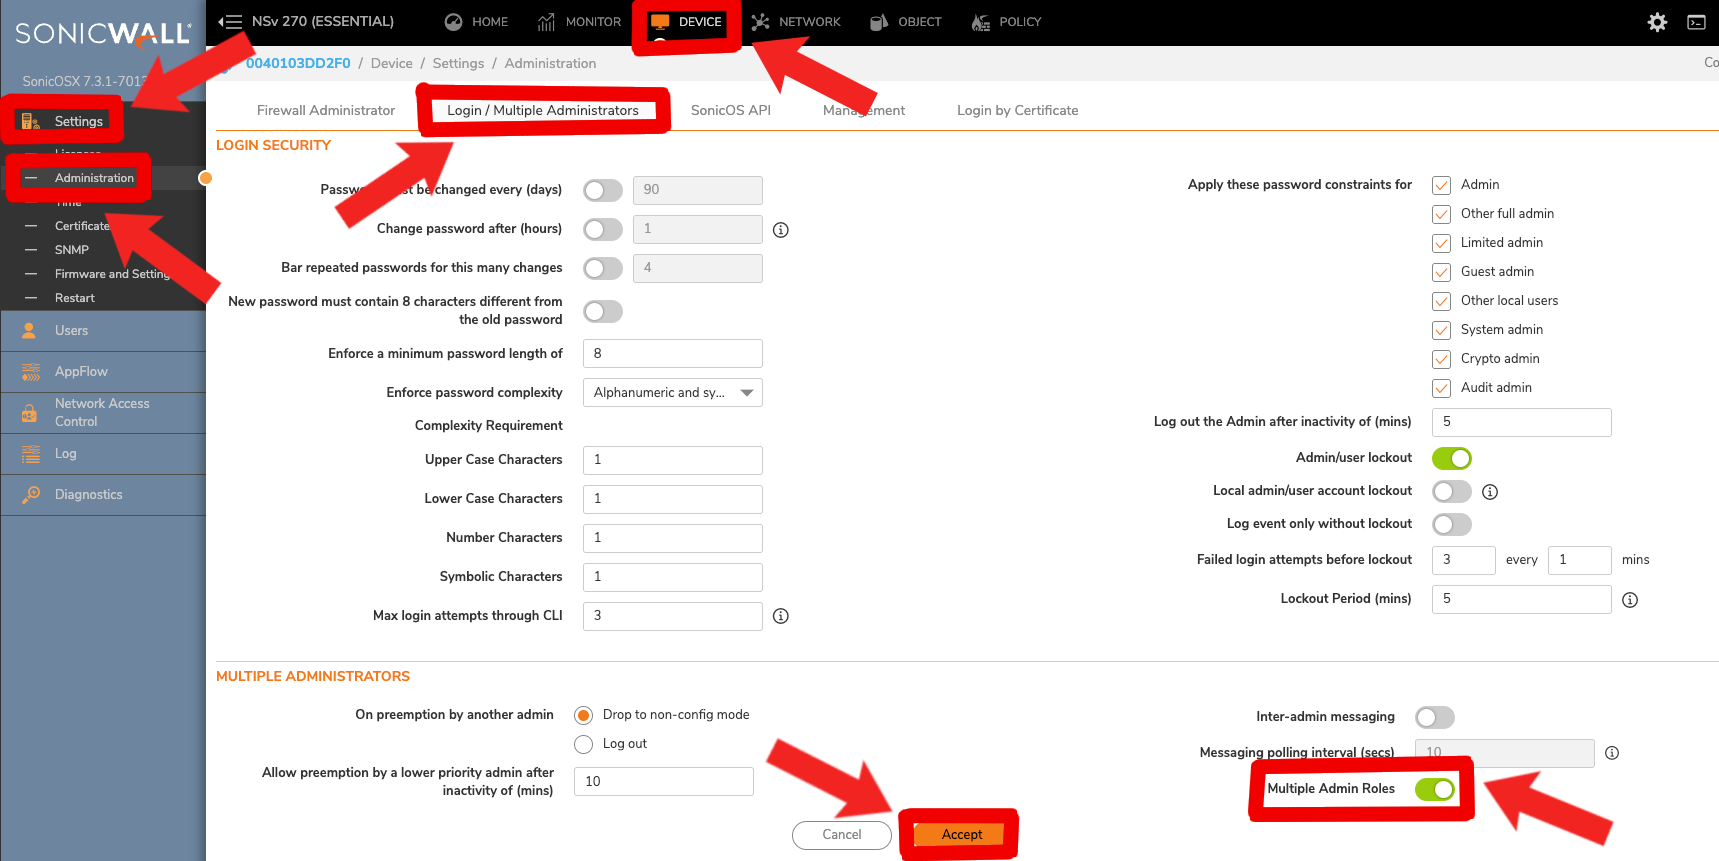
You likely need to enable 'RFC-2617 HTTP Basic Access authentication'. Do this via Sonicwall --> Device --> Settings --> Administration --> SonicOS API --> RFC-2617 HTTP Basic Access authentication. Enable this setting and click accept.

You're now ready to configure Knocknoc.
Knocknoc configuration
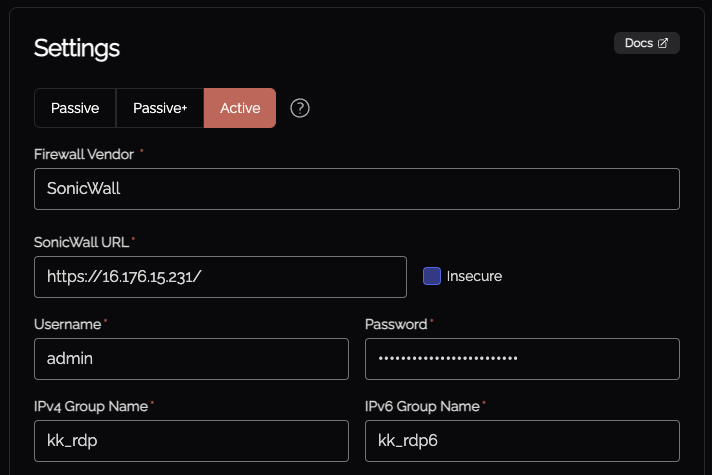
Select the "Firewalls / Appliances" Knoc configuration, selecting "Active"
Follow the prompts, as the example below:
A non-admin credential can created and utilized, however management must also be allowed on the network interface. Unfortunately Sonicwall does not allow fine grained controls, they may in future releases.
Note that the credential is encrypted and only visible to the orchestration-agent assigned during configuration. Read more about credential management here.
Testing it out!
Log in to Knocknoc as a user linked in the Knoc.
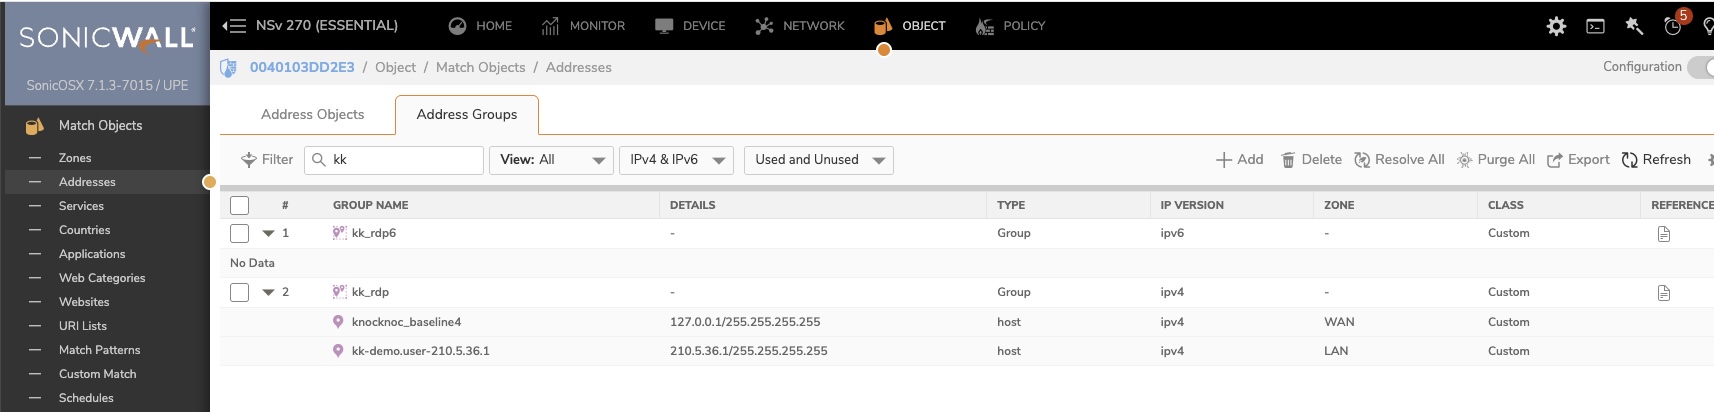
On the Sonicwall, refreshing the Address Group will now list their IP address and username as an object.
Using this in a firewall rule
You can now use this knocknoc-managed dynamic address group within firewall rules and policies.
Active Checklist
✅ IF a NEW API ADMIN account has been made for Knocknoc, you have:
- Checked to see if the password is complex enough (when you log into the Knocknoc admin account, it will prompt you for this if it is not complex enough after first creation)
- You are automatically redirected to the dashboard (if not you must enable 'Members go straight to the management UI on web login')
✅ You have created an Address Object specifically for your knocknoc agent
✅ You have created BOTH a knocknoc Address Group for IPv4 and IPv6 with correct names in the Knoc configuration
✅ You have enabled 'RFC-2617 HTTP Basic Access authentication'
Passive (DEAG polling)
Knoc configuration
- Log in to Knocknoc as an Admin
- Navigate to Knocs, Create new
- Select Firewalls, Passive
- Enter a meaningful name and proceed through to the API key step

- Select "Do not require API key" - Sonicwall does not support authentication on the DEAG polling, so a combination of IP source trust and/or randomness (security-through-obscurity..) is relied on to protect the IP address source list.

- Put in source IP addresses if possible, it's unlikely your firewall IPs will change so this is definitely worth doing.
- Save
- Copy the Allowlist URI, it is required in the next step.


Sonicwall configuration
Log in to the Sonicwall as an Admin user.
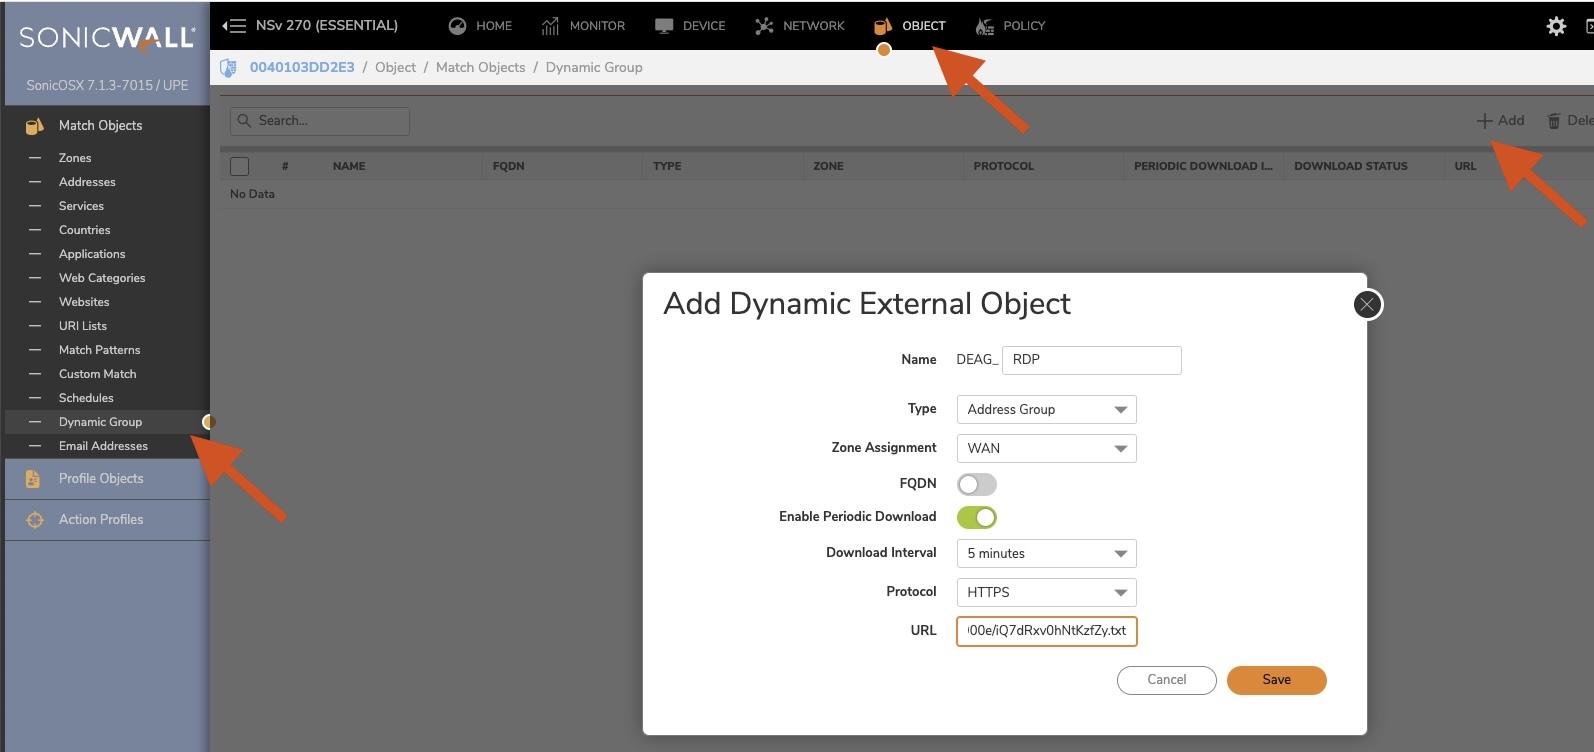
- Navigate to Object, Match Objects, Dynamic Group
- Click "+ Add"
- Provide a meaningful name, unfortunately you cannot use _ chars.
- Set the Type as "Address Group"
- Select the Zone, likely WAN
- Select "Enable Periodic Download" and set to 5 minutes. This can be shortened using Passive+ mode (see below)
- Select HTTPS
- Paste in the Knoc Allowlist URI created previously
- Save.
- Click Download (top right hand side) to make sure it connects.
- Log in to Knocknoc, then refresh the list in Sonicwall or wait for the polling time.
- The users IP address will now be visible in the list (see below), and removed when they logout/timeout.


You're now ready to use this IP address group within your Sonicwall rules!
Passive Checklist
✅ IF using a custom non-admin API user, please follow this checklist
✅ You've made a Dynamic Group which matches the naming convention within your Knoc
✅ Your Dynamic Group has Enabled Periodic Download every 5 minutes with HTTPS enabled
✅ You've checked that when you click download, it connects
Non-Admin API User
We recommend using a non-default-admin "admin" account for API interactions with your Sonicwall - this section will walk through each step you need to do.
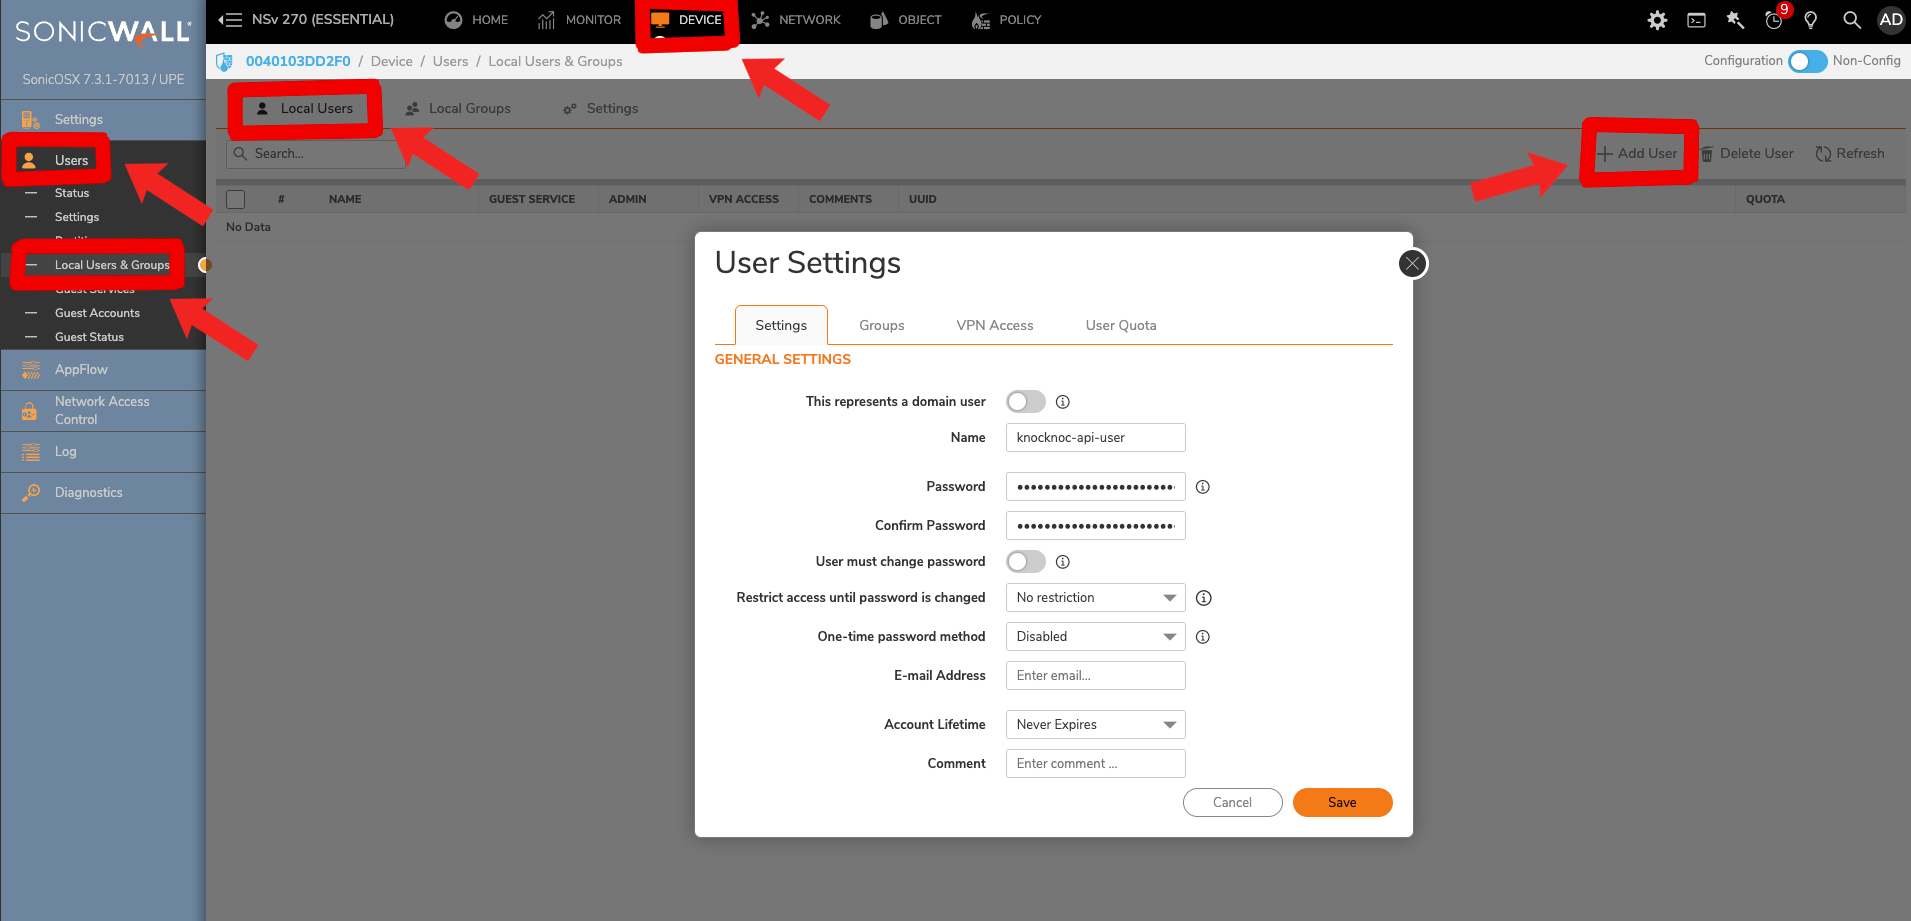
- Head to user config, which is in 'Sonicwall --> Device --> Users --> Local Users & Groups' and create a new user

- Then switch from the 'Settings' tab to the 'Groups' tab, where we'll add the 'SonicWALL Administrators' to the 'Selected User Groups' before accepting changes with 'Save'.

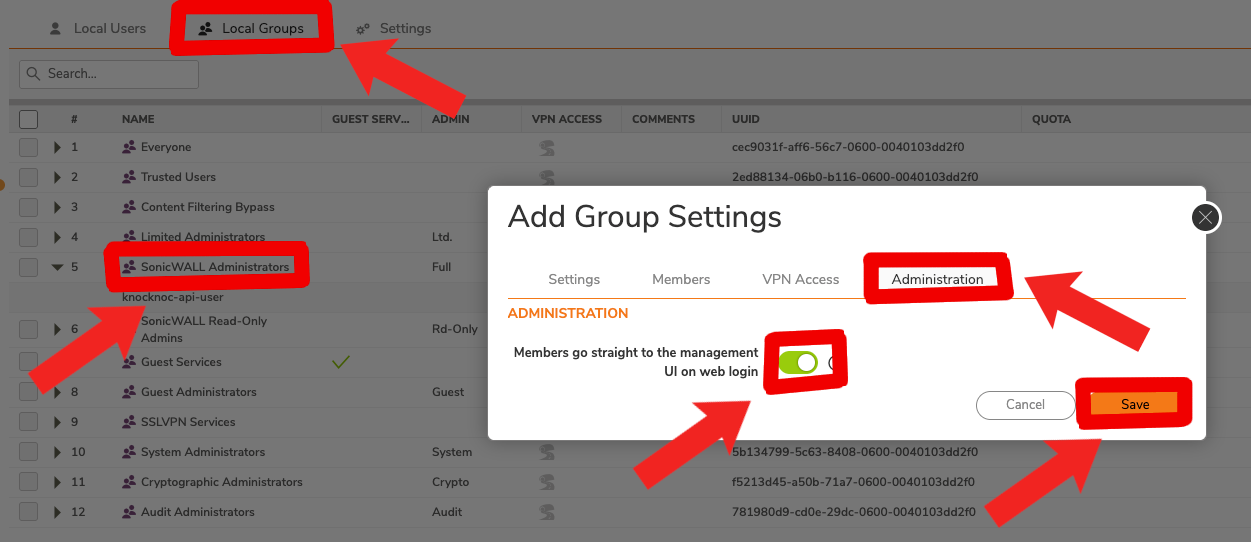
- Now we're going to change from 'Local Users' to 'Local Groups', selecting and editing 'SonicWALL Administrators' where we should also see our newly added 'knocknoc-api-user'. We'll need to go to the 'Administration' tab and turn on 'Members go straight to the management UI on web login' so our agent starts in the correct spot.

- For this account to have admin permissions working while our current 'admin' account exists, we'll also need to allow multiple admin roles. We can enable this feature within Sonicwall --> Device --> Settings --> Administration --> Login / Multiple Administrators --> Multiple Admin Roles


Troubleshooting
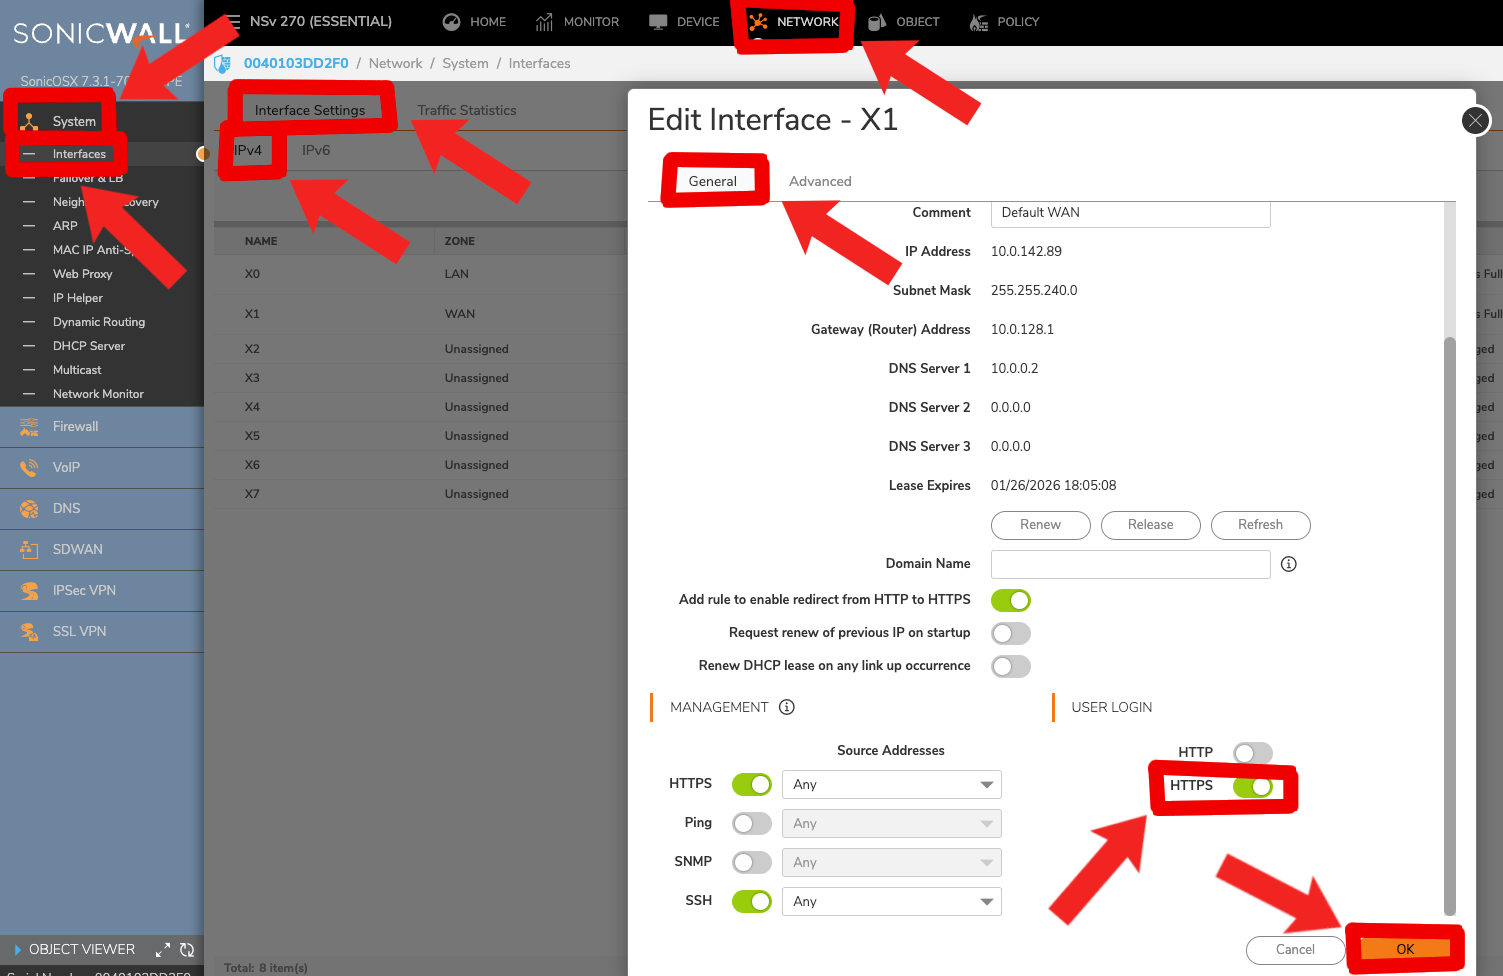
"Location not allowed" login warning
If you're using a non-default-admin user and accessing the management API via a non-standard interface (eg: not X0), you may experience "location not allowed" errors. Enable 'HTTPS User Login' on the management interface the orchestration agent is accessing. This setting can be found in Sonicwall --> Network --> System --> Interfaces --> Interface Settings --> IPv4 --> '<your chosen interface, e.g. X1>' --> General --> User Login HTTPS.