
SAML with OKTA
SAMLThe following example assumes your Knocknoc instance is alocated complicatedat topic,https://demo.knoc.cloud. withWherever manyyou variables,see sothat, please takesubstitute it for your own instance URL.
Setting Up the timeIdP
Create read through the documentation and check all the settings are correct.
First we need a newan Application
in
- Click Create App
Integration,Integration - Select SAML 2.0
- Set an App
name,name.EG(e.gKnocknoc
Knocknoc) - Optional: Upload a
logologo. - Click
youNext. - Click
OK
- Enter the Single sign-on URL
is:(e.g https://demo.knoc.cloud/api/saml/acsacs) - Leave Use this for Recipient URL and Destination URL
tickedticked. - Enter the Audience URL (SP Entity
ID)IDis:URL e.g https://demo.knoc.cloud/api/saml/metadatametadata) - Leave Default Relay State
blankcblank - Set Name ID Format
:as Persistent - Set Application
user:user as Okta Username - Click Show advanced
Settingssettings - Upload your own
certificatecertificate, one can be createdlike so:On your own PC or similar:Makeon anewLinuxcertmachineandusingkey:the following command.openssl req -new -x509 -days 3650 -nodes -subj /CN=Knocknoc/ -out user-demo-knoc-cloud.crt -keyout user-demo-knoc-cloud.key - Leave other options default
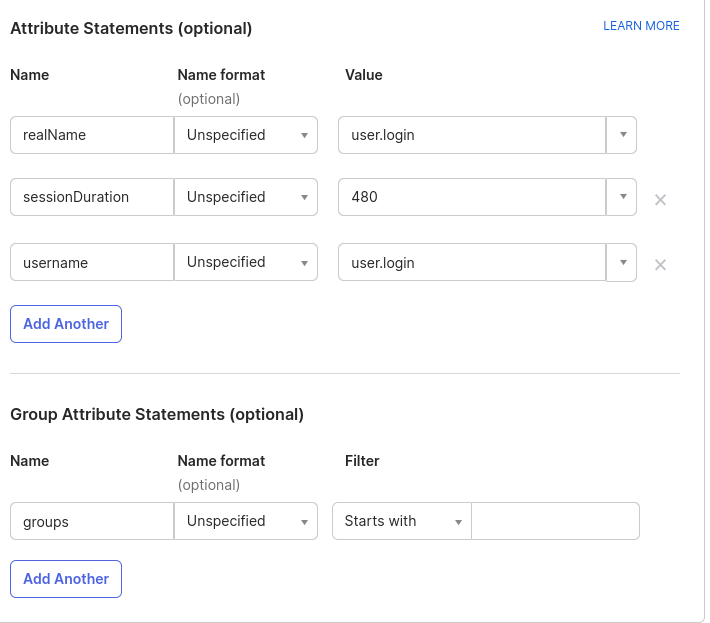
- Add
an Attribute
statement with the following settingsstatements

Then NextOK
The
SAML Signing Certificates
In
- Delete the original
onecertificate,thereit(itsisprobablylikely SHA1andwhereyourthenewnewly generated one isSHA2).SHA2 - View the IDP
metadata,metadata and save it as an XML file.
You then need to
Knocknoc SettingsAssignments
Upload
- Assign the
saved IDP metadataApplication to your users. - Enable the option to send Groups, to allow the users to be automatically assigned to the correct ACLs.
Knocknoc asSAML SAMLMetadataFile
Config
Set
- Login In the Knocknoc admin interface.
- Click on Settings on the left.
- Under Public URL
toenteryouryouKnocknocknocknocinstanceurl.URLNote:(withoutdothenot add a / at theend!)endSetof theSAMLMetadataURLURL. - For the SAMLMetaDataFile, upload the xml file you downloaded from EntraID.
- For the SAMLCertFile, upload the certificate (.crt) file you created in during the SAML Configuration.
- For the SAMLKeyFile, upload the key (.key) file you created in during the SAML Configuration.
- For the SAMLMetadataUrl, paste the Metadata
DetailsDetails, Metadata URL from the Okta controlpanelpanel.Upload - Click
certificateSave.
Assignments
You also need to assign the Application to your users, and make sure you send Groups, so the Groups can map to Knocknoc groups and have ACLs assigned to them.