
SAML with Gsuite as IDP
Gsuite can be setup as an Identity Provider if you have Gsuite Business Startter or above plan.
The basis of this guide is the official docs here: https://support.google.com/a/answer/6087519?hl=en which should be referred to in case any thing changes from the Gsuite end.
Gsuite Setup
- Login as a Super Admin to https://admin.google.com/ for your Domain. Super Admin is needed to add custom user attributes.
- Go to Directory -> Users -> More Options -> Manage custom attributes
- Add a Custom Attribute, Category Knocknoc, Custom field Name: sessionDuration, Whole number, Visible to user and admin, Single value, and click Save.
Add SAML App
Service Provider Details
- In the ACS URL, enter your Knocknoc server URL with /api/saml/acs appended eg: https://gsuitesamltest.knoc.cloud/api/saml/acs
- In the Entity ID enter your Knocknoc server URL with /api/saml/metadata appended eg: https://gsuitesamltest.knoc.cloud/api/saml/metadata
- Leave Start URL blank (this is for IDP initiated login which is unsupported at present)
- Leave Signed response Unticked
- Change Name ID format to PERSISTENT
- Name ID should be Basic Information > Primary email, then click Continue
Attribute Mapping
- Click Add Mapping, and Map the following:
Primary email --> realName
Primary email --> email - Knocknoc > sessionDuration --> sessionDuration
- Group Mapping - select your Groups that match Knocknoc ACLs and the App attribute is groups
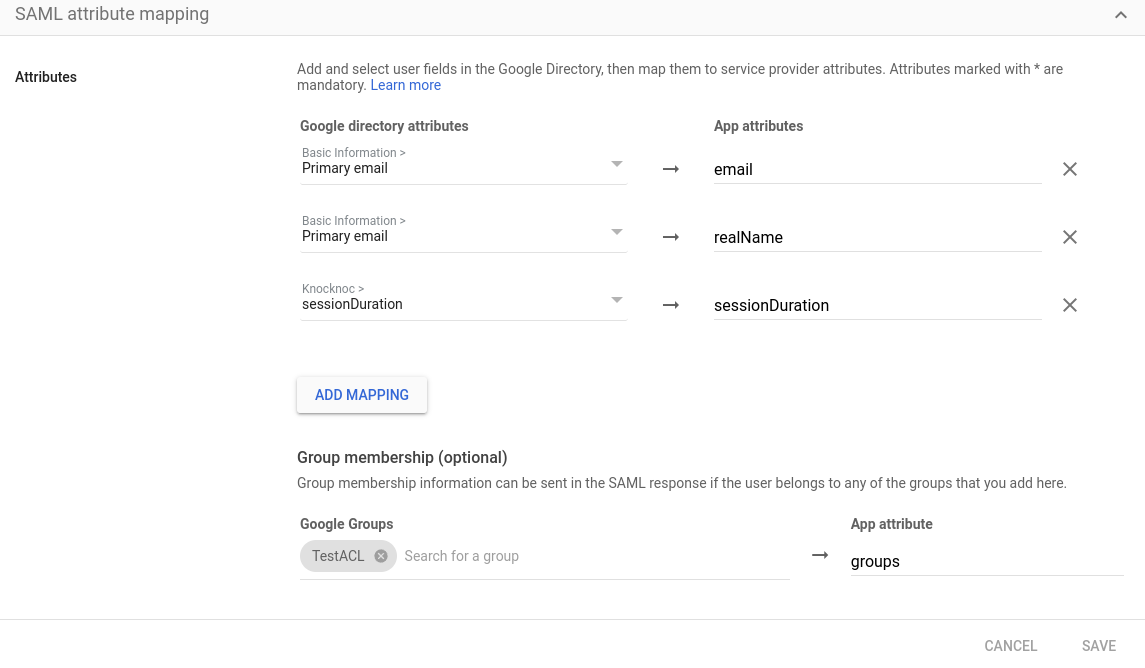
TestACL in also a Knocknoc group that maps to a Knocknoc ACL.
User Attribute for SessionDuration
Each user needs a sessionDuration set for them, so in Directory -> Users, select the user, and in the User Information section under Knocknoc sessionDuration, set it to the number of minutes you want for the user session duration.
Groups with custom attributes in gsuite is still in development.
You will also want to toggle the User Access to ON for everyone as desired.
Download Metadata
Now back on the app's page, you can click Download Metadata, and save the XML file provided for later upload to Knocknoc.
Knocknoc Gsuite Config
- Login to /admin in your Knocknoc instance.
- Edit the PublicURL field to contain your knocknoc instance URL. WITHOUT the / on the end!
eg: https://gsuitesamltest.knoc.cloud - Upload the SAMLMetadataFile you downloaded in the previous section
- Generate a SAML key and Cert like so:
openssl req -new -x509 -days 3650 -nodes -subj /CN=Knocknoc/ -out user-gsuite.crt -keyout user-gsuite.key - Upload the .crt file to SamlCertFile, and the .key file to SamlKeyFile
- Click Save
To allocate Groups to ACLs, please add a group that matches the Gsuite group name, and map the ACL to that group. User to group mapping is done in SAML.