Knocknoc with ADFS
The following example assumes your Knocknoc instance is located at https://your-knocknoc.cloud/. Wherever you see that, please substitute it for your own instance URL.
Knocknoc SAML config
- Login In the Knocknoc admin interface (eg: https://your-knocknoc.cloud/admin/)
- Click on Settings on the left.
- Under Public URL enter you knocknoc url, eg: https://your-knocknoc.cloud. Note: do not add a / at the end of the URL.
- For the SamlMetadataUrl enter your ADFS host, adding /FederationMetadata/2007-06/federationmetadata.xml
- eg: https://your-adfs-site/FederationMetadata/2007-06/federationmetadata.xml
- If you wish to optionally encrypt inner SAML assertions, you need to generate a key/cert and upload these to Knocknoc and then ADFS - see Create Certificates below
- SAMLCertFile, upload the certificate (.crt) file you created in during the Certificate creation.
- SAMLKeyFile, upload the key (.key) file you created in during the Certification creation.
- Click Save.
- You can verify this worked correctly by visiting https://your-knocknoc.cloud/api/saml/metadata and observing the downloaded metadata file.
Setting up the IdP (ADFS)
Define the Relying Party Trust
Define the Claim Issuance Policy
-
Once on the Edit Claim Issuance Policy section
- Click Add Rule
- Select Transform and Incoming Claim, click Next
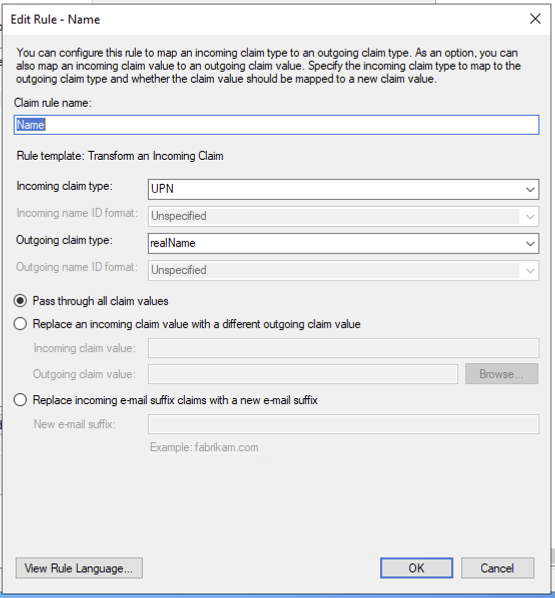
- Name the rule, eg: Username
- Incoming claim type should be set to UPN (or Windows account name if you prefer the login to be shown in the Knocknoc portal)
- Outgoing claim type: Name ID
- Outgoing name ID format: Persistent Identifer
- Click Finish and Apply
- It should appear similar to the below

Repeat this process and add Name as UPN as realName
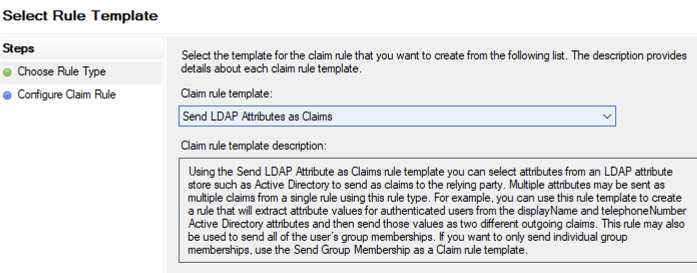
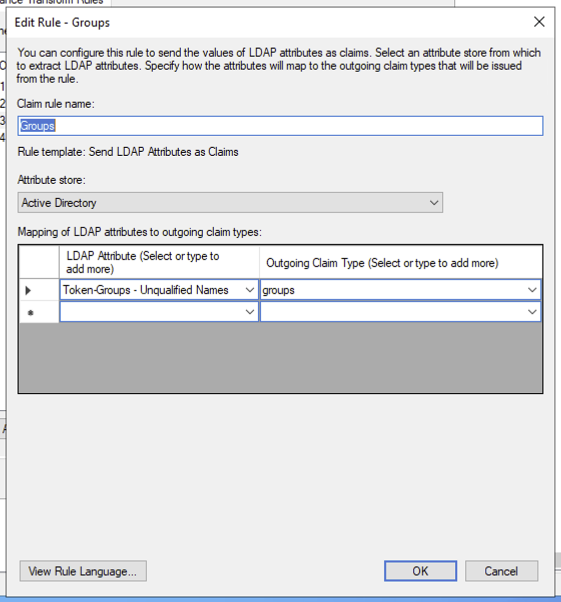
Groups need to be passed via LDAP attributes, select Add then LDAP attributes
- Name the rule, eg: Groups
- Select Active Directory for the Attribute Store
- Add the attribute Token-Groups - Unqualified Names
- In the Outgoing Claim Type, type in groups (all lower case)
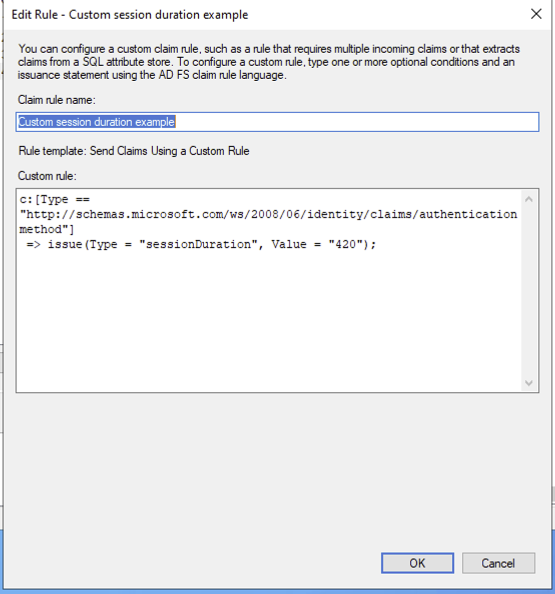
A session duration time (in minutes) is passed through for users - this can be a single value or defined per group
- Select Add Rule
- Select Send Claims using custom rule
- Type the below, noting the default is 420 minutes (7 hours)
c:[Type == "http://schemas.microsoft.com/ws/2008/06/identity/claims/authenticationmethod"]
 => issue(Type = "sessionDuration", Value = "420");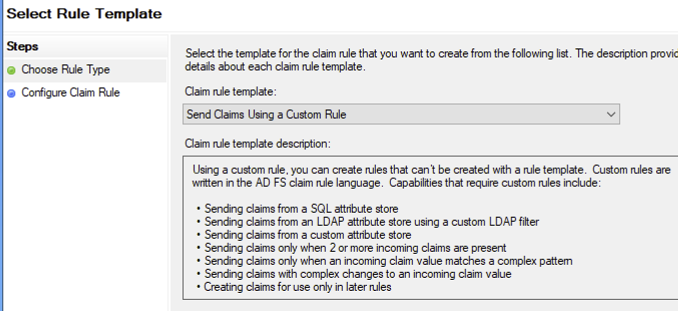
You are now ready to test the integrated ADFS login!
Final Testing
Assuming you granted your own user permission to one or more Knocknoc groups in EntraID, you should now be able to login to Knocknoc using SSO.
- Browse to https://your-knocknoc.cloud/
- There should now be an "Single Sign-On" button.
- Click this, if you are not already authenticated to your IdP you should now be directed to the IdP login page. Note: If you are already authenticated you'll simply be redirected to an authenticated Knocknoc session.
- If ACLs have already been added you should also see these now say Granted.
If this all works, congratulations! You've successfully run the ADFS+SAML gauntlet.
Create certificates (optional)
Create a key/certificate pair on your local machine
- Generate a new certificate and key, this can be done on a Linux host using the below command.
openssl req -new -x509 -days 3650 -nodes -subj /CN=Knocknoc/ -out user-demo-knoc-cloud.crt -keyout user-demo-knoc-cloud.key - Enter a password and note it down.
- If you wish to encrypt the inner assertions - This will be required for both sides of the connection, Windows AD FS and Knocknoc
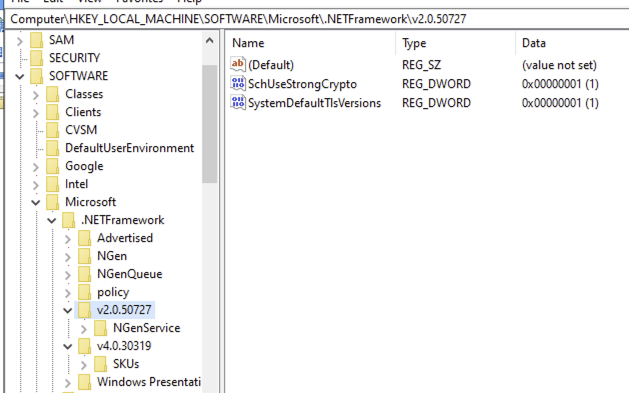
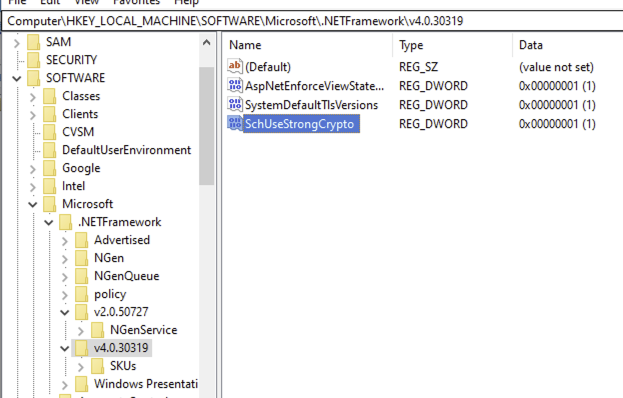
TLS versions on Server <=2019
Enabling TLS/1.2
If you receive TLS/SSL errors trying to validate the metadata file, you may need to enable TLS/1.2 via your registry.

Registry configuration to enable TLS/1.2: