Getting Started
Consider your use case
Knocknoc can ultimately act as an authentication portal for many use cases. To simplify the setup to begin with, it helps to consider a single application to put behind Knocknoc, and build it out from there. Once you have added an application, configured and tested user and/or group authentication you can update your reverse proxy or firewall to block all traffic not authenticated via Knocknoc.
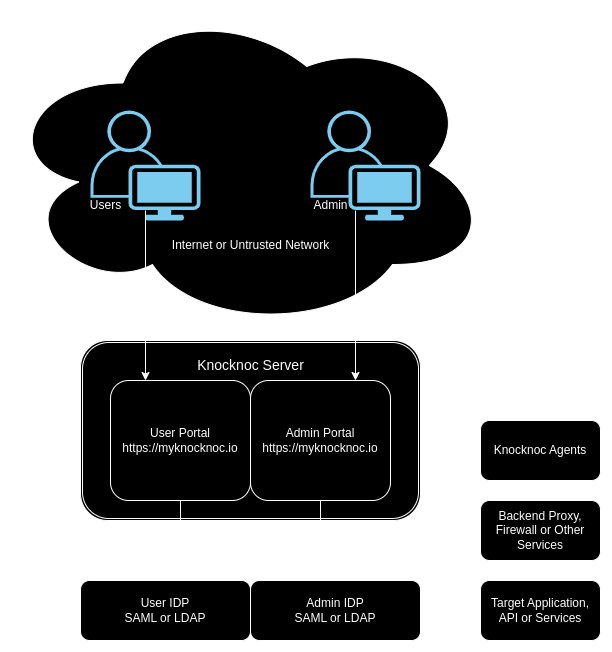
The architecture of a typical Knocknoc environment is often as follows:
Cloud or self-hosted server?
The answer will depend on a few factors. For example, if your LDAP authentication source is not on the internet, then of course you need self-hosted. A self-hosted Knocknoc server may also suit you better for various security segmentation scenarios, or even Knocknoc on the LAN, which is great for SCADA or ICS systems.
However, depending on your environment it may be hard to get inbound public IP access to the Knocknoc server in which case cloud hosting would make sense. Our cloud servers are deployable in under a minute, with DNS records and inbound rules all configured for you ready to go.
Where will your agents run?
The Knocknoc agent connects out to the server over port 443/TCP (HTTPS), and maintains a secure web socket connection to manage your ACLS. The agent needs to live where it can reach the backend it is managing, for example a HAproxy Unix socket is going to need to be on the same machine, or a firewall IPset or API might require the agent to be deployed in a control plane firewall zone. Deploying the agent is easy, and as long as you consider where in your network they live, this can strike a great balance between security and control.
Select your backends
The backend is a type of control mechanism, for example, a HAproxy unix socket, an AWS security group script or a firewall IPset. The backend needs to be able to apply the change to your protected application instantly and idempotently. Knocknoc agents are resilient and will update ACLs on backends in a reliable fashion, however various backends have limitations. For example an AWS security group can only have 60 entries before you need a support ticket, so you may want to consider if that suits your use case.
Download the server
Cloud or self-hosted, you need a Knocknoc server, and once you have installed it, you will be able to login to the admin panel and start configuration. https://docs.knocknoc.io/books/admin-guide/page/server-installation
Download the agent
The agents perform the backend work of updating ACLs, so you need at least one, even if its on the same machine as the server.
https://docs.knocknoc.io/books/admin-guide/page/agent-installation
Configure Backends, ACLs and groups
Next comes the backends, ACLS and groups. However you may want to also configure SAML or LDAP authentication at this step, so you can then map groups to ACLs. We recommend SAML where possible, as it is the most secure option for many people.
Test it out!
That first time you login and works feels like magic. We can't wait for you to enjoy using Knocknoc every day.
Roll it out to your users
Once everything is ready, you need to then need to demonstrate or document the steps for your users, and away you go.
Monitor and Manage
Knocknoc can stream metrics using GELF, and can supply regular exports of user activity.

